INTRODUCTION When the VTech VT 2960 is not in use, you can easily answer a call on the Handset by pressing any key other than the OFF or Volume keys. This is very useful in a dark environment. Thank you for purchasing a VTech cordless telephone. This manual is designed to familiarize you with your VT 2960. To get the maximum use from your new phone, we suggest that you read this Instruction Manual before using your VT 2960.
INTRODUCTION SPECIAL FEATURES • 900MHz Operation • Fully Digital Link between Handset and Base Unit with ADPCM voice coding for enhanced audio quality • Digitally-Scrambled Voice Communication for call security • Two-line Capability • Alphanumeric Call Waiting Caller ID; Name and Number • 50 CID memory capacity • 2 Line Digital Answering System (for both lines).
INTRODUCTION Parts Check List 1. 2. 3. 4. 5. 6.
IMPORTANT SAFETY INSTRUCTIONS Important Safety Instructions When using your telephone, please follow these basic safety precautions to reduce the risk of fire, electric shock or injury to persons: I. R e a d a n d u n d e r s t a n d a l l instructions. II. VII.This product should be operated only from the type of power source indicated on the marking label. If you are not sure of the type of power supply to your home, consult your dealer or local power company. VIII.
IMPORTANT SAFETY INSTRUCTIONS XII. Unplug this product from the wall outlet : E. If the product has been dropped and the cabinet has been damaged. A. When the power supply cord or plug is damaged or frayed. F. B. If liquid has been spilled into the product. XIII.Avoid using a telephone (other than a cordless type) during an electrical storm. There may be a remote risk of electric shock from lighting. C. If the product has been exposed to rain or water. D.
RECHARGEABLE BATTERY PACKS Charging the Handset batteries The Handset of your VTech 2960 cordless telephone is powered by a rechargeable battery pack. It charges automatically whenever the Handset is in the Base Unit cradle. You should charge the battery pack for 16 hours when you first receive your phone.
RECHARGEABLE BATTERY PACKS Replacing The Handset Battery Pack 1. Remove the battery cover by pressing on the ridged lines and sliding downward. 4. The new battery pack must be charged before using your telephone. Place the Handset in the cradle of the Base Unit and allow it to charge for 16 hours. 14 15 16 17 18 19 20 PRESS and SLIDE DOWNWARD ERASE CHARGE THE HANDSET BATTERY PACK FOR 16 HOURS BEFORE USING 2. Discard the old battery pack.
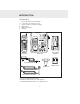
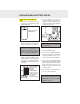
WALL MOUNTING The Wall Mount bracket is designed to fit on standard Wall Mount plates. TONE PULSE 1. Choose a spot near an electrical outlet and a telephone jack. Your phone requires a modular telephone jack and a standard electrical outlet (120v AC). The power cord is six feet long; make sure there is an electrical outlet within reach of the Base. The outlet should not be controlled by a wall switch. If the switch is ever turned off, the phone will not operate.
HANDSET FEATURES HANDSET FEATURES ANTENNA DISPLAY BELT CLIP NOTCH VOLUME UP KEY VOLUME DOWN KEY 1 LINE 2 FLASH FLASH LINE 1 OFF KEY 1 2 abc 3 def 4 ghi 5 jkl 6 mno 7 pqrs 8 tuv 9 wxyz * 0 tone LINE (FLASH) KEYS LINE 2 OFF oper REDIAL CID HOLD MEM CONF INT.COM PROG CLEAR DELETE PAUSE DIALING KEYS ( 0-9) 7.DATE KEY ( FOR CID ) 9.
HANDSET FEATURES LINE 1 KEY Press this key to select LINE 1. OFF KEY Press this key to end your call. If the Handset has already accessed LINE 1, pressing this key will FLASH the line. Press this key to exit from MEMORY DIALING, CID, or any programming mode. If LINE 1 is on HOLD, pressing this key will take LINE 1 off HOLD and return you to your call. In CONFERENCE mode, pressing this key will disconnect both lines.
HANDSET FEATURES REDIAL KEY Press this key to display and/or dial the last number you called. 1. LINE 1 is on a call and LINE 2 is on HOLD 2. LINE 2 is on a call and LINE 1 is on HOLD 3. Both lines are on HOLD. When the Handset is On (with dial tone), press this key to dial the last number called. NOTE: While in CONFERENCE mode, MEMORY DIALING numbers and CID records cannot be accessed. When the Handset is Off, pressing this key will display the last dialed phone number on the LCD.
HANDSET FEATURES The VT 2960 is also equipped with a detachable belt clip. Align the pins on the inside edge of the belt clip with the notches on the inside of the VT 2960 Handset. The belt clip should snap securely into place. Do not force the connection. See illustration: While you are reviewing CID or MEMORY DIALING records, press and hold this key to delete the record currently displayed. The LCD will confirm deletion.
EXAMPLES OF THE LCD DISPLAY Base Unit is attempting to contant Handset via INTERCOM key The handset has accessed LINE 1 The handset has accessed LINE 2 LINE 1 on hold The Base Unit has accessed LINE 1 LINE 2 on hold The handset has accessed LINE 1, while the Base Unit has accessed LINE 2 Extension phone is using LINE1 Extension phone is using LINE2 Both handset and Base have accessed LINE 1 Handset is in Conference mode with LINES 1 & 2 Current Handset volume level Base Unit is in Conference mode
EXAMPLES OF THE LCD DISPLAY Handset is asking for 2-digit location during Memory Dial programming Example of alphanumeric CID display when a call comes in A mistake was made during Memory Dial programming Press & hold 7 key while reviewing CID records to view the phone # and when it came in Enter a 2-digit location for Memory (Speed) Dialing Scrolling through the CID records, this displays the caller’s name, CID location, and LINE The contents of a Memory Dial location have been deleted Press & hold
EXAMPLES OF THE LCD DISPLAY The contents of Memory Dial location #13 Example of the LCD as you select a ringer type You have deleted Memory Dial location #15 The name and number of the caller are unavailable as the call comes in To prevent accidental deletions of all CID records or Memory Dial locations, this message prompts you to confirm your decision As the phone rings, this indicates that the caller has blocked CID information As you review CID records, this indicates that the name and/or phone n
BASE UNIT FEATURES BASE UNIT FEATURES MENU MEMORY DIALING 1 11 2 12 3 13 4 14 5 15 6 16 7 17 8 18 9 19 10 20 MEMORY DIALING CARD POWER INDICATOR CHARGING INDICATOR SPARE BATTERY INDICATOR VT 2960ci SELECT TIME/SET POWER CHARGING L2 SPARE BATTERY ERASE KEY SPARE BATTERY CHARGING COMPARTMENT INTERCOM KEY/INDICATOR HOLD KEY LINE KEYS LINE INDICATORS REPEAT MSG MSG SELECT ANSWER L1 ERASE MSG ANSWER STOP/PLAY ON/OFF SKIP RECORD/ MEMO VOLUME INT.COM LINE 1 HOLD MUTE LINE 2 CONF.
BASE UNIT FEATURES BASE LED INDICATORS POWER LED Glows when the AC adaptor supplying power to the Base Unit. LINE 2 (EXTENSION IN USE) LED Glows steadily when the Base Unit is accessing LINE 2. is Flashes slowly when only the Handset or an extension phone is accessing LINE 2. Flashes rapidly when LINE 2 is placed on HOLD. CHARGE LED Glows when the Handset is placed in the Base Unit cradle to charge. Flashes in cadence with the incoming ring when you receive a call.
BASE UNIT FEATURES CONF KEY Press this key to conference LINE 1 and LINE 2. VOLUME UP & DOWN KEYS Press these keys to raise and lower the Speakerphone volume level. You can hold a key down to achieve maximum (or minimum) volume. HOLD KEY Press this key to place your call on HOLD. RINGER ON/OFF SWITCHES Located on the right edge of the Base Unit (antenna side), these switches control the Base Unit ringer for each line. These switches have no effect on the Handset ringers.
GETTING STARTED Setting up your VTech VT 2960 NOTE: Connect power to the Base Unit before placing the Handset into the cradle. 1. Choose an area near an electrical outlet and telephone wall jack(s). 2. Plug the AC power adaptor into the electrical outlet and the DC connector to the back of the Base Unit. 6. Connect the telephone line cords: If you have 2 telephone lines installed on a single jack (type RJ14), use the 2-line cord provided. This is a 4 wire cord .
BASIC OPERATIONS MAKING CALLS Extend the Antenna whenever you remove the Handset from the Base Unit cradle If you are on LINE 1 and press LINE 2, LINE 1 will automatically go into HOLD mode. Press OFF to end your call with LINE 2, then press LINE 1 to return to your party on LINE 1. Otherwise, with LINE 1 on HOLD and LINE 2 active, press CONF/ CLEAR to enter CONFERENCE mode. There are two ways to make a call: • Press LINE 1/FLASH or LINE 2/ FLASH and listen for dial tone.
BASIC OPERATIONS ANSWERING CALLS FROM THE HANDSET ANSWERING CALLS FROM THE BASE UNIT (SPEAKERPHONE) Extend the Antenna whenever you remove the Handset from the Base Unit cradle. In addition to the audible ringer, the LINE LED flashes in cadence with the incoming ring signal to indicate an incoming call. In addition to the audible ringer, a flashing arrow in the lower portion of the Handset LCD will indicate which line is receiving an incoming call.
BASIC OPERATIONS NOTE: If you use the Speakerphone in an environment that is not very quiet, your caller’s voice may fade in and out. Should this occur, press the MUTE key before your party begins to speak, then press MUTE again (to turn MUTE off) when it’s your turn to speak. Switching from Speakerphone to Handset If you are on a Speakerphone call, and want to switch to the Handset: 1. Press HOLD on the Speakerphone. 2. Press the appropriate LINE/Flash key on the Handset to resume your conversation.
BASIC OPERATION Base Unit Paging Handset When the INT.COM key is pressed on the Base Unit, the Handset will ring differently than its incoming call ring. The LCD will display BASE PAGING HANDSET, as well. The Handset user can then do the following: • Press INT.COM. The Base Unit and Handset are now in INTERCOM mode. OR • Press OFF. The alerting ring will stop. OR • Let the ringing continue. It will stop after 5 rings. Handset Paging Base Unit When the INT.
ADVANCED OPERATIONS CONFERENCE CALLS This feature allows you to link both lines together for a 3-way conversation between you and the parties on LINE 1 and LINE 2. Conference calls can take place from the Handset or the Base Unit. For example: If the Handset is in CONFERENCE mode, and someone at the Base Unit wants to join the conversation, press either LINE key on the Base Unit. The Base Unit has now entered CONFERENCE mode.
ADVANCED OPERATIONS Programming the Base Unit Ringer 1. Press and hold the MEM/PROG key until the LCD displays PROGRAM LOCATION _ _. 2. Press #. LCD displays ?: 1=HANDSET 2=BASE. 3. Press 2. LCD displays ?: 1=LINE 1 2=LINE 2. 4. Press 1 (or 2, depending on which line you’re programming). 5. Press 1,2,3, or 4. The Base Unit will generate the tone you’ve selected. Press any of the other ringer selections (1,2,3,4) to compare the different tones. 6. Once you have selected a ringer tone, press OFF. 2.
ADVANCED OPERATIONS Dialing from Memory DELETING STORED NUMBERS You can delete individual phone numbers stored in memory, or all stored numbers at one time. 1. Press the desired LINE key to get a dial tone. 2. Press MEM/PROG. The LCD displays SPEED DIAL LOCATION _ _. 3. Enter the 2-digit Memory location (01-20).
CID-CALLER ID Your VT 2960 cordless telephone is capable of displaying the name and phone number of the calling party, before you answer the call. In addition, it will display Caller ID information when you are on the phone and receive a Call Waiting signal. Subscription to CALLER ID and CALL WAITING ID (otherwise known as Type II Caller ID) through your local telephone service provider is required to fully utilize this feature. The names of these services may vary from one provider to another.
CID-CALLER ID 3. Press INT.COM/DELETE to confirm deletion of all CID records. The LCD will display DELETING ALL CALLS. Pressing any key other than INT.COM/DELETE cancel this operation. Caller ID data transmission is incomplete. If this display appears often, contact your local service provider. DIALING FROM CID MEMORY DELETING CID RECORDS Your VT 2960 stores the most recent 50 CID records in memory. When CID memory is completely filled, the oldest record is automatically deleted as a new call is stored.
CID-CALLER ID S TO R I N G C I D R E C O R D S I N MEMORY DIALING LOCATIONS You can store a phone number from a CID record in a Memory Dialing location. 1, With the Handset OFF, press the CID key. 2. Use the * ( ) or # ( ) keys to scroll to the CID record you wish to store in memory. 3. Press CID again. The LCD displays the phone number. 4. Press and hold the MEM/PROG k ey. T h e L C D w i l l d i s p l ay PROGRAM LOCATION _ _. 5. Enter a 2-digit memory location (0120).
THE VT2960 ANSWERING SYSTEM PLEASE READ AND FOLLOW THE INSTRUCTIONS STEP BY STEP the Base Unit. The Base display becomes a timer as you record your message. 5. Press STOP/PLAY when you complete your outgoing message. It will automatically be played back to you. You can re-record your outgoing message at any time, by repeating the above sequence. The VT2960 Answering System will: • Record messages on either Line 1, Line 2, or both lines.
THE VT2960 ANSWERING SYSTEM different security code for each line. To set the security code: 1. Press MENU. Voice prompt says, "Please select line." 2. Press SELECT until the voice prompt announces the desired line. 3. Press TIME/SET. The voice prompt will confirm your line choice, followed by "Set outgoing message." 4. Press MENU. Voice prompt says, "Set Security Code." 5. Press SELECT. Voice prompt says, "XX" (current security code). 6. Press SELECT to change your security code.
THE VT2960 ANSWERING SYSTEM SETTING THE NUMBER OF RINGS For each line, the answering system can answer calls after 2, 4 or 6 rings; or Toll Saver. SETTING THE NUMBER OF RINGS MENU VT 2960 SELECT TIME/SET L2 Toll Saver is a feature which, when selected, will command the answering system to answer an inbound call after 2 rings only if there are new, unplayed messages in memory. Otherwise, the answering system will answer after 4 rings.
THE VT2960 ANSWERING SYSTEM SELECT button down will increase the minute setting by increments of 10. 7. Press TIME/SET. Voice prompt will announce the current day and time. 8. P r e s s S T O P / P L AY t o e x i t programming mode. AUDIBLE MESSAGE ALERT This feature provides a beep tone from the Base Unit at approximately 10 second intervals, alerting you to new, unplayed messages. To program Audible Message Alert: 1. Press MENU three times. Voice p r o m p t s ay s , " S e t Au d i b l e Message Alert.
THE VT2960 ANSWERING SYSTEM SELECTING LINES FOR MESSAGE PLAYBACK Pressing the MSG SELECT button allows you to hear recorded messages from Line 1, Line 2, or Both Lines. As you press MSG SELECT, the corresponding L1 MSG and L2 MSG indicators will illuminate. SKIP >> During message playback, press SKIP to advance to the next message. REPEAT << During message playback, press REPEAT to return to the beginning of the message currently being played.
THE VT2960 ANSWERING SYSTEM MEMO RECORDING To record a memo, do the following: You will then hear a confirmation beep, followed by an announcement of how many messages are in memory for that line. Afterwards, automatic playback of messages will begin. 1. Press RECORD/MEMO. Voice prompt says, "Now Recording," followed by a beep. Speak toward the front of the Base Unit. 2. Press STOP/PLAY when finished. Voice prompt says, " End of Recording," followed by a beep.
HEADSET INSTALLATION AND OPERATING INSTRUCTIONS Your VT2960 cordless telephone is equipped with a 2.5mm Headset Jack for use with an optional accessory Headset or hands-free operation. If you choose to use the Headset option, you must do the following: INSTALLATION Obtain an optional accessory Headset, which is compatible with the VT2960. ON RIGHT EAR ON LEFT EAR The headband can be adjusted to fit the contour of your head.
MAINTENANCE Electrical storms Electrical storms can sometimes cause power surges harmful to electronic equipment. MAINTENANCE TAKING CARE OF YOUR TELEPHONE. Your VTech VT 2960 cordless telephone contains sophisticated electronic parts so it must be treated with care. For your own safety, use caution when using electric appliances during storms. Avoid rough treatment Place the Handset down gently. Save the original packing materials to protect your telephone if you ever need to ship it.
IN CASE OF DIFFICULTY YOU GET NOISE, STATIC, OR A WEAK SIGNAL EVEN WHEN YOU’RE NEAR THE BASE UNIT. • Place the Handset in the Base momentarily to reset the security code. Then press LINE to get a line. If you have difficulty operating your phone, the suggestions below should solve the problem.
IN CASE OF DIFFICULTY YOUR CALLER FADES IN AND OUT. You may be nearly out of range. Move closer, or relocate the base. COMMON CURE FOR ELECTRONIC EQUIPMENT Electronics, like people, can sometimes get confused. If the unit does not seem to be responding normally, then try putting the Handset in the cradle to re-initialize the unit. If it still does not seem to respond, perform the following steps (in the order listed): 1. Disconnect the power to the Base Unit. 2 Remove the Handset battery Pack 3.
WARRANTY STATEMENT WHAT DOES OUR WARRANTY COVER? • Any defect in material or workmanship. FOR HOW LONG AFTER THE ORIGINAL PURCHASE? • To the original purchaser only - ONE YEAR. WHAT WILL VTECH DO? • At our option, repair or replace your unit. HOW DO I SEND MY UNIT, IN OR OUT OF WARRANTY? • In the U.S. Call VTECH Communications customer service for Return Authorization at: 1-800-595-9511 In Canada call VTECH Electronics at: 1-800-267-7377 • Properly pack your unit.
WARRANTY STATEMENT WHAT DOES OUR WARRANTY NOT COVER? • Batteries • Damage from misuse, neglect, or acts of nature (lightning, floods, power surges, etc.) • Products which may have been modified or incorporated into other products • Products purchased and/or operated outside the USA, its territories, or Canada.
FCC AND IC REGULATIONS This equipment complies with Parts 15 and 68 of the Federal Communications Commission (FCC) rules for the United States. It also complies with Industry Canada (IC) rules RSS210 and CS-03 for Canada. FCC Part 15 Warning: Changes or modifications to this unit not expressly approved by the party responsible for compliance’s could void the user’s authority to operate the equipment.
FCC AND IC REGULATIONS FCC Part 68 The FCC requires that you connect your cordless telephone to the nationwide telephone network through a modular telephone jack (USOC RJ11C/RJ11W or RJ14C/RJ14W). If it is determined that your telephone equipment is malfunctioning, the FCC requires that it not be used and that it be unplugged from the modular jack until the problem has been corrected.
FCC AND IC REGULATIONS IC (Industry Canada) This telephone is registered for use in Canada. Notice: The REN/IES assigned to this telephone determines the number of devices you may connect to the telephone loop which is used by the device to prevent overloading. The termination on a loop may consist of any combination of devices subjected only to the requirement that the sum of the REN/IES does not exceed five (5.0). Notice: The Industry Canada label identifies certified equipment.
SPECIFICATIONS FREQUENCY CONTROL Crystal Controlled Dual PLL Synthesizer WEIGHT Handset : 292 g (Battery included) Base : 800 g TRANSMIT FREQUENCY Handset: 925.05 MHz to 927.75 MHz (All ten channels within this range) Base POWER REQUIREMENTS Handset : Self-contained nickel-cadmium rechargeable battery supply, 3.6V nominal, 600mAh capacity. : 902.3 MHz to 905.0 MHz (All ten channels within this range) Base MEMORY Speed Dial: 20 Memory locations,20 digits per location. RECEIVE FREQUENCY Handset: 902.
TABLE OF CONTENTS INTRODUCTION ......................................................................................................... 1 Special Features ......................................................................................................... 2 Parts Checklist ............................................................................................................. 3 IMPORTANT SAFETY INSTRUCTIONS ..........................................................................
TABLE OF CONTENTS SWITCHING FROM THE HANDSET TO BASE OR BASE TO HANDSET .................... 22 Switching from Handset to Base Unit Speakerphone ................................................. 22 Switching from Speakerphone to Handset ................................................................... 22 INTERCOM/PAGE ....................................................................................................... 22 Base Unit Paging Handset ..........................................................
VTECH COMMUNICATIONS LTD. Is a trademark of VTECH COMMUNICATIONS LTD.., a member of THE VTECH GROUP OF COMPANIES. Distributed in the U.S.A. by VTECH Communications, 8770 SW Nimbus Avenue / Beaverton, Oregon, 97008. Distributed in Canada by VTECH Electronics Canada Ltd., Suite 200 - 7671 Alderbridge Way Richmond, B.C. V6X 1Z9. Copyright 1998 for VTECH COMMUNICATIONS LTD..