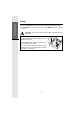
Important Safety Instructions When using your telephone equipment, basic safety precautions should always be followed to reduce the risk of fire, electric shock and injury, including the following: 1. Read and understand all instructions. 2. Follow all warnings and instructions marked on the product. 3. Unplug this product from the wall outlet before cleaning. Do not use liquid cleaners or aerosol cleaners. Use a damp cloth for cleaning. 4.
Getting Started BEFORE YOU BEGIN Enhanced 2.4GHz Technology - Dual Band transmission combines the best of 2.4GHz and 900MHz technologies, providing enhanced performance over standard cordless telephones. About Caller Identification (Caller ID) This product has a Caller ID with Call Waiting feature that works with service from your local phone service provider. Caller ID with Call Waiting lets you see whos calling before you answer the phone, even when youre on another call.
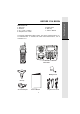
Parts Check List: 1. Base Unit 2. Handset 3. AC Power Adaptor 4. Telephone Line Cords 5. Battery Pack 6. Belt Clip 7. Owners Manual To purchase replacement battery packs, call VTech Communications, Inc. at 1-800-595-9511. In Canada, call VTech Telecommunications, Ltd. at 1-800-267-7377.
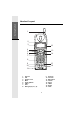
Getting Started Handset Layout 1 2 3 12 4 5 6 7 13 14 LINE LINE 8 9 10 11 1. 2. 3. 4. 5. 6. 7. 8. 15 16 Antenna LCD Headset Jack Menu Scroll Up/Down LINE 1 Hold Dialing Keys (0-9, *, #) 9. 10. 11. 12. 13. 14. 15. 16.
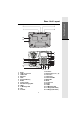
2 3 1 4 26 25 12 5 6 7 8 9 10 11 LINE LINE 21 22 1. 2. 3. 4. 5. 6. 7. 8. 9. 10. 11. 12. 13. 14. 15. 16. 17. 18. 19. 20. 21. 22. 23. 24. 25. 26.
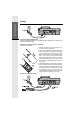
Getting Started Setup LINE1/ LINE2 L1+L2 DATA Connecting Power to Base Unit Plug the AC power adapter into an electrical outlet, and the DC connector into the back of the Base Unit Installation of Battery Pack in Handset Follow the steps below: 1. Remove the battery cover by pressing on the indent and sliding downward. 1 2. With the red and black wires at the bottom right corner of the pack, angle the top of the battery into the compartment, under the two claws.
Examples of 1-Line and 2-Line Cords RJ-11 One line cord RJ-14 2 line cord Your VT 20-2438 will work fine even if you only have one telephone line. We recommend connecting the modular telephone cord to the jack labelled LINE 1 / L1 + L2, located on the back of the Base Unit; in which case, you will be using LINE 1.
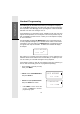
Getting Started Setup 3. Press the SCROLL key to change dial mode between TONE and PULSE. 4. Press SELECT to confirm your choice. Press MENU to return to the idle screen. CAUTION: Use only the VTech power supply provided with your telephone IMPORTANT: For best performance the VT20-2438 should be installed as follows: In an elevated location, in the center of the room, with no obstructions nearby.
Getting Started Handset Programming In the idle (on hook) mode, press MENU, then press the SCROLL key to access the following programming options: LINE 1 RINGER LINE 2 RINGER VOICE MESSAGES SET TIME SET DATE DIAL MODE LINE LINE Programming the Handset Ringer There are 4 different ring styles for each line. In addition, you can turn the Handset ringer off for one or both lines. In the idle (on hook) mode, press MENU. LINE 1 RINGER is displayed. SCROLL down if you want to program the LINE 2 RINGER.
Getting Started Handset Programming Voice Messages (for Voicemail service from your local phone company) Your VT 20-2438 is designed to work with most local and regional telephone service providers Voice Messaging service, providing alerts on both the Handset and Base Unit when new messages come in. Voice Messaging is a subscription service, available through most local and regional service providers, for a monthly fee. Some service providers may not offer compatatible Voicemail service.
To turn this feature off for all calls (each line is programmed separately): At the Handset, in the idle (on hook) mode, press MENU. SCROLL down to VOICE MESSAGES, then press SELECT. SCROLL to L1 (or L2) VOICEMSG OFF, then press SELECT to confirm. VOICE MESSAGES 8/28 2:19PM L1 VOICEMSG OFF 8/28 2:19PM Press MENU to return to the idle screen, or SCROLL to another programming option. You can reactivate this feature for each line: At the Handset, in the idle (on hook) mode, press MENU.
Getting Started Handset and Base Unit Programming At the Handset, in the idle (on hook) mode, press MENU. SCROLL to SET TIME, then press SELECT. Using the dial pad, enter the correct hour and minute. The hour must be entered as two digits (03, for example). Use the SCROLL key to select AM or PM. Then press SELECT. Now, SCROLL to SET DATE, then press SELECT. Using the dial pad, enter the correct month and day. Both the month and day must be entered as two digits (08/04, for example).
Handset LEDs Icons Description LINE 1 and LINE 2 keys Glows when Handset or Base is on an active call. Blinks slowly while call is on hold. Flashes in cadence with the incoming ring. Base Unit LEDs Icons Description LINE 1 and LINE 2 keys Glows when Handset or Base is on an active call. Blinks slowly while call is on hold. Flashes in cadence with the incoming ring. CHARGING Illuminates when the Handset is charging in the cradle.
Basic Operation Making Calls from the Handset Basic Operation Enter the telephone number, up to 32 digits. If you make a mistake, press the SCROLL key to backspace. Press the desired LINE key. The number will be dialed. To end your call, press the appropriate LINE key, or place the Handset in the charging cradle. You can also press a LINE key first, then dial the number. LINE LINE Making Calls from the Base Unit Enter the telephone number, up to 32 digits. Press the desired LINE key.
Basic Operation How to Adjust Volume on the Handset During an active call, press the VOLUME button, located on the right (antenna) side of Handset. There are four levels. Repeated pressings of the button will cycle through the four settings. As you adjust, the Handset will display the current level: VOLUME=3 8/28 2:19PM During an active call, press the + VOL or VOL key to adjust the Base Speakerphone volume. There are eight levels.
Basic Operation Press SELECT. The microphone is now muted. TURN MUTE OFF is displayed on the Handset. Press SELECT again to return to the two-way conversation. The display will return to TURN MUTE ON. LINE LINE Basic Operation From the Base Unit With the Speakerphone ON (in use), press MUTE. The Base microphone is now muted. The MUTE indicator is illuminated. LINE LINE Press MUTE again to return to the two-way conversation.
Basic Operation Press REDIAL. The last phone number dialed from the Handset is displayed. SCROLL UP or DOWN to view the other phone numbers stored in Redial memory. With the desired number displayed, press a LINE key to dial. LINE LINE Press REDIAL. The last phone number dialed from the Base Unit is displayed. Press the desired LINE key to dial. Basic Operation Redial from the Base Unit - OR Press the desired LINE key first; listen for a dial tone. LINE LINE Press REDIAL.
Basic Operation Intercom from Handset to Base Unit Basic Operation Press INT.COM. The Handset displays CALLING BASE. Both Handset and Base emit a page tone, lasting three minutes. Press INT.COM at the Base Unit to respond to the Handset. Both units will display INTERCOM. The Handset and Base can now talk to each other. CALLING BASE 8/28 2:19PM INTERCOM 8/28 2:19PM Press INTER.COM at either unit to end the Intercom call. Intercom from Base Unit to Handset Press INT.COM.
Directory Your VT20-2438 Handset can store 50 Names and Numbers in its Phone Book Directory, providing you with easy access to frequently called friends and businesses. LINE LINE Saving Names and Numbers in the Directory With the Handset in the idle (on hook) mode, press DIR. The Handset displays ADD NEW ENTRY. Press SELECT. The Handset displays ENTER NUMBER. Use the keypad to enter the phone number. If you make a mistake, press SCROLL to backspace.
Directory What is Distinctive Ring? You can program your VT20-2438 to add a unique ring when certain parties in your Directory call you. If the incoming Caller ID number matches the phone number programmed in your directory entry, the Handset will add additional tones to the ring. This allows you to prioritize your incoming calls. Note: Caller ID must be received before the distinctive ring is engaged.
Directory Editing and Deleting a Directory Entry You can Delete a directory entry, Edit the Number, Edit the Name, Change the Ring. Delete a Directory Entry LINE LINE With the Handset in the idle (on hook) mode, press DIR. SCROLL until you see the desired entry. OR Press MENU. DELETE ENTRY is displayed. Press SELECT to confirm deletion. ENTRY DELETED is displayed, and you hear a confirmation tone. You can now SCROLL to another entry, or press DIR to exit.
Directory Edit the phone number as needed, using the SCROLL key to backspace. When finished, press SELECT. Youll hear a confirmation tone. SCROLL to another entry, or press DIR to exit. JOHNSON CHARLIE 9735550123 8/28 2:19PM Edit the Name in a Directory Entry With the Handset in the idle (on hook) mode, press DIR. LINE LINE SCROLL until you see the desired entry. Advanced Operation OR SCROLL to any entry, then press the first letter or letters of the name.
Directory SCROLL to any entry, then press the first letter or letters of the name. If the desired name is not displayed, SCROLL to the correct name. Press MENU. DELETE ENTRY is displayed. Press SCROLL until CHANGE RING is displayed. Then press SELECT. Press SCROLL to toggle between NORMAL RING and DISTINCTIVE RNG. Press SELECT to confirm your choice.Youll hear a confirmation tone. SCROLL to another entry, or press DIR to exit.
Directory Storing the Contents of REDIAL in a Memory Location With the Base in the idle (off) mode, press and hold PROG/MEM. The Base will display ENTER NUMBER. Press REDIAL. The last phone number dialed at the Base will be displayed. Press PROG/MEM. The Base displays ENTER MEM 0-9. Enter the desired location.The Base now displays NUMBER SAVED and youll hear a confirmation tone.
Directory The Base displays ENTER MEM 0-9. Enter the desired location that to be deleted. The Base now displays ENTRY DELETED and youll hear a confirmation tone. ENTRY DELETED 8/28 2:19PM Advanced Operation Replacing a Memory Entry Stored in the Base Unit If you want to replace a phone number stored in a particular memory location, simply follow the procedure in the section Storing a Phone Number in a Memory Location, on page 23.
Caller ID (CID) and Call Waiting ID Caller ID (CID) and Call Waiting ID Your VT20-2438 is capable of displaying the name and number of the calling party, before you answer the phone (Caller ID). It is also capable of displaying Caller ID information in conjunction with a Call Waiting alert signal (Call Waiting ID). It will also store up to 90 CID records. You can review call history at the Handset.
Caller ID (CID) and Call Waiting ID Press SCROLL until DIAL ALTERNATE is displayed. DIAL ALTERNATE 555 555 555 Press SELECT, then SCROLL to see the format options: 11 digits 10 digits 8 digits 7 digits L2 8/30 3:20PM OLD01 1555 555 5555 555 555 5555 1 555 5555 555 5555 With the correct format displayed, press a LINE key. Deleting CID Records NOTE: You do not have to delete CID records.
Caller ID (CID) and Call Waiting ID Save a CID Record in the Directory REMOVE With the desired CID record displayed, press MENU. REMOVE is displayed. Press SCROLL until MOVE TO DIR is displayed. 555 555 5555 L2 8/30 3:20PM OLD 01 MOVE TO DIR 555 555 5555 L2 8/30 3:20PM OLD 01 Advanced Operation Press SELECT then enter the name. Press SELECT again. The screen will display ENTRY ADDED then NORMAL RING. If you prefer a distinctive ring, press SCROLL. The Handset will display DISTINCTIVE RNG.
Headset Operation Your VT20-2438 Handset is equipped with a 2.5mm Headset Jack for use with an optional accessory Headset for hands-free operation. If you choose to use the Headset option, you must obtain an optional accessory Headset, which is compatible with the VT20-2438. To purchase a Headset, call VTECH Customer Service at 1-800-595-9511. Once you have a compatible 2.5mm Headset, locate the Headset Jack on the VT20-2438 Handset. Connect the plug on the Headset cord to the jack on the cordless Handset.
Maintenance Taking Care Of Your Telephone Your VT20-2438 cordless telephone contains sophisticated electronic parts, so it must be treated with care. Avoid rough treatment Place the Handset down gently. Save the original packing materials to protect your telephone if you ever need to ship it. Avoid water Your telephone can be damaged if it gets wet. Do not use the Handset outdoors in the rain, or handle it with wet hands. Do not install your Base Unit near a sink, bathtub or shower.
In Case Of Difficulty If you have difficulty operating your phone, the suggestions below should solve the problem. If you still have difficulty after trying these suggestions, call VTech Communications at 1-800-595-9511. In Canada, call VTech Telecommunications at 1-800-267-7377. The Phone Doesn't Work At All Make sure the Power Cord is plugged in. Make sure the telephone line cord is plugged firmly into the Base Unit and the telephone wall jack. Make sure the batteries are properly charged.
In Case Of Difficulty If you still hear other calls, the problem is probably in your wiring or local service. Call your local telephone company. You Hear Noise In The Handset, And None Of The Keys Or Buttons Work Make sure the power cord is plugged in. Common Cure For Electronic Equipment If the unit does not seem to be responding normally, then try putting the Handset in the cradle. If it does not seem to respond, do the following(in the order listed) : 1. Disconnect the power to the Base. 2.
Warranty Statement What does this limited warranty cover? The manufacturer of this VTECH product, VTECH Communications, warrants to the holder of a valid proof of purchase (Consumer or you) that the product and all accessories provided by VTECH in the sales package (Product) are free from material defects in material and workmanship, pursuant to the following terms and conditions, when installed and used normally and in accordance with operation instructions.
Warranty Statement 7. Product returned without valid proof of purchase (see 2 below); or 8. Charges for installation or set up, adjustment of customer controls, and installation or repair of systems outside the unit. How do you get warranty service? To obtain warranty service in the United States of America, call 1 800-595-9511 for instructions regarding where to return the Product. Before calling for service, please check the users manual.
Warranty Statement State Law Rights: This warranty gives you specific legal rights, and you may also have other rights which vary from state to state. Limitations: Implied warranties, including those of fitness for a particular purpose and merchantability (an unwritten warranty that the product is fit for ordinary use) are limited to one year from date of purchase. Some states do not allow limitations on how long an implied warranty lasts, so the above limitation may not apply to you.
FCC, ACTA and IC Regulations This equipment complies with Parts 15 of the Federal Communications Commission (FCC) rules for the United States. It also complies with regulations RSS210 and CS-03 of Industry and Science Canada. Operation is subject to the following two conditions: (1) this device may not cause interference, and (2) this device must accept any interference, including interference that may cause undesired operation of the device.
FCC, ACTA and IC Regulations FCC and ACTA Information If this equipment was approved for connection to the telephone network prior to July 23, 2001, it complies with Part 68 of the Federal Communications Commission (FCC) rules. If the equipment was approved after that date, it complies with the Part 68 rules and with Technical Requirements for Connection of Equipment to the Telephone Network adopted by the Administrative Council for Terminal Attachments (ACTA).
FCC, ACTA and IC Regulations with the FCC. Your telephone company may make changes in its facilities, equipment, operation, or procedures that could affect the proper functioning of this product. The telephone company is required to notify you if such changes are planned. 5. Hearing aid compatibility If this product is equipped with a corded or cordless handset, it is hearing aid compatible. 6.
FCC, ACTA and IC Regulations this equipment, or equipment malfunctions, may give the telecommunications company cause to request the user to disconnect the equipment. Users should ensure for their own protection that the electrical ground connections of the power utility, telephone lines and internal metallic water pipe system, if present, are connected together. This precaution may be particularly important in rural areas.
Technical Specifications FREQUENCY CONTROL Crystal controlled PLL synthesizer TRANSMIT FREQUENCY Base: 2411.15 - 2418.40 MHz Handset: 912.75 - 917.10 MHz POWER RE QUIREMENTS Handset: 3.6V 400mAh Ni-Cd Battery Pack RECEIVE FREQUENCY Base: 912.75 - 917.10 MHz Handset: 2411.15 -2418.
VTECH TELECOMMUNICATIONS LTD. A member of THE VTECH GROUP OF COMPANIES. Distributed in the U.S.A. by VTech Communications Inc.; Beaverton, Oregon. Distributed in Canada by VTech Telecommunications Canada Ltd., Suite 200, 7671 Alderbridge Way, Richmond, B.C. V6X 1Z9. Copyright 2002 for VTECH TELECOMMUNICATIONS LTD.
Table of Contents Important Safety Instructions .................................................................. 1 Getting Started ............................................................................................ 2 Before your Begin ........................................................................................ 2 About Caller Identification ........................................................................... 2 Parts Check List ....................................................
Table of Contents Dialing from the Directory ......................................................................... 20 Editing and Deleting a Directory Entry .................................................... 21 Change Your Ring Preference for a Directory Entry .............................. 22 Memory Dialing from the Base ................................................................ 23 Storing a Phone Nummber in a Memory Location ................................