Important Safety Instructions When using your telephone equipment, basic safety precautions should always be followed to reduce the risk of fire, electric shock and injury, including the following: 1. Read and understand all instructions. 2. Follow all warnings and instructions marked on the product. 3. Unplug this product from the wall outlet before cleaning. Do not use liquid cleaners or aerosol cleaners. Use a damp cloth for cleaning. 4.
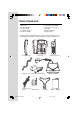
Parts Check List 1 2. 3. 4. 5. 6. Base AC Power Adapter 7. Telephone Line Cord 8. Belt Clip 9. Owner’s Manual 10. Battery Pack Base Unit Corded Handset Handset Cord Cordless Handset Handset Charger To purchase replacement battery packs, call VTech Communications inc. at 1-800-595-9511. In Canada, call VTech Electronics Ltd. at 1-800-267-7377.
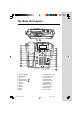
The Base Unit Layout 1. Corded Handset 2. LCD Display 3. Clear 4. CID (Caller ID) / 5. DIR (Directory) / 6. Select 7. Program 8. Flash 9. Intercom 10.Hold 11.Mute 12. Handset Cord Jack 13. Line In/Out Jacks 14. Power Jack 15. Display Dial 16. Message LED 17. Redial/Pause 18. Dialing Keys 19. Volume Keys 20. Speakerphone 21. Microphone 22. In Use LED 3 2498-manual-output.
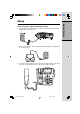
The Cordless Handset Layout 1. 2. 3. 4. 5. 6. 7. Antenna Earpiece Volume/Scroll Keys Phone ( Flash ) Dialing Keys ( 0-9,*, # ) Intercom Program ( Channel ) 8. Headset Jack 9. LCD Display 10. Select 11. Hold 12. Off 13. Redial ( Pause ) 14. Microphone 4 2498-manual-output.
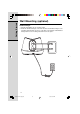
Getting Started Setup Connecting power to Base Unit/Handset Charger 1. Plug the AC power adapter into an electrical outlet, and the DC connector into the back of the Base Unit. 2. Choose the location for your Handset Charger, and plug its power supply into an electrical outlet. 3. Using the coiled Handset Cord, connect the corded Handset to the Base Unit. The corded Handset jack is on the front left edge of the Base. 5 2498-manual-output.
Getting Started Setup Installation of Battery Pack in Handset Follow the steps below: 1. Remove battery compartment cover by pressing on the indentation and sliding downward. 2. Align the two holes in the plug with the socket pins, then snap the plug into place. 3. Snap the battery pack in place with the wires in the lower left corner, along the bottom of the battery pack. 4. Replace cover by sliding it up into place. 5. Place the Handset in the Charger, and allow it to charge for 12 hours.
IMPORTANT: 1. Do not dispose of a battery pack in a fire, the cell may explode. 2. Do not open or mutilate the battery pack. Toxic substances may be released causing harm to eyes or skin. 3. Exercise care in hardling battery packs in order to prevent an accidental short of the charge contacts, potentially causing the battery pack to overheat. 4. Do not dispose of this battery pack into household garbage. Please refer to the information concerning proper battery recycling.
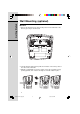
Getting Started Wall Mounting (optional) Base Unit 1. Release the bracket from its desk mount position on the underside of the Base by pressing as shown below: 2. Turn the bracket down and snap it into the 2 holders on the lower portion of the Base Unit’s underside. 3. With the corded Handset out of the cradle, remove the reversible hook by pushing upwards, then rotate it 180 degrees and slide it back in place. 8 2498-manual-output.
4. Connect the telephone line cord to the jack labeled TEL. LINE on the back of the Base. 5. Connect the power cord to the jack labeled DC 9V on the back of the Base. 6. Wrap the telephone line cord around the posts on the bottom of the Base. 7. Connect the corded Handset to the Base. 8. Connect the telephone line cord to the modular telephone jack. 9. Plug the power cord into the electrical outlet. 10.Mount the Base on the wall. a) Align holes on Base with mounting studs on wall jack.
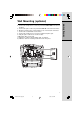
Getting Started Wall Mounting (optional) Handset Charger 1 Plug the AC adapter into an electrical outlet. 2 Mount the Handset Charger on the wall. Position the Handset Charger so the mounting studs will fit into the holes on the back of the Charger. Slide Handset Charger down on the mounting studs until it locks into place. 10 2498-manual-output.
Getting Started Base Features Base Ringer Volume Switch * Located on the left edge of the Base, select from HIGH, LOW or OFF. CLEAR Key * Press CLEAR to return the Base display to the idle mode. Key CID/ * Press this key to enter access Caller ID and Call Waiting ID records. * While entering digits during predialing or Directory programming, press CID/ to backspace. SELECT Key * Used in connection with PROG for Base programming. MESSAGE LED * Flashes to alert you to new voice mail messages.
Getting Started Base Features HOLD Key * Press HOLD to place your call on hold. The IN USE light flashes. * Press HOLD or SPEAKER to return to the call. * You can also return to the call by picking up the corded Handset. * You can also return to the call by pressing PHONE on the cordless Handset. SPEAKER Key * Press to either make or receive a Speakerphone call. The SPEAKER key illuminates when you are on an active speakerphone call.
Getting Started Cordless Handset Features CID/ Key * While on a call, press this key to lower the Handset volume. * Press this key to access Caller ID and Call Waiting ID records. * While entering digits during predialing or Directory programming, press CID/ to backspace. PHONE/FLASH Key * Press PHONE/FLASH to make or answer a call. * While on a call, press this key to access services such as Call Waiting. HOLD Key * Press this key to place your call on Hold.
Getting Started Cordless Handset Features SELECT Key * Use in conjunction with PROG/ CHAN for Handset programming. OFF Key * Press OFF to end your call. * Press OFF to exit programming and return to the idle screen. * Press OFF to end a page. REDIAL/PAUSE Key * Press this key to display the last number dialed, up to 32 digits. You can then press PHONE to complete the call. * During Directory programming, press REDIAL/PAUSE to place a 2 second pause in a dialing sequence.
Operating Instructions Cordless Handset Menu In the idle mode, press PROG/CHAN, then options: or to scroll through the following DIRECTORY for programming Name and Numbers in Phone Book Memory. RINGER select a ring style, or shut the Handset ringer off. DATE/TIME for setting the Handset date and time. MESSAGES WAITING for clearing the Message Waiting alert. Note: Incoming Caller ID will set the Handset date and time.
Operating Instructions Base Menu In the idle mode, press PROG, then or to scroll through the following options: DIRECTORY for programming Name and Numbers in Phone Book Memory. DIAL MODE choose Tone or Pulse MESSAGES WAITING for clearing the Message Waiting alert. Setting Dial Mode (preset to TONE) * Press PROG, then press or and scroll to DIAL MODE. to choose TONE or PULSE. * Press SELECT, then press or * Press SELECT to confirm your choice.
Operating Instructions Making a Call from the Base Unit * Pick up the corded Handset or press SPEAKER, then dial the number; -OR* Dial the number first. Use CID/ to backspace if you make a mistake. * Press DISPLAY DIAL. Basic Operation Making a Call from the Cordless Handset * Press PHONE/FLASH, then dial the number; -OR* Dial the number first; use CID/ to backspace if you make a mistake. * Press PHONE/FLASH to dial the displayed number.
Operating Instructions Ending a Base Unit Call Basic Operation * Return the corded Handset to the cradle, or press SPEAKER. Ending a call when using the Cordless Handset * Press OFF, or return the Handset to its remote charger. 18 2498-manual-output.
Operating Instructions Intercom From Cordless Handset to Base: * Press INTERCOM on the cordless Handset. The screens display ** PAGING **. * Press INTERCOM on the Base, or pick up the corded Handset. * Press OFF on the cordless Handset, INTERCOM on the Base, or return the corded Handset to the cradle to end the Intercom call. From Base to Cordless Handset: Transferring a Call from Cordless Handset to Base using INTERCOM: * Press HOLD to place your call on hold. * Press INTERCOM on the cordless Handset.
Operating Instructions Handset Ringer Style Basic Operation You can select from 4 different Handset ringer styles, or turn the Handset ringer off. With the Handset in the idle (Off) mode: * Press PROG/CHAN. until the screen displays: RINGER: __ * Press * Press SELECT. The current selection will blink. to sample each of the ring styles, or * Press or choose OFF. * Press SELECT to confirm your choice.
Operating Instructions Base Display Messages Screen Displays: When: BUSY Base Intercom denied since cordless Handset is in use. HOLD Call was placed on Hold. INTERCOM Base is in intercom mode with cordless Handset. MESSAGES WAITING New unplayed messages are in your voice mailbox. MUTE Microphone is muted. OLD 05 New and previously viewed CID records. ** PAGING ** Base paging Handset or Handset paging Base. PHONE Corded Handset is in use. ** RINGING ** There is a call coming in.
Phone Book Directory Both the Base and cordless Handset can independently store 50 names and phone numbers, up to 24 digits long. Storing a name and phone number in the Base Unit's Phone Book Directory has no effect on the cordless Handset, and vice versa. The Directory stores the names alphabetically. If you want your directory to alphabetize by last name, enter the names last name first. NOTE: Press OFF (on the cordless Handset) or CLEAR (on the Base) to exit Directory mode.
Phone Book Directory * When you finish entering the name, press SELECT. The screen displays ENTER NUMBER. to backspace if you make a mistake. * Enter the telephone number. Press Press REDIAL/PAUSE to add a 2-second pause to the dialing sequence. Multiple presses of the REDIAL/PAUSE key will increase the pause in two second increments; - OR Instead of entering the telephone number, press REDIAL/PAUSE to display the last number dialed. * Press SELECT.
Phone Book Directory Deleting a Number/Name Stored in the Directory Basic Operation * Press ( ). The screen displays DIRECTORY. * Press or to search for the desired entry, or press the key containing the first letter of the entry. Keep pressing the key if your desired entry is not the first one to come up. or until * With the desired entry displayed, press SELECT, then press ERASE flashes. * Press SELECT. The screen displays ERASE NO YES, along with the phone number. * Press or until YES flashes.
Caller ID Operation For each call that comes in, the screen displays the following information between the first and second rings: • Your caller’s name (15 letters are sent by your telephone company) • The caller’s area code and telephone number • The time and date of the call If you answer a call before the information appears on the screen, it will not be in the call history. If there appears a * in the upper right corner of the screen, it signifies the caller has called you at least two times.
Caller ID Operation Deleting Records from Call History Delete a Specific Call * Locate the record you want to delete from call history by following the steps in Review Call History. * Press SELECT. ERASE is flashing. Basic Operation * Press SELECT. The screen displays ERASE NO YES ALL and the telephone number. * Press or until YES flashes. * Press SELECT. The Handset will beep to confirm deletion. Delete ALL Calls * While viewing call history, press SELECT, then press or until ERASE flashes.
Caller ID Operation Store a Call History Record in the Phone Book Directory * Locate the record you want to store from call history by following the steps in Review Call History. * To change the dialing string (4 choices: 7, 8, 10 or 11 digit dialing), press # until the correct sequence is displayed. or until PGM flashes. * Press SELECT, then press or . Basic Operation * Press SELECT. Edit the Name, if desired. * Press SELECT. Edit the Number, if desired. * Press SELECT.
Headset Operation Your VT2498 Cordless Handset is equipped with a 2.5mm Headset Jack for use with an optional accessory Headset for hands-free operation. If you choose to use the Headset option, you must obtain an optional accessory Headset, which is compatible with the VT2498. To purchase a Headset, call VTECH Customer Service at 1-800-595-9511. Once you have a compatible 2.5mm Headset, locate the Headset Jack on the VT2498 Handset. Connect the plug on the Headset cord to the jack on the cordless Handset.
Maintenance Taking Care Of Your Telephone Your VT2498 cordless telephone contains sophisticated electronic parts, so it must be treated with care. Avoid rough treatment Place the Handset down gently. Save the original packing materials to protect your telephone if you ever need to ship it. Avoid water Your telephone can be damaged if it gets wet. Do not use the Handset outdoors in the rain, or handle it with wet hands. Do not install your Base Unit near a sink, bathtub or shower.
In Case Of Difficulty If you have difficulty operating your phone, the suggestions below should solve the problem. If you still have difficulty after trying these suggestions, call VTECH Communications at 1-800-595-9511. In Canada, call VTECH Electronics at 1-800-267-7377. The Phone Doesn't Work At All • Make sure the Power Cord is plugged in. • Make sure the telephone line cord is plugged firmly into the Base Unit and the telephone wall jack. • Make sure the batteries are properly charged.
In Case Of Difficulty You Hear Other Calls While Using Your Phone • Disconnect your Base Unit from the telephone jack, and plug in a regular telephone. If you still hear other calls, the problem is probably in your wiring or local service. Call your local telephone company. You Hear Noise In The Handset, And None Of The Keys Or Buttons Work • Make sure the power cord is plugged in.
Warranty Statement What does this limited warranty cover? • The manufacturer of this VTECH product, VTECH Communications, warrants to the holder of a valid proof of purchase (“Consumer” or “you”) that the product and all accessories provided by VTECH in the sales package (“Product”) are free from material defects in material and workmanship, pursuant to the following terms and conditions, when installed and used normally and in accordance with operation instructions.
Warranty Statement conditions, network reliability or cable or antenna systems; or 4. Product to the extent that the problem is caused by use with non-VTECH electrical accessories; or 5. Product whose warranty/quality stickers, Product serial numbers plates or electronic serial numbers have been removed, altered or rendered illegible;or 6.
Warranty Statement Other Limitations • This warranty is the complete and exclusive agreement between you and VTECH. It supersedes all other written or oral communications related to this Product. VTECH provides no other warranties for this product. The warranty exclusively describes all of VTECH’s responsibilities regarding the product. There are no other express warranties. No one is authorized to make modifications to this limited warranty and you should not rely on any such modification.
FCC, ACTA and IC Regulations This equipment complies with Parts 15 of the Federal Communications Commission (FCC) rules for the United States. It also complies with regulations RSS210 and CS-03 of Industry and Science Canada. Operation is subject to the following two conditions: (1) this device may not cause interference, and (2) this device must accept any interference, including interference that may cause undesired operation of the device.
FCC, ACTA and IC Regulations FCC and ACTA Information If this equipment was approved for connection to the telephone network prior to July 23, 2001, it complies with Part 68 of the Federal Communications Commission (FCC) rules. If the equipment was approved after that date, it complies with the Part 68 rules and with Technical Requirements for Connection of Equipment to the Telephone Network adopted by the Administrative Council for Terminal Attachments (ACTA).
FCC, ACTA and IC Regulations 4. Rights of the telephone company If this equipment is causing harm to the telephone network,thetelephone company may temporarily discontinue your telephone service. The telephone company is required to notify you before interrupting service. If advance notice is not practical, you will be notified as soon as possible.You will be given opportunity to correct the problem and the telephone company is required to inform you of your right to file a complaint with the FCC.
FCC, ACTA and IC Regulations NOTICE: The Ringer Equivalence Number (REN) for this terminal equipment is 0.7. The REN assigned to each terminal equipment provides an indication of the maximum number of terminals allowed to be connected to a telephone interface. The termination on an interface may consist of any combination of devices subject only to the requirement that the sum of the Ringer Equivalence Numbers of all the devices does not exceed five.
The RBRC® Seal The RBRC® Seal on the nickel-cadmium battery indicates that VTech communications, Inc. is voluntarily participating in an industry program to collect and recycle these batteries at the end of their useful lives, when taken out of service within the United States and Canada. The RBRC® program provides a convenient alternative to placing used nickelcadmium batteries into the trash or municipal waste, which may be illegal in your area.
Technical Specifications FREQUENCY CONTROL WEIGHT Crystal controlled PLL synthesizer Handset : 151 grams Base : 893 grams (excluding battery pack) TRANSMIT FREQUENCY Base: 2411.15 - 2418.4 MHz Handset: 912.75 - 917.10 MHz POWER REQUIREMENTS Handset: 3.6V 400mAh Ni-Cd Battery Pack Base: 912.75 - 917.10 MHz Handset: 2411.15 - 2418.
VTECH TELECOMMUNICATIONS LTD. A member of THE VTECH GROUP OF COMPANIES. Distributed in the U.S.A. by VTech Communications Inc.; Beaverton, Oregon. Distributed in Canada by VTech Electronics Canada Ltd., Suite 200, 7671 Alderbridge Way, Richmond, B.C. V6X 1Z9. Copyright 2002 for VTECH TELECOMMUNICATIONS LTD. Printed in China 2498-manual-output.
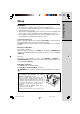
CONTENTS Important Safety Instructions..........................................................................................1 Parts Check List..................................................................................................................2 The Base Unit Layout.......................................................................................................3 The Cordless Handset Layout.......................................................................................
CONTENTS Phone Book Directory.................................................................................................22 Storing a Number/Name in the Phone Book Directory............................22 Edit a Number/Name Stored in the Directory...........................................23 Deleting a Number/Name Stored in the Directory....................................24 Caller ID Operation.......................................................................................................