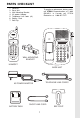
PARTS CHECKLIST 1. 2. 3. 4. 5. 6. 7. Handset Base Unit Wall Mounting Bracket AC power Adaptor Telephone Line Cords (x2) Battery Pack Belt Clip To purchase replacement battery packs, call VTECH Communications at 1-800595-9511. In Canada, call VTECH Electronics at 1-800-267-7377.
IMPORTANT SAFETY INSTRUCTIONS When using your telephone equipment, basic safety precautions should always be followed to reduce the risk of fire, electric shock and injury to persons, including the following: 1. Read and understand all instructions. 2. Follow all warnings and instructions marked on the product. 3. Unplug this product from the wall outlet before cleaning. Do not use liquid cleaners or aerosol cleaners. Use a dry cloth for cleaning. 4.
IMPORTANT SAFETY INSTRUCTIONS D. If the product does not operate normally by following the operating instructions. Adjust only those controls, that are covered by the operating instructions because improper adjustment of other controls may result in damage and will often require extensive work by a qualified technician to restore the product to normal operation. E. If the product has been dropped or the cabinet has been damaged. F. If the product exhibits a distinct change in performance. 13.
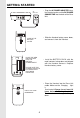
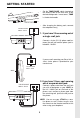
GETTING STARTED • Plug the AC POWER ADAPTER into a live electrical outlet and the DC POWER CONNECTOR into the back of the Base Unit. AC OUTLET - + DC IN 9V LINE 2 L1/L1+L2 LINE 2 L2 DC • Slide the Handset battery cover down, and remove it from the Handset. SLIDE IN THE BATTERY COVER PLACE THE NEW BATTERY PACK INTO THE BATTERY COMPARTMENT • Install the BATTERY PACK, with the metal contacts facing down and aligned with the Handset contacts. Replace Handset battery cover.
GETTING STARTED L1 RINGER LEVEL L2 OFF LOW • Set the TONE/PULSE switch, located on the antenna side of the Base Unit, to the desired dialing mode. In most areas, TONE is the desired mode. • After charging the battery pack, connect the telephone line(s) DIAL MODE HIGH OFF L 2 HIGH PULSE LOW TONE TONE/PULSE SWITCH BASE RINGER SWITCH TELEPHONE WALL JACK 1.
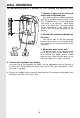
WALL MOUNTING The Wall Mounting bracket is designed to fit on standard Wall Mounting plates 1. Choose a spot near an electrical outlet and a telephone jack. Your phone requires a modular telephone jack and a standard electrical outlet (120v AC). The power cord is six feet long; make sure there is an electrical outlet within reach of the Base Unit. The outlet should not be controlled by a wall switch. If the switch is ever turned off, the phone will not operate. en od wotud s wa llb oa rd 2.
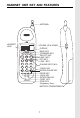
HANDSET UNIT KEY AND FEATURES ANTENNA HEADSET JACK VOLUME UP & DOWN DISPLAY SELECT LINE 1 OFF LINE 2 1 2 ABC 3 DEF 4 GHI 5 JKL 6 MNO 7 PQRS 8 TUV 9 WXYZ TONE HOLD 0OPER PROG CONF FLASH REDIAL/PAUSE INTERCOM BACK KEY FORWARD KEY SELECT KEY LINE 2 KEY OFF KEY LINE 1 KEY DIALING KEYS (0-9) FLASH KEY REDIAL/PAUSE KEY PROG KEY HOLD KEY INTERCOM KEY CONF KEY TONE KEY (Temporary Tone) BATTERY COMPARTMENT 7
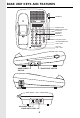
BASE UNIT KEYS AND FEATURES ANTENNA PGM/PRV KEY REDIAL/PAUSE KEY MUTE KEY HOLD KEY MEM KEY FLASH KEY VOLUME UP KEY VOLUME DOWN KEY LINE 2 KEY OFF KEY LINE 1 KEY L2 TONE/PULSE SWITCH BASE RINGER SWITCH DATA PORT LINE 2 LINE 2 DC AC POWER JACK PHONE CORD JACK 8
BASIC TELEPHONE OPERATIONS AREA CODE PROGRAMMING To benefit from all the Caller ID features of your telephone, you must enter your home area code. If you live in an area where you dial calls within your own area code by dialing 7 digits (no area code), follow these steps (with the Handset OFF ): • • • • Press PROG. Press until AREA is blinking. Press SELECT. until it HOME should be blinking. If not, press blinks. • Press SELECT. ENTER AREA CODE is displayed.
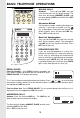
BASIC TELEPHONE OPERATIONS MAKING CALLS SELECT LINE 1 1 OFF LINE 2 2 3 ABC Handset: Press desired LINE key and listen for dial tone. Dial the phone number. The Base Unit will display HANDSET IN USE, and the corresponding LINE key will blink.Press OFF to end your call. DEF Alternative Method Dial the phone number, checking the display for accuracy. If you make a mistake, use the key to backspace. Once you have entered the phone number, press the desired LINE key. Press OFF to end your call.
BASIC TELEPHONE OPERATIONS Speakerphone: Press the flashing LINE key. The LINE key will glow steadily and the Base Unit will display: The corresponding LINE key on the Handset will blink while the Speakerphone is in use. Press OFF to end your call. LINE IN USE (Parallel Set Detection) If a different telephone device, sharing the same line(s) as your VT 2931, is in use, the corresponding LINE key(s) will blink on the Handset and Base Unit, indicating activity on that line.
BASIC TELEPHONE OPERATIONS INTERCOM (Conversation between the Base and Handset) From the Handset: Press INTERCOM. The Base Unit will ring, and the intercom call will be automatically connected. From the Base: Press INTERCOM/PAGE. The Handset will ring. To answer the call, press INTERCOM on the Handset. To end an Intercom call, press OFF on either the Handset or the Base. MIC VOICE MAIL INDICATOR If you subscribe to Voice Mail, the MESSAGE light on the Base Unit will flash when you have new messages.
BASIC TELEPHONE OPERATIONS There are 4 ringer styles. The current setting is displayed. • Press or to hear the other ring styles OR turn the Handset ringer OFF. • When the desired ringer type is blinking, press SELECT. BASE UNIT RINGER L2 The Base Unit ringer volume is controlled by a switches on the right edge of the Base Each line can be set to Off, Low, or High volume. CONFERENCE CALLING To talk to both lines at the same time: 1. While you are one line, press HOLD. 2.
CALLER ID This telephone provides two types of Caller ID: Caller ID: Displays the name and number of each caller after the phone begins ringing (requires Caller ID service from your telephone company). Caller ID on Call Waiting: Shows the name and number of each caller on Call Waiting after you hear the Call Waiting tone (requires Caller ID on Call Waiting service). The phone has a Call Log, which stores the name, number, date, and time of the last 20 calls received.
DIRECTORY TO STORE A NAME AND NUMBER • Press PROG. DIRECTORY will be blinking. • Press SELECT. • The screen will display ENTER NAME. Use the Dialing keys to enter the desired name. Press the key until the desired letter or character appears. A guide to the characters: KEY 1 2 3 4 5 6 7 8 9 0 * # CHARACTERS 1 A>B>C>2 D>E>F>3 G>H>I>4 J>K>L>5 M>N>O>6 P>Q>R>S>7 T>U>V>8 W>X>Y>Z>9 0 * &’,-.
DIRECTORY the name is correct, press SELECT. If you want to edit the number, press to erase digits. Use the dialpad to enter new digits. When the number is correct, press SELECT. You will then hear a long beep. The name and number have been stored in the Directory. MAKING DIRECTORY CALLS • Press SELECT. DIRECTORY will appear. or to scroll to the desired name; or, • Press • Search by entering the first letter of the name, and then press or if necessary. • Press the desired LINE key.
BASE UNIT OPERATION ANSWERING CALLS • • Press LINE 1 or 2. Press OFF again to end your call. DIALING • Press LINE 1 or 2. Dial the phone number. Adjust the Base Unit volume to a comfortable level. • Press OFF to end your call. SPEED DIALING • • • Press LINE 1 OR 2. Press MEM. Enter Location (0-9). Press OFF to end your call. MIC PROGRAMMING SPEED DIAL NUMBERS • • • • Press PROG. The Base will display: PROGRAM. Press MEM. The Base will display : ENTER 0 TO 9 Enter desired Location (0-9).
BASE UNIT OPERATION STORING A PAUSE IN A DIALING SEQUENCE To insert a pause while programming a speed dial number, press REDIAL/PAUSE at the appropriate point in the number sequence. This inserts a 2 second pause. A “P” appears in the display representing the pause. For longer pauses, press REDIAL/PAUSE two or more times. Each pause is treated as a stored digit. INTERCOM You can Intercom the Handset from the Base Unit (or vice versa). Press INTERCOM/PAGE on the Base Unit.
ADDITONAL OPERATIONS POWER BACKUP When a spare battery pack (optional) is installed in the Base Unit, your VTech cordless telephone uses this battery to provide operational backup during a power failure. If you have a fully charged battery pack in the Base Unit charger, you will be able to place and receive calls from the Handset for up to 5 hours. Note: During power backup mode, the Base Unit functions are not operable, In addition, Caller ID information may not be reliable.
HEADSET OPERATIONS Your VTech cordless phone is equipped with a 2.5mm headset Jack for use with an optional accessory Headset for hands-free operation. If you choose to use the Headset option, you must obtain an optional accessory Headset, which is compatible with the VTech cordless phone. To purchase a Headset, call VTech Customer Service at 1-800-595-9511. In Canada, call VTECH Electronics at 1-800-267-7377. Once you have a compatible 2.
MAINTENANCE Your VT1932 cordless telephone contains sophisticated electronic parts, so it must be treated with care. Avoid rough treatment Please the Handset down gently. Save the original packing materials to protect your telephone if you ever need to ship it. Avoid water Your telephone can be damaged if it gets wet. Do not use the Handset outdoors in the rain, or handle it with wet hands. Do not install your Base Unit near a sink, bathtub or shower.
IN CASE OF DIFFICULTY THE PHONE DOESN'T WORK AT ALL. • • • Make sure the Power Cord is pugged in. Make sure the telephone line cords are plugged firmly into the base unit and the telephone wall jack. Make sure the batteries are properly charged. If the 'LOW BATTERY' message is shown, the battery pack needs charging. NO DIAL TONE. • • First check all the suggestions above. If you still don't hear a dial tone, disconnect the base unit from the telephone jack and connect a different phone.
IN CASE OF DIFFICULTY YOU HEAR NOISE IN THE HANDSET, AND NONE OF THE KEYS OR BUTTONS WORK. Make sure the power cord is plugged in. COMMON CURE FOR ELECTRONIC EQUIPMENT ADDITIONAL INFORMATION Electronics, like people, can sometimes get confused. If the unit does not seem to be responding normally, then try putting the handset in the cradle. If it does not seem to respond after trying this a few times, do the following (in the order listed): 1. Disconnect the power to the base. 2.
WARRANTY STATEMENT WHAT DOES OUR WARRANTY COVER? • Any defect in material or workmanship. FOR HOW LONG AFTER THE ORIGINAL PURCHASE? • To the original purchaser only - ONE YEAR. WHAT WILL VTECH DO? • At our option, repair or replace your unit. HOW DO I SEND MY UNIT, IN OR OUT OF WARRANTY? • Call VTECH Communications customer service for Return Authorization at: 1-800-595-9511 in Canada, call VTECH Electronics at: 1-800-267-7377. • Properly pack your unit.
FCC AND IC REGULATIONS This equipment complies with Parts 15 and 68 of the Federal Communications Commission (FCC) rules for the United States. It also complies with regulations RSS210 and CS-03 of Industry and Science Canada. Operation is subject to the following two conditions: (1) this device may not cause interference, and (2) this device must accept any interference, including interference that may cause undesired operation of the device.
FCC AND IC REGULATIONS operation, or procedures that could affect the operation of your equipment. If so, you will be given advance notice of the change to give you an opportunity to maintain uninterrupted service. The base unit contains no user serviceable parts. replaceable battery pack. The handset contains a user If it is determined that your telephone equipment is malfunctioning, the FCC requires that it not be used and that it be unplugged from the modular jack until the problem has been corrected.
FCC AND IC REGULATIONS Your VT 2931 is designed to operate at the maximum power allowed by the FCC . This means your handset and base unit can communicate only over a certain distance - which will depend on the location of the base unit and handset, weather, and the construction and layout of your home or office. THE RBRC TM SEAL The RBRC R Seal on the nickel-cadmium battery contained in our product indicates that VTech Communications, Inc.
TECHNICAL SPECIFICATIONS FREQUENCY CONTROL Crystal Controlled Dual PLL Synthesizer TRANSMIT FREQUENCY Handset : 923.10 MHz to 927.75 MHz ( All ten channels within this range) Base : 902.3 MHz to 906.65 MHz (All ten channels within this range) RECEIVE FREQUENCY Handset : 902.3 MHz to 906.65 MHz ( All ten channels within this range) Base : 923.10 MHz to 927.75MHz ( All ten channels within this range) NOMINAL EFFECTIVE RANGE Maximum power allowed by FCC and IC.
TABLE OF CONTENTS PARTS CHECK LIST...............................................................................................................1 IMPORTANT SAFETY INSTRUCTIONS...............................................................................5 GETTING STARTED..............................................................................................................7 WALL MOUNTING.................................................................................................................
VTECH TELECOMMUNICATIONS LTD. A member of THE VTECH GROUP OF COMPANIES. Distributed in the U.S.A. by VTech Communications Inc, Beaverton, Oregon, 97008 Distributed in the Canada by VTech Electronics Canada Ltd., Suite 200-7671 Alderbridge Way Richmond, B.C. V6X 1Z9. Copyright 2000 for VTECH TELECOMMUNICATIONS LTD.