VTECH COMMUNICATIONS LTD. Distributed in the U.S.A. by VTECH Communications, Beaverton, OR Distributed in Canada by VTECH Electronics Canada Ltd., Richmond, B.C.. Copyright 1999 for VTECH COMMUNICATIONS LTD.
USER’S MANUAL VT 9125 900MHz CALLER ID CORDLESS TELEPHONE IMPORTANT VTECH COMMUNICATIONS LTD. BEFORE USING YOUR NEW PHONE, WE STRONGLY RECOMMEND YOU READ THIS MANUAL THOROUGHLY.
IMPORTANT SAFETY INSTRUCTIONS IMPORTANT SAFETY INSTRUCTIONS Read and understand all instructions. Follow all warnings and instructions marked on the telephone. Use only the battery type recommended in the Instruction Manual.Do not use a lithium battery. Unplug this telephone from the wall outlet before cleaning. Do not use liquid or aerosol cleaners, just use a damp cloth for cleaning. Do not use this telephone near water.
IMPORTANT SAFETY INSTRUCTIONS CAUTION To reduce the risk of fire or injury to persons, read and follow these instructions: TELEPHONE WIRING AND JACK INSTALLATION Use caution when installing or modifying telephone lines. Never install telephone wiring during an electrical storm. Never install telephone jacks in wet locations unless the jack is specifically designed for wet locations. Never touch uninsulated telephone wires or terminals unless the telephone line is disconnected at the network interface.
Table of Contents TABLE OF CONTENTS IMPORTANT SAFETY INSTRUCTIONS i TABLE OF CONTENTS iii GETTING TO KNOW YOUR NEW PHONE Unpacking Your Phone Using Your Phone’s Features 1 1 2 4 4 4 6 7 7 7 SETTING UP YOUR PHONE Step 1. Choose a Central Location for the Base Step 2. Plug in the Cords Step 3. Add the Battery to the Handset Step 4. Select Tone or Pulse Service Step 5. Set Ringer On or Off Step 6.
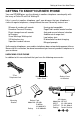
Getting to Know Your New Phone GETTING TO KNOW YOUR NEW PHONE Your new VT 9125 gives you the ultimate in cordless telephone sound quality with the luxury of Caller ID and Call Waiting ID. If this is your first cordless telephone, you’ll soon discover that your telephone is similar to regular telephones, except without the cord.
Getting to Know Your New Phone Your VT 9125 comes with a handset and a base.
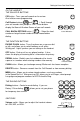
Getting to Know Your New Phone ON THE HANDSET THE CALLER ID BUTTONS CID button - Turns your call records on for review. Also initiates menu programming. # )- Scroll through Call Review buttons( TONE and your call records after you press CID. These buttons display the Name & Number Screen of your call records. CID 0 TONE # OPER CALL BACK# OPTIONS button ( OPER0 ) - Select the local number or long distance number of a call record before dialing.
Setting Up Your Phone SETTING UP YOUR PHONE Now that you’ve checked the contents of the carton, it only takes a few steps to set up your phone. STEP 1. CHOOSE A CENTRAL LOCATION FOR THE BASE The base should be away from all other electronic equipment such as the microwave, personal computer, stereo, television, VCR or other cordless telephones. It is also a good idea to place the unit away from noisy areas, or from heat sources such as a radiator or direct sunlight.
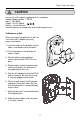
Step 2. Plug in the Cords CAUTION Use only the AC adapter supplied with this telephone. Adapter Model number : VT9125 Input : 120V 60Hz Output : 9V DC 400mA Polarity : Center Positive Incorrect polarity or voltage can seriously damage the unit. To Mount on a Wall: When you mount the phone on a wall, be sure that the AC adapter can easily reach a wall outlet. 1. Insert the hooks of the bracket into the holes in the bottom half of the base. 2. Push the bracket in the direction of arrows shown. 3.
Setting Up Your Phone STEP 3. ADD THE BATTERY TO THE HANDSET If this is the first time you are installing the battery, the battery cover is not on the handset. It is located in your accessory packet. Skip step 1. 1. Remove the battery cover by sliding it out. 2. Locate the battery connector inside the battery well. If you are replacing a dead battery, remove the old battery by pulling firmly on the battery cords. 3. Insert the battery plug into the connector.
Step 4. Select Tone or Pulse Service CAUTION Risk of explosion if battery is replaced by an incorrect type. To reduce the risk of fire or injury to persons or damage to the phone, replace only with battery NP 600, B-650 or 3N-600AACL in this phone. Do not attempt to open the sealed battery pack. All used Ni - Cad batteries must be recycled or disposed of properly in accordance with all applicable laws. STEP 4.
Operating Your Phone OPERATING YOUR PHONE DIALING This telephone lets you make calls using traditional or short-cut dialing methods. USING TRADITIONAL DIALING 1. Press lit. PHONE on the handset. The PHONE button becomes FLASH The channel number and the call timer are shown on the display. 2. Use the number pad to dial the phone number. The phone number appears on the display as you enter the number. You also hear beeps for each digit as you dial. 3. Listen for a connection. 4.
Using Short-cut Dialing Methods USING SHORT-CUT DIALING METHODS USING CALL RECORDS See Dialing From Call Recordson page 14. USING REDIAL Redial is a fast method of calling the last number that you dialed. This feature works whether you dialed it manually, or it was from a call record or the speed dial list. 1. Press REDIAL . The last telephone number you called is shown on the display. 2. Verify the correct number. 3. Press PHONE to dial the telephone number.
Operating Your Phone 3. Press the number buttons to select the characters. Each button pressed will go through a set of characters as shown below. 1: 2: 3: 4: 5: 6: 7: 8: 9: 0: A D G J M P T W 0 B E H K N Q U X Press C F I L O R V Y 2 3 4 5 6 S 8 Z 7 9 # when you get to the desired character on the button. If you want to insert a space, press # again. 4. Repeat step 3 until you have entered the name. You can enter up to 15 characters maximum. 5. Press again.
Using the Speed Dial List USING THE SPEED DIAL LIST REVIEWING SPEED DIAL ENTRIES You can review the entries in your Speed Dial List. You can use this method to check the contents of your Speed Dial List before you create a new entry. 1. Press OFF 2. Press to clear the display. . The display shows the first entry in the list. MEM 3. Press 1 - 9 on the keypad to directly access the entry. Alternatively, press TONE or # to go through the list.
Operating Your Phone USING FLASH To access your custom calling services, like Call Waiting, while you are on the telephone, press PHONE . FLASH USING TEMPORARY TONE SERVICE If you have Rotary / Pulse service, you can temporarily set your telephone to tone service for use with automated telephone services. Press TONE after you connect with the automated service. The phone automatically returns to rotary / pulse service after you hang up the call.
Using Caller ID and Call Waiting ID USING CALLER ID AND CALL WAITING ID Caller ID and Call Waiting ID allow you to see information about an incoming call so you can decide whether to answer the call. With Caller ID or Call Waiting ID service from your local telephone company, the telephone displays the caller’s information and stores it in the call records. Caller ID lets you know who is calling before you pick up the phone.
Using Caller ID and Call Waiting ID DIALING FROM CALL RECORDS You can use your Call Records as a short-cut method of dialing. 1. Press CID NEW CALL# to see the Call Summary. CALL# 2. Press 3. Press or TONE 0 OPER # to find the desired call record. , and stop at the number you want to dial out. Remove the area code. Press 0 OPER Add 1+ area code. Press 0 OPER Remove the 1. Keep the area code. Press OPER Press OPER 0 Remove the area code. Add 1 to local number.
Saving Call Records SAVING CALL RECORDS Your phone stores up to 50 Call Records before the memory becomes full. When the next call comes in, the oldest record drops off and makes room for the new call record. To save specific calls, transfer call records to the Speed Dial List or delete old call records. For more information about saving call records to the Speed Dial List, see Transferring a Caller ID Call Record on page 10.
Using Caller ID and Call Waiting ID READING DISPLAY MESSAGES In addition to call record information, you also receive status messages: MESSAGE MEANING You have reached the end of the call records list. Press TONE or # to continue. There are no calls in your call records. Caller ID information is too long to be displayed. You should not dial from this call record as the number is incomplete. The caller chose to block the transmission of his/her Caller ID information.
Setting Up VIP Distinctive Ring SETTING UP VIP DISTINCTIVE RING This phone can give you a distinctive ringing tone if the call comes from one of your favorite callers. You can store up to 9 numbers in your VIP List. CREATING YOUR VIP LIST 1. Press CID , then . MEM The display shows the first menu. 2. Press 3. Press 4. Press twice. TONE 3 to see the total VIP numbers you have set up. 0 and enter the telephone number including DEF OPER the area code. 5. Press again.
Speed Dialing in a Chain SPEED DIALING IN A CHAIN You can dial numbers from your speed dial list one after another. Suppose you want to make a long distance call from your Caller ID call records through another carrier. Follow the steps below. 1. Copy the call record to an empty Index Number, for example TUV 8 , in the speed dial list. See Transferring a Caller ID Call Record on page 10. 2. Press 3. Press and memory location number, for MEM example 4. Press .
Troubleshooting TROUBLESHOOTING Are you having a problem with your phone? Here are some of the most common problems and their solutions. SYMPTOM No dial tone CORRECTIVE ACTION Verify that the line cord is connected and secure. Check to see that you are not out of range from the base. Check that the AC adapter is plugged into the wall outlet. Check to see that the Ni-Cad Battery is connected inside the battery compartment. Check that the handset battery pack is fully charged.
Troubleshooting SYMPTOM Caller ID / Call Waiting ID doesn't work properly CORRECTIVE ACTION Verify that Caller ID service is active. Call your local telephone company’s business office to ensure that your services are active. Determine if an extension phone is in use at the same time. Check to see that you are not out of range from the base. Visusal Message Waiting Indication (VMWI) does not show Verify that VMWI service is active.
FCC Requirements FCC REQUIREMENTS This product complies with Part 68 of FCC Rules. The Federal Communications Commission (FCC) has established these rules that permit this device to be directly connected to the telephone network. Standardized jacks are used for these connections. If this device is malfunctioning, it might also be harmful to the telephone network; disconnect the unit until the source of the problem is determined and the device is repaired.
FCC Requirements This equipment has been tested and found to comply with limits for a Class B digital device, pursuant to Part 15 of the FCC Rules. These limits are designed to provide reasonable protection against harmful interference in a residential installation. This equipment generates, uses, and can radiate radio frequency energy, and if not installed and used in accordance with the instructions, may cause harmful interference to radio communications.
Limited Warranty LIMITED WARRANTY WHAT DOES OUR WARRANTY COVER ? Any defect in material or workmanship. FOR HOW LONG AFTER THE ORIGINAL PURCHASE ? To the original purchaser only - ONE YEAR. WHAT WILL VTECH DO ? To our option, repair or replace your unit. HOW DO I SEND MY UNIT, IN OR OUT OF WARRANTY ? Call VTECH Communications customer service for Return Authorization at: 1-800-595-9511 Properly pack your unit. Included any cables & accessories, which were originally provided with the product.