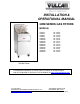
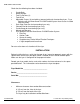
INSTALLATION & OPERATIONAL MANUAL GRM SERIES GAS FRYERS MODELS: 1GR35M 1GR45M 1GR65M 1GR85M 1GR45MF 1GR65MF 1GR85MF 2GR45MF 2GR65MF 2GR85MF 3GR45MF 3GR65MF 3GR85MF 4GR45MF ML-136407 ML-136408 ML-136409 ML-136410 ML-136785 ML-136786 ML-136787 ML-136417 ML-136418 ML-136419 ML-136420 ML-136421 ML-136422 ML-136423 1GR45M Shown For additional information on Vulcan-Hart or to locate an authorized parts and service provider in your area, visit our website at www.vulcanequipment.
GRM SERIES GAS FRYERS IMPORTANT FOR YOUR SAFETY THIS MANUAL HAS BEEN PREPARED FOR PERSONNEL QUALIFIED TO INSTALL GAS EQUIPMENT, WHO SHOULD PERFORM THE INITIAL FIELD START-UP AND ADJUSTMENTS OF THE EQUIPMENT COVERED BY THIS MANUAL. POST IN A PROMINENT LOCATION THE INSTRUCTIONS TO BE FOLLOWED IN THE EVENT THE SMELL OF GAS IS DETECTED. THIS INFORMATION CAN BE OBTAINED FROM THE LOCAL GAS SUPPLIER.
GRM SERIES GAS FRYERS TABLE OF CONTENTS IMPORTANT FOR YOUR SAFETY………………………………………. 2 INTRODUCTION…………………………………………………………… 4 GENERAL…………………………………………………………… 4 ORDERING PARTS………………………………………………… 4 FRYER CAPACITIES………………………………………………. 4 UNPACKING………………………………………………………… 4 INSTALLATION……………………………………………………………. 5 Clearances…………………………………………………....5 Location ………………..……………………………….…. 6 CODES AND STANDARDS……………………………………….. 6 ASSEMBLY …………..…………………………………………… 6 FLUE CONNECTION……………………………………………….
GRM SERIES GAS FRYERS INTRODUCTION GENERAL Vulcan Fryers are produced with quality workmanship and material. Proper installation, usage and maintenance will result in years of satisfactory performance. Before installing the fryer, thoroughly read this manual and carefully follow all instruction. This manual is applicable to model listed on the cover page. Procedures in this manual will apply to all models unless specified.
GRM SERIES GAS FRYERS Check that the following have been included: Crumb Rack Basket Hanger Twin Fry Baskets (2) Tank Brush Adjustable Casters (4) two locking, two non-locking for freestanding fryers. Fryer Batteries with the KleenScreen PLUS® Filtration System have casters installed from the factory. Drain Pipe Extension for freestanding fryers only. Cleanout Rod for freestanding fryers only. Crumb Scoop for freestanding fryers only.
GRM SERIES GAS FRYERS Minimum clearance from noncombustible construction: 0” from the sides of the fryer 0” from the back of the fryer Between the fryer and any open-top flame units: 16” (41 cm) Allow space for servicing and operation. Location Install fryer in an area with sufficient air supply for gas combustion at fryer burners. Do not obstruct the flow of combustion and ventilation air. Provide adequate clearance for air openings into the combustion chamber.
GRM SERIES GAS FRYERS ASSEMBLY The fryer must be restrained to prevent tipping and the splashing of hot liquid. The means of restraint may be the manner of installation, such as connection to a battery of appliances, installing the fryer in an alcove, or by separate means such as adequate ties.
GRM SERIES GAS FRYERS Prior to lighting, check all joints in the gas supply line for leaks. Use soap and water solution. Do not use an open flame. After piping has been checked for leaks, fully purge gas pipes to remove air. GAS PRESSURES (ALL MODELS): The gas pressure should be set at 4” W.C. (Water Column) (0.8 kPa) for natural gas and 10” W.C. (2.75 kPa) for propane gas. If incoming pressure exceeds ½ PSI (3.45 kPa), an additional pressure regulator must be installed.
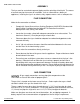
GRM SERIES GAS FRYERS The fryer must be installed with a connector (not supplied by Vulcan) complying with the above codes. The fryer must be installed with restraining means to guard against transmission of strain to the connector. See illustration. The fryer must be installed with the casters provided. If the restraint is ever to be disconnected, first turn the gas supply off.
GRM SERIES GAS FRYERS BEFORE FIRST USE Cleaning New units are wiped down at the factory to remove any visible signs of dirt, oil, grease, etc. remaining from the manufacturing process. Before any food preparation, thoroughly wash the protective oil from all surface parts and the tank interior with hot soapy water to remove any film residue and dust or debris. Do not use chlorine or sulfate/sulfide cleaners. Wash any accessories shipped with unit.
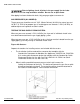
GRM SERIES GAS FRYERS LIGHTING THE PILOT A B A Thermostat Knob B Gas Control Handle 1. Open the door. 2. Turn the thermostat to OFF (see figure below, view A). The thermostat is located behind the door. 3. Push the gas control valve knob and turn to OFF. Wait 5 minutes for unburned gas to vent. 4. Push and turn gas control valve knob to the “L” in PILOT (see figure below, view B). 5. While still holding the knob in, light the pilot with a lit flame.
GRM SERIES GAS FRYERS TURNING ON THE FRYER Set the temperature knob to desired temperature. After the set temperature has been reached, the thermostat shuts off the gas flow to burners. The pilot remains lit. The burners will cycle on and off, maintaining the set temperature. TURNING OFF THE FRYER 1. Turn the thermostat OFF. 2. To keep the pilot lit, turn the gas valve to “L” in Pilot. 3. To shut off all gas to the system, including the pilot, turn the gas valve knob to the OFF position.
GRM SERIES GAS FRYERS When frying doughnuts and fritters, turn product only once during frying. When cooking French fries or onion rings, shake the basket several times. Batter-covered foods should be dropped carefully, one by one, into shortening or basket. If you use the basket, first dip the basket into the shortening to reduce batter-build up on basket surfaces. When frying is completed, remove basket or product. Hang basket on rear hanger.
GRM SERIES GAS FRYERS 5. Slowly open the drain valve to allow oil to flow from the fry tank to the filter pan. Then open the drain valve all the way. 6. When fry tank is empty use the tank brush to remove any additional debris. 7. Close the drain valve. 8. Fill tank with new shortening. Fill to a minimum of the MIN level but no higher than halfway between MIN and MAX. Oil will expand as it is heated. 9. After the fry tank is filled with new oil, turn the thermostat knob to the desired set temperature.
GRM SERIES GAS FRYERS Use a damp cloth with warm water and a mild soap or detergent. Do not use chlorine or sulfate/sulfide cleaners. Rinse thoroughly, and then polish with a soft dry cloth. Keep the fryer exterior clean and free of accumulated grease to prevent stubborn stains from forming. If regular cleaning is neglected, grease will be burned on and discolorations may form. Remove discolorations by washing with any detergent or soap and water.
GRM SERIES GAS FRYERS KleenScreen PLUS® Filtration System Installation and Operational Manual For GRMF Models 2GR45MF Shown GAS KleenScreen PLUS® Models: 1GR45MF 1GR65MF 1GR85MF 2GR45MF 2GR65MF 2GR85MF 3GR45MF 3GR65MF 3GR85MF 4GR45MF ML-136785 ML-136786 ML-136787 ML-136417 ML-136418 ML-136419 ML-136420 ML-136421 ML-136422 ML-136423 VULCAN-HART F-31233 Rev.
GRM SERIES GAS FRYERS Filtering Instructions for KleenScreen PLUS® Fryers General The KleenScreen PLUS® filtration system filters the oil as it is pumped back into its’ respective tank(s). Only one tank can be drained and filtered at a time. Under no circumstances should both tanks be drained at the same time. Assembly After unpacking, wash the filter pan, crumb basket and filter screen assembly. Make sure you remove the insert located inside the filter screen.
GRM SERIES GAS FRYERS Fully assembled filter screen assembly: Fig. 2 Secure Tube with Suction Tube Clip Filter Screen Lays Flat On Bottom of Filter Pan Fig. 3 Micro-Filtration Fabric Envelope Assembly: Same Suction Tube Fabric Envelope Insert (Different from Screen Assembly) Fabric Envelope Same Clip Same Knurled Knob Fig. 4 VULCAN-HART F-31233 Rev.
GRM SERIES GAS FRYERS INSTRUCTIONS TO REMOVE & REPLACE KLEENSCREEN PLUS® FILTER ENVELOPE FOR ABSOLUTE FILTRATION & MAXIMUM FLOW RATE WE RECOMMEND YOU CHANGE YOUR FILTER ENVELOPES AT EVERY OIL CHANGE (10-14 DAYS DEPENDING ON OIL USAGE). Step 1 Discard all oil from the filter vessel, (see pages 23 or 24). When the filter pan is empty, use a spatula and scrape off all debris left on the filter envelope and in the filter pan.
GRM SERIES GAS FRYERS Operation Hot oil and parts can cause burns. Use care when operating, cleaning and servicing the fryer. Spilling hot frying compound can cause severe burns. Do not move fryer without draining all frying compound from the tank. Never run water or boil out solution through filter and motor / pump. Doing so will void your fryer warranty. Solid shortening should NOT be used with GRM fryers. Melting solid shortening will damage the tank and void your warranty.
GRM SERIES GAS FRYERS 4. Drain the oil out of the fry tank by turning the red handle drain valve. The filter pan will begin to fill with oil. When the oil level fills half of the filter pan, pull the red handled filter lever towards you. The motor / pump will begin and oil will flow back into the fry tank. The oil will flow into the back of the tank towards the front and down the drain back into the filter pan.
GRM SERIES GAS FRYERS FLUSH AND DISCARD: 1. Follow filtering instructions 1-3, however do not put oil treatment media into the fryer. Drain the fryer oil into the filter pan. 2. Attach the quick disconnect hose to the discard male quick disconnect fitting. 3. Place other end of the discard hose into a container that is large enough to retain the discarded shortening. 4. To start the discard operation, turn Power Switch ON. 5.
GRM SERIES GAS FRYERS THERMAL OVERLOAD PROTECTION BUTTON: The motor/pump supplied with the filtering system has a thermal overload protection circuit that senses when excess heat occurs due to filtering for long periods of time or under heavy load prior to discarding debris buildup. If the thermal overload protection is tripped, wait 5 minutes and then reset the motor by pushing in the red button.
GRM SERIES GAS FRYERS Troubleshooting Chart: Problem: Probable Cause: No Heat: Thermostat dial not turned on. Pilot not lit. Gas supply not turned on. Wire connections loose (call service) Wires connections need cleaning (call service) Thermopile (call service) Insufficient or too much heat: Thermostat dial not set to desired temperature. High limit tripped (call service) Temperature probe (call service) Tank will not drain: Shortening too cold. Drain pipe clogged with debris.