
User's Manual


— 12 —
GR SERIES GAS FRYERS
CAUTION: Solid shortening should NOT be
used with GRM Fryers with
millivolt controls. Melting solid
shortening will damage the fryer
tank and void your warranty.
• Close the drain valve.
• Fill the fryer tank with liquid shortening.
• Shortening level should be between the
MIN and MAX lines in fryer tank.
Shortening will expand when heated. Do
not fill the fryer tank past the MAX line.
• Add fresh shortening as needed to
maintain oil level.
LIGHTING THE FRYER
(FREE-STANDING MODELS)
WARNING: BEFORE TURNING ON THE
BURNERS, THE FRYER TANK
MUST BE FILLED WITH
LIQUID SHORTENING. NEVER
OPERATE FRYER EMPTY OR
THE FRYPOT WILL BE
DAMAGED AND MAY CAUSE
A FIRE, VOIDING YOUR
WARRANTY.
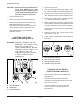
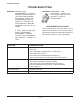
A Gas Valve Knob
B Gas Supply
C Thermostat Knob
1. Open the rear door.
2. Turn the thermostat OFF (See Figure, view
A). The thermostat is located behind the door.
3. Push the gas control valve knob and turn to
OFF. Wait 5 minutes for unburned gas to vent.
4. Push and turn gas control valve knob to the
“I” in PILOT (See Figure, view B).
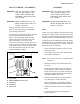
5. While still holding the knob in, light the pilot
with a lit taper. Continue to depress the knob
until pilot remains lit when knob is released.
If the pilot does not remain lit, repeat steps
3 through 5.
6. Depress and turn gas control knob to ON
(See Figure, view C).
7. If gas supply is interrupted, repeat steps 2
through 6.
A Gas Valve Knob, View A
B Gas Valve Knob, View B
C Gas Valve Knob, View C
D Indicator Point, All Views
TURNING ON THE FRYER
(FREE-STANDING MODELS)
• Set the thermostat knob to the desired
temperature.
• After the set temperature has been
reached, the thermostat shuts off the gas
flow to the burners.
• The pilot remains lit. The burners will
cycle on and off, maintaining the set
temperature.