INSTALLATION & OPERATION MANUAL 7000 SERIES GAS OVENS MODEL 7018A1 7088A1 7888A1 7086A1 7016A1 7066A1 7019A1 7099A1 7999A1 7096A1 7098A1 7988A1 7998A1 ML-104491 ML-104492 ML-104493 ML-104494 ML-104495 ML-104496 ML-104497 ML-104498 ML-104499 ML-104500 ML-104501 ML-104502 ML-104503 MODEL 7019A1 VULCAN-HART COMPANY, FORM 30857 (Rev. A, 10-95) P.O. BOX 696, LOUISVILLE, KY 40201-0696, TEL.
IMPORTANT FOR YOUR SAFETY THIS MANUAL HAS BEEN PREPARED FOR PERSONNEL QUALIFIED TO INSTALL GAS EQUIPMENT, WHO SHOULD PERFORM THE INITIAL FIELD START-UP AND ADJUSTMENTS OF THE EQUIPMENT COVERED BY THIS MANUAL. POST IN A PROMINENT LOCATION THE INSTRUCTIONS TO BE FOLLOWED IN THE EVENT THE SMELL OF GAS IS DETECTED. THIS INFORMATION CAN BE OBTAINED FROM THE LOCAL GAS SUPPLIER.
TABLE OF CONTENTS MODEL 7000 SERIES OVEN CONFIGURATIONS . . . . . . . . . . . . . . . . . . . . . . . . . . . . . . . . . . . . . Bake Ovens . . . . . . . . . . . . . . . . . . . . . . . . . . . . . . . . . . . . . . . . . . . . . . . . . . . . . . . . . . . . . . Roast Ovens . . . . . . . . . . . . . . . . . . . . . . . . . . . . . . . . . . . . . . . . . . . . . . . . . . . . . . . . . . . . . . Combination Bake & Roast Ovens . . . . . . . . . . . . . . . . . . . . . . . . . . . . . . . . . . . . . . . .
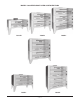
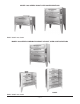
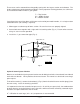
MODEL 7000 SERIES BAKE OVEN CONFIGURATIONS 7018A1 7088A1 7888A1 7086A1 7016A1 7066A1 —4—
MODEL 7000 SERIES ROAST OVEN CONFIGURATIONS 7019A1 7099A1 Model 7999A1 not shown. MODEL 7000 SERIES COMBINATION BAKE & ROAST OVEN CONFIGURATIONS 7096A1 7098A1 7988A1 Model 7998A1 not shown.
Installation, Operation and Care of VULCAN 7000 SERIES BAKE AND ROAST OVEN KEEP THESE INSTRUCTIONS GENERAL The manufacturer suggests that you thoroughly read this entire manual and carefully follow all of the instructions provided. Your Vulcan 7000 Series Bake and Roast Oven is produced with quality workmanship and material. Proper installation, usage and maintenance of your oven will result in many years of satisfactory performance.
INSTALLATION UNPACKING Immediately after unpacking, check for possible shipping damage. If the oven is found to be damaged, save the packaging material and contact the carrier within 15 days of delivery. There may be a large label located on the front of the oven which reads, "Remove this label before operation." To remove label, peel corner edges and slowly pull label off. If resistance is met, spray area with WD-40, wait several minutes, then slowly remove label.
ASSEMBLY Legs If oven is to be mounted on legs, assemble legs to the oven. Tip oven back and install two front legs with bolts through bottom of oven base frame. Tip oven forward, block up back and install rear legs. Remove shipping harnesses from the burner area. If oven is to be placed on legs, do not remove burner shipping harness until legs have been assembled to the oven. To remove shipping harnesses, dismantle the oven deck and insulation pans.
These ovens can be mounted interchangeably starting with the largest section on the bottom. The factory shipping tags will be marked accordingly. For the purpose of stacking positions, the suffix letter at the end of the model number is your guide: T — Top Section M — Middle Section B — Bottom Section If you do not have one of the above suffix letters at the end of your model number, it is a single section stand-alone oven (no stacking is required). 1. Mount upper section on top of lower section.
GAS CONNECTIONS All gas supply connections and any pipe joint compound used must be resistant to the action of propane gases. The oven is equipped for a 3/4" gas pipe connection. Pipe gas supply to the oven. Make sure the pipes are clean and free of obstructions, dirt and piping compound. When connecting the gas supply to the oven, it is important that adequate size piping be run to the point of connection at the oven with as few elbows or tees as possible.
ELECTRICAL CONNECTIONS WARNING: ELECTRICAL AND GROUNDING CONNECTIONS MUST COMPLY WITH THE APPLICABLE PORTIONS OF THE NATIONAL ELECTRICAL CODE AND/OR OTHER LOCAL ELECTRICAL CODES. WARNING: APPLIANCES EQUIPPED WITH A FLEXIBLE ELECTRIC SUPPLY CORD ARE PROVIDED WITH A THREE-PRONG GROUNDING PLUG. IT IS IMPERATIVE THAT THIS PLUG BE CONNECTED INTO A PROPERLY GROUNDED THREE-PRONG RECEPTACLE. IF THE RECEPTACLE IS NOT THE PROPER GROUNDING TYPE, CONTACT AN ELECTRICIAN. DO NOT REMOVE THE GROUNDING PRONG FROM THIS PLUG.
OPERATION WARNING: THE OVEN AND ITS PARTS ARE HOT. USE CARE WHEN OPERATING, CLEANING OR SERVICING THE OVEN. CONTROLS (Fig. 4) Burner Valve — when opened, allows gas to flow to the oven burner. To open valve, turn knob counterclockwise; to close valve, turn knob clockwise. Ignition Button — used to reset the oven pilot. To operate, push button in and follow pilot lighting instructions in this manual. Thermostat — used to regulate amount of heat needed to cook a product.
LIGHTING AND SHUTTING DOWN PILOT 1. Turn on main gas supply. 2. Turn burner valve ON and purge air from line. Turn burner valve OFF. 3. Wait 5 minutes, then turn burner valve ON and depress ignition button. Using a lit taper, ignite oven pilot (Fig. 5). Continue to hold button in for approximately 30 seconds, then release. 4. If pilot goes out, turn burner valve off and wait 5 minutes before relighting. 5. Repeat this procedure until pilot stays lit. 6. Set thermostat to desired temperature.
PREHEATING Set thermostat knob to desired temperature and allow oven to preheat for approximately 15 minutes before loading. LOADING OVEN 1. When using 2- or 4-deck sections that have one control for two compartments, load both compartments simultaneously. If a quantity sufficient for only one compartment is to be baked, load only the compartment with the thermostat bulb. DO NOT stagger loading. 2. Always load each shelf evenly, spacing pans away from each other and side walls of oven. 3.
CLEANING WARNING: TURN OVEN OFF AND UNPLUG THE ELECTRICAL CORD (IF APPLICABLE) BEFORE CLEANING. Clean interior and exterior of oven daily with warm water and detergent solution. Rinse thoroughly and wipe dry with a soft clean cloth. Oven Inspection Window (Optional) The oven inspection window may be cleaned with an oven cleaner compound or with a cloth dampened with detergent solution. Rinse thoroughly and dry with a soft clean cloth.
MAINTENANCE WARNING: THE OVEN AND ITS PARTS ARE HOT. USE CARE WHEN OPERATING, CLEANING OR SERVICING THE OVEN. REPLACING OPTIONAL LAMPS WARNING: TURN OVEN OFF AND UNPLUG ELECTRICAL CORD BEFORE REPLACING LAMPS. Lamps are located in the top of the oven, centered at the back. 1. Remove (4) 10-24 sheet metal screws, remove glass, and unscrew (2) bulbs. 2. Install (2) new G.E. incandescent 25 watt, 120 volt bulbs. 3. Replace glass and reinstall screws.