
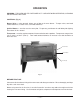
Oven User Manual


— 11 —
ELECTRICAL CONNECTIONS
WARNING: ELECTRICAL AND GROUNDING CONNECTIONS MUST COMPLY WITH THE
APPLICABLE PORTIONS OF THE NATIONAL ELECTRICAL CODE AND/OR OTHER LOCAL
ELECTRICAL CODES.
WARNING: APPLIANCES EQUIPPED WITH A FLEXIBLE ELECTRIC SUPPLY CORD ARE
PROVIDED WITH A THREE-PRONG GROUNDING PLUG. IT IS IMPERATIVE THAT THIS PLUG BE
CONNECTED INTO A PROPERLY GROUNDED THREE-PRONG RECEPTACLE. IF THE
RECEPTACLE IS NOT THE PROPER GROUNDING TYPE, CONTACT AN ELECTRICIAN. DO NOT
REMOVE THE GROUNDING PRONG FROM THIS PLUG.
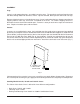
Ovens equipped with the optional inspection window and interior light are supplied with a cord and plug.
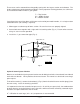
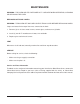
MINIMUM BYPASS (BURNER FLAME) ADJUSTMENT (Fig. 3)
This adjustment must be made at the time the oven is installed. Be sure oven burner pilot flame is
ignited. To adjust this flame:
1. With oven cold, turn dial counterclockwise slowly from "Low Stop," until bypass seat just snaps on.
2. Remove dial.
3. With a screwdriver, turn bypass flame adjustor screw counterclockwise to increase the bypass
flame or clockwise to decrease the entire burner to a minimum stable flame.
4. Replace dial.
CAUTION: While making this adjustment, if the oven should become heated while the dial is set
at a low range (below 350
°F), the bypass flame will shut off completely. If this occurs, turn dial
counterclockwise slowly until the bypass gas snaps on. Then check bypass adjustment as
described above.
Fig. 3