INSTALLATION & OPERATION MANUAL FOR Achiever Charbroilers MODELS MLS VACB20 VACB25 VACB36 VACB47 VACB60 VACB72 ML-135285 ML-710543 ML-710544 ML-710545 ML-710546 ML-135286 www.vulcanhart.com MODELS MLS ACB20 ACB25 ACB36 ACB47 ACB60 ACB72 ML-135285 ML-710543 ML-710544 ML-710545 ML-710546 ML-135286 www.wolfrange.com VACB47 ITW Food Equipment Group, LLC 3600 North Point Blvd.
IMPORTANT FOR YOUR SAFETY THIS MANUAL HAS BEEN PREPARED FOR PERSONNEL QUALIFIED TO INSTALL GAS EQUIPMENT, WHO SHOULD PERFORM THE INITIAL FIELD START-UP AND ADJUSTMENTS OF THE EQUIPMENT COVERED BY THIS MANUAL. POST IN A PROMINENT LOCATION THE INSTRUCTIONS TO BE FOLLOWED IN THE EVENT THE SMELL OF GAS IS DETECTED. THIS INFORMATION CAN BE OBTAINED FROM THE LOCAL GAS SUPPLIER.
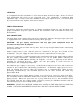
INSTALLATION, OPERATION AND CARE OF GAS COUNTERTOP CHARBROILERS GENERAL Gas Countertop Charbroilers are designed for commercial use only and feature fast, efficient gas heat. Each burner is controlled by an adjustable gas valve. Cast radiants are located directly above each burner to maintain uniform temperature. Radiants are easily removed for cleaning when cool. Heavy-duty, cast iron top grates are reversible to allow all or part of the cooking grid surface to be level or sloped.
supply connection(s). Provide 24" clearance at the front for cleaning, maintenance, service and proper operation. Minimum clearances to combustible construction are 12" to the back and 9" to the sides. Minimum clearances to non-combustible walls are 0" to the rear and 0" to the sides. INSTALLATION CODES AND STANDARDS The Charbroiler must be installed in accordance with: In the United States of America: 1. State and local codes. 2. National Fuel Gas Code, ANSI-Z223.1/NFPA #54 (latest edition).
LEVELING It is important that the charbroiler is level front to back and left to right. Areas of uneven heat distribution will occur on an unleveled unit. The charbroiler is equipped with adjustable legs. Turn the feet at the bottom of the legs to adjust to level. The unit should be rechecked for level anytime it has been moved. VENTILATION HOOD The broiler should be installed under a suitable ventilation hood.
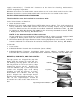
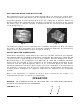
GAS PRESSURE REGULATOR INSTALLATION Gas regulator pressure is preset at 5” Water Column (W.C.) for natural gas, and 10” W.C. for propane gas. Minor adjustments may be required based on site specific gas pressure. Install the regulator as close to the broiler on the gas supply line as possible. Make sure that the arrow on the underside of the regulator is oriented in the direction of gas flow to the broiler (Fig. 2) and the regulator is positioned with the vent plug and adjustment screw upright (Fig. 3).
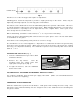
BURNER VALVES Fig. 2 All orifices are of the fixed type and require no adjustment. Standing pilots should be adjusted to provide a slight yellow tip on the flame. lighted by removing adjacent cast iron top grates and radiants. Pilots may be Air shutters on the main burners must be individually adjusted to provide a blue flame. All traces of yellow should be adjusted out of the burner flame.
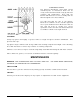
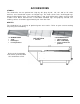
COMPONENT PARTS The Achiever Charbroiler comes with several standard parts as illustrated. Each can be easily removed and installed easily by hand for cleaning and maintenance. Note that the Burner and Deflector are an assembly and are NOT designed to be disassembled. You will find that the two of the BurnerDeflector assemblies on the extreme right and left of your charbroiler have Deflectors that are flat, and not bent as shown.
ACCESSORIES STANDS The charbroiler has an optional 24” high by 30” deep by 24”, 36”, 48”, 60” stainless steel stand with casters or flanged legs. The front casters lock, and may be bolted to the floor. The stand includes a top shelf with marine edges a lower shelf. When mounted on a stand with standard legs and properly cooking surface should be approximately 36” from the floor. or 72” wide flanged legs style lip and leveled, the GRATES The charbroiler has a variety of optional grate accessories.