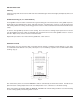
INSTALLATION & OPERATION MANUAL ELECTRIC RESTAURANT RANGES MODELS E24L, E36L, E48L, & E60L SERIES Model E48L For additional information on Vulcan-Hart or to locate an authorized parts and service provider in your area, visit our website at www.vulcanhart.com VULCAN-HART DIVISION OF ITW FOOD EQUIPMENT GROUP, LLC P.O. BOX 696, LOUISVILLE, KY 40201-0696 TEL. (502) 778-2791 FORM 30968 Rev.
The following models have been discontinued and are no longer available: E24SL E24FL E36XL E48L E48SL E48FL –2– E48XL E60SL
TABLE OF CONTENTS ELECTRIC RESTAURANT RANGE MODELS . . . . . . . . . . . . . . . . . . . . . . . . . . . . . . . . . . . . . . . . . . . . . . . . . 4 GENERAL . . . . . . . . . . . . . . . . . . . . . . . . . . . . . . . . . . . . . . . . . . . . . . . . . . . . . . . . . . . . . . . . . . . . . . . . . . . . . . 5 INSTALLATION . . . . . . . . . . . . . . . . . . . . . . . . . . . . . . . . . . . . . . . . . . . . . . . . . . . . . . . . . . . . . . . . . . . . . . . . . 6 Unpacking . . . . . . . . . . .
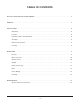
ELECTRIC RESTAURANT RANGE MODELS E24L E24SL E24FL E36SL E36L E48SL E48L E36XL E48FL E60SL E60L E24L E36FL E36L E60FL E48L –4– E48XL E60XL E60L PL-51578
Installation, Operation and Care of MODEL E24L, E36L, E48L & E60L SERIES ELECTRIC RESTAURANT RANGES KEEP THESE INSTRUCTIONS FOR FUTURE USE GENERAL The manufacturer suggests that you thoroughly read this entire manual and carefully follow all of the instructions provided. Your Vulcan-Hart range is produced with quality workmanship and material. Proper installation, usage and maintenance of your range will result in many years of satisfactory performance.
INSTALLATION UNPACKING Immediately after unpacking, check for possible shipping damage. If the range is found to be damaged, save the packaging material and contact the carrier within 15 days of delivery. Remove all shipping wire, wood blocking, and accessories. Uncrate the high shelf, backguards and/or broiler. Before installing, verify that the electrical service agrees with the specifications on the rating plate located behind the kick panel on the left side.
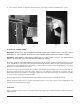
3. Assemble heat shield to splasher back (Fig. 1). Top edge of heat shield must be placed inside the rear top flange of the splasher back. CAUTION: It is essential that the heat shield in the back of the high shelf be installed in such a way that the bent section at the bottom be inward, touching the rear wall of the range, thereby allowing the stack action of the double wall back splasher to draw air through the area below the top surface units. PL-40459 Fig. 1 4.
5. Place shelf in position on splasher and fasten with 1/ 4-20 screws and nuts provided (Fig's. 4 & 5) . PL-40463 PL-40462 Fig. 4 Fig. 5 ELECTRICAL CONNECTIONS WARNING: ELECTRICAL AND GROUNDING CONNECTIONS MUST COMPLY WITH THE APPLICABLE PORTIONS OF THE NATIONAL ELECTRICAL CODE AND/OR OTHER LOCAL ELECTRICAL CODES. WARNING: DISCONNECT ELECTRICAL POWER SUPPLY AND PLACE A TAG AT THE DISCONNECT SWITCH TO INDICATE THAT YOU ARE WORKING ON THE CIRCUIT.
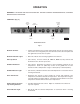
OPERATION WARNING: THE RANGE AND ITS PARTS ARE HOT. BE VERY CAREFUL WHEN OPERATING, CLEANING OR SERVICING THE RANGE. CONTROLS (Fig. 6) Oven Indicator Light Element Control Knobs Oven Thermostat Oven Infinite Switch Element Indicator Light PL-40464-1 Model E36L Shown Fig. 6 Element Controls — Infinite load switches that control and maintain heat to the surface plates. The controls are arranged in pairs; the left knob controls the front plate and the right knob controls the rear plate.
BEFORE FIRST USE Cleaning Clean the range and all accessories with water and a mild detergent. Rinse thoroughly and wipe dry with a soft clean cloth. Griddle Seasoning (SL, FL and XL Models) A new griddle surface must be seasoned to do a good cooking job. The metal surface of the griddle is porous. Food tends to get trapped in these pores and stick; therefore, it is important to "season" or "fill up" these pores with cooking oil before cooking.
Some DO'S and DO NOT'S of Surface Cooking DO use utensils to fit the tops (9" to 10" [229 to 254 mm] inside diameter). DO use flat-bottomed, straight-sided pots and pans. DO use covers for stock pot work. Water will boil much sooner and much less heat is required for cooking in a covered container. Less water may be used, thereby retaining vitamins and minerals in the food. DO turn off plates a few minutes before cooking is completed to use the heat stored in the plate.
BROILER (Accessory) The high-shelf broiler is available on Models E36L and E60L except those models supplied with hot top sections. The broiler is equipped with 2 tubular 3000 W. heating elements independently controlled by two infinite heat switches. The switches are located on the switch panel at the right of the broiler. The top switch controls the element for the left half of the broiler, and the bottom switch controls the element for the right half of the broiler.
Roasting Place meat on a rack in an open pan with sides sufficiently high to retain the drippings. Roasting may be done on the oven rack or the deck. For best results, roast at the low temperatures of 200°F (93°C) to 325°F (163°C) recommended by the Department of Agriculture and the American Meat Institute. Most meats may be roasted with the infinite heat switch set at HI. If heavy browning on poultry is not desired, the switch should be set between MED-LO and VERY-LO.
Broiler Empty grease collector as often as necessary. It is recommended that the grease collector be emptied whenever it is 3/4 filled. Remove grease collector slowly and be careful of liquid wave action. After each day's use, empty and wash the grease collector and wash the grid and drip shield. Clean the inside bottom, back and sides of the broiler compartment as often as necessary, with special care to clean the inside surface of the baffle across the front top of the broiler.
MAINTENANCE WARNING: THE RANGE AND ITS PARTS ARE HOT. BE VERY CAREFUL WHEN OPERATING, CLEANING OR SERVICING THE RANGE. SERVICE AND PARTS INFORMATION To obtain service and parts information concerning this range, contact the Vulcan-Hart Service Department in your area or Service Department at the address or phone number shown on the front cover of this manual.
FORM 30968 Rev. A (02-04) – 16 – PRINTED IN U.S.A.
FORMULAIRE 30968 RÉV. A (02-04) – 16 – IMPRIMÉ AUX É.-U.
ENTRETIEN AVERTISSEMENT : LA CUISINIÈRE ET SES PIÈCES SONT CHAUDES. EXERCER UNE EXTRÊME PRUDENCE AU MOMENT DE L’UTILISER, DE LA NETTOYER OU DE PROCÉDER À L’ENTRETIEN. SERVICE DE L’ENTRETIEN ET PIÈCES DE RECHANGE Pour obtenir des renseignements sur cette cuisinière ou son entretien, communiquer avec le service de l’entretien Hobart le plus près.
Grilloir Vider le tiroir de propreté aussi souvent que nécessaire. Il est recommandé de le vider dès qu’il est rempli aux trois quarts. L’enlever lentement en prenant soin de ne pas en renverser. Le vider et le nettoyer de même que la grille et le pare-éclaboussures après chaque journée d’utilisation.
Si la sole et la grille sont toutes deux chargées à pleine capacité, il est nécessaire d’interchanger les plats sur la sole et ceux sur la grille environ à la mi-cuisson, faute de quoi le dessous des aliments sur la grille et le dessus des aliments sur la sole ne cuiront pas uniformément. Rôtissage Mettre la viande dans un plat à rôtir dont les bords sont suffisamment hauts pour empêcher le jus de cuisson de déborder. Déposer le plat sur la grille ou la sole.
GRILLOIR (accessoire) Le grilloir à tablette surélevée est offert pour les modèles E36L et E60L sauf si ceux-ci sont pourvus de plaques à bouillir. Le grilloir est équipé de deux éléments chauffants tubulaires de 3 000 W commandés par des commutateurs à réglage continu distincts. Ceux-ci se trouvent sur le panneau de commande à droite du grilloir. Le commutateur du haut commande l’élément de la partie gauche du grilloir alors que celui du bas commande l’élément de la partie droite.
Recommandations pour l’utilisation des plaques de surface UTILISER des marmites et casseroles de même dimension que les plaques (diamètre intérieur de 229 à 254 mm [9 à 10 po]). UTILISER des marmites et casseroles à fond plat et côtés droits. UTILISER des couvercles sur les marmites. L’eau vient ainsi à ébullition beaucoup plus rapidement. De plus, la cuisson dans un récipient couvert requiert une quantité moindre d’eau et d’énergie de sorte que les aliments conservent leurs vitamines et minéraux.
AVANT UNE PREMIÈRE UTILISATION Nettoyage Nettoyer la cuisinière et tous les accessoires au moyen d’eau et de détergent doux. Bien rincer et essuyer à l’aide d’un chiffon propre et doux. Apprêtage de la plaque à frire (modèles SL, FL et XL) Il est nécessaire d’apprêter une plaque à frire neuve pour obtenir une bonne qualité de cuisson. Sa surface de métal est poreuse et les aliments ont tendance à s’incruster dans les pores et à y adhérer.
FONCTIONNEMENT AVERTISSEMENT : LA CUISINIÈRE ET SES PIÈCES SONT CHAUDES. EXERCER UNE EXTRÊME PRUDENCE AU MOMENT DE L’UTILISER, LA NETTOYER OU DE PROCÉDER À L’ENTRETIEN. COMMANDES (Fig. 6) Voyant de four Bouton de thermostat Commutateur à réglage continu du four Boutons de commande des éléments chauffants Voyant d’éléments chauffants MODÈLE E36L Fig. 6 Lorsqu’il est allumé, ce voyant indique que la température désirée est atteinte ou maintenue.
5. Positionner la tablette surélevée sur le panneau anti-éclaboussures et fixer au moyen des vis et écrous 1/4-20 fournis (Fig. 4 et 5). Fig. 4 Fig. 5 RACCORDEMENT ÉLECTRIQUE AVERTISSEMENT : LE RACCORDEMENT ÉLECTRIQUE ET LA MISE À LA TERRE DOIVENT ÊTRE CONFORMES AUX NORMES CONCERNÉES DU CODE CANADIEN DE L’ÉLECTRICITÉ OU DE TOUT AUTRE CODE D’ÉLECTRICITÉ EN VIGUEUR.
3. Fixer l’écran thermique au panneau anti-éclaboussures (Fig. 1). Insérer le bord supérieur de l’écran dans la bordure supérieure arrière du panneau anti-éclaboussures. ATTENTION : Il est essentiel d’installer l’écran thermique au dos de la tablette surélevée, la partie inférieure pliée vers l’intérieur et s’appuyant contre la paroi arrière de la cuisinière, permettant ainsi au panneau anti-éclaboussures à double paroi de tirer l’air jusqu’à la zone en dessous des éléments chauffants de surface. Fig.
INSTALLATION DÉBALLAGE Immédiatement après avoir déballé l’appareil, vérifier s’il n’a pas été endommagé lors du transport. En cas de dommages, conserver le matériel d’emballage et aviser le transporteur dans les sept jours suivant la date de réception. Enlever tous les câbles et blocs de bois servant à l’expédition ainsi que tout accessoire. Déballer la tablette surélevée, les dosserets et le grilloir, s’il y a lieu.
INSTALLATION, FONCTIONNEMENT ET ENTRETIEN CUISINIÈRE ÉLECTRIQUE POUR RESTAURANTS MODÈLES E24L, E36L, E48L ET E60L DOCUMENT À CONSERVER EN CAS DE BESOIN. GÉNÉRALITÉS Il est recommandé de lire ce manuel au complet et de suivre attentivement toutes les instructions. Les appareils Vulcan sont fabriqués avec le plus grand soin et à partir des meilleurs matériaux. Leur installation, utilisation et entretien appropriés permettront d’en obtenir un rendement optimal pendant de nombreuses années.
MODÈLES DE CUISINIÈRES ÉLECTRIQUES POUR RESTAURANTS E24L E36L E24SL E36SL E24FL E36FL E48SL E48L E36XL E48FL E60SL E60L E24L E48XL E60FL E36L E48L E60XL E60L PL-51578 –4–
TABLE DES MATIÈRES MODÈLES DE CUISINIÈRES ÉLECTRIQUES POUR RESTAURANTS . . . . . . . . . . . . . . . . . . . . . . . . . . . . 4 GÉNÉRALITÉS . . . . . . . . . . . . . . . . . . . . . . . . . . . . . . . . . . . . . . . . . . . . . . . . . . . . . . . . . . . . . . . . . . . . . . . . . 5 INSTALLATION . . . . . . . . . . . . . . . . . . . . . . . . . . . . . . . . . . . . . . . . . . . . . . . . . . . . . . . . . . . . . . . . . . . . . . . . . 6 Déballage . . . . . . . . . . . . . . . . . . . . . . . . .
Leur fabrication ayant cessé, les modèles suivants ne sont plus offerts : E24SL E24FL E36XL E48L E48SL E48FL E48XL E60SL –2–
MANUEL D'INSTALLATION ET MODE D’EMPLOI CUISINIÈRE ÉLECTRIQUE POUR RESTAURANTS MODÈLES E24L, E36L, E48L ET E60L Modèle E48L Pour de plus amples détails sur Vulcan-Hart ou pour repérer le détaillant de pièces et de service autorisé le plus près, visitez notre site internet à : www.vulcanhart.com VULCAN-HART UNE DIVISION DE GROUPE ITW ÉQUIPEMENT ALIMENTAIRE, LLC P.O. BOX 696, LOUISVILLE, KY 40201-0696 TÉL. (502) 778-2791 FORMULAIRE 30968 RÉV.