INSTALLATION & OPERATION MANUAL ELECTRIC RESTAURANT RANGES MODELS E24L, E36L, E48L, & E60L SERIES Model E48L For additional information on Vulcan-Hart or to locate an authorized parts and service provider in your area, visit our website at www.vulcanhart.com VULCAN-HART DIVISION OF ITW FOOD EQUIPMENT GROUP, LLC P.O. BOX 696, LOUISVILLE, KY 40201-0696 TEL. (502) 778-2791 FORM 30968 Rev.
The following models have been discontinued and are no longer available: E24SL E24FL E36XL E48L E48SL E48FL –2– E48XL E60SL
TABLE OF CONTENTS ELECTRIC RESTAURANT RANGE MODELS . . . . . . . . . . . . . . . . . . . . . . . . . . . . . . . . . . . . . . . . . . . . . . . . . 4 GENERAL . . . . . . . . . . . . . . . . . . . . . . . . . . . . . . . . . . . . . . . . . . . . . . . . . . . . . . . . . . . . . . . . . . . . . . . . . . . . . . 5 INSTALLATION . . . . . . . . . . . . . . . . . . . . . . . . . . . . . . . . . . . . . . . . . . . . . . . . . . . . . . . . . . . . . . . . . . . . . . . . . 6 Unpacking . . . . . . . . . . .
ELECTRIC RESTAURANT RANGE MODELS E24L E24SL E24FL E36SL E36L E48SL E48L E36XL E48FL E60SL E60L E24L E36FL E36L E60FL E48L –4– E48XL E60XL E60L PL-51578
Installation, Operation and Care of MODEL E24L, E36L, E48L & E60L SERIES ELECTRIC RESTAURANT RANGES KEEP THESE INSTRUCTIONS FOR FUTURE USE GENERAL The manufacturer suggests that you thoroughly read this entire manual and carefully follow all of the instructions provided. Your Vulcan-Hart range is produced with quality workmanship and material. Proper installation, usage and maintenance of your range will result in many years of satisfactory performance.
INSTALLATION UNPACKING Immediately after unpacking, check for possible shipping damage. If the range is found to be damaged, save the packaging material and contact the carrier within 15 days of delivery. Remove all shipping wire, wood blocking, and accessories. Uncrate the high shelf, backguards and/or broiler. Before installing, verify that the electrical service agrees with the specifications on the rating plate located behind the kick panel on the left side.
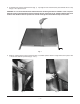
3. Assemble heat shield to splasher back (Fig. 1). Top edge of heat shield must be placed inside the rear top flange of the splasher back. CAUTION: It is essential that the heat shield in the back of the high shelf be installed in such a way that the bent section at the bottom be inward, touching the rear wall of the range, thereby allowing the stack action of the double wall back splasher to draw air through the area below the top surface units. PL-40459 Fig. 1 4.
5. Place shelf in position on splasher and fasten with 1/ 4-20 screws and nuts provided (Fig's. 4 & 5) . PL-40463 PL-40462 Fig. 4 Fig. 5 ELECTRICAL CONNECTIONS WARNING: ELECTRICAL AND GROUNDING CONNECTIONS MUST COMPLY WITH THE APPLICABLE PORTIONS OF THE NATIONAL ELECTRICAL CODE AND/OR OTHER LOCAL ELECTRICAL CODES. WARNING: DISCONNECT ELECTRICAL POWER SUPPLY AND PLACE A TAG AT THE DISCONNECT SWITCH TO INDICATE THAT YOU ARE WORKING ON THE CIRCUIT.
OPERATION WARNING: THE RANGE AND ITS PARTS ARE HOT. BE VERY CAREFUL WHEN OPERATING, CLEANING OR SERVICING THE RANGE. CONTROLS (Fig. 6) Oven Indicator Light Element Control Knobs Oven Thermostat Oven Infinite Switch Element Indicator Light PL-40464-1 Model E36L Shown Fig. 6 Element Controls — Infinite load switches that control and maintain heat to the surface plates. The controls are arranged in pairs; the left knob controls the front plate and the right knob controls the rear plate.
OPERATION 480 VOLT SUPPLEMENT WARNING: THE RANGE AND IT’S PARTS ARE HOT. BE VERY CAREFUL WHEN OPERATING, CLEANING OR SERVICING THE RANGE. CONTROLS (Fig. 6A & 6B) 480 volt MODEL E36L SHOWN 6A 1 2 3 4 4 MODEL E36X SHOWN 6B 5 1. 2. 3. 4. 5. 6. 7. 6 5 6 OVEN INDICATOR LIGHT – Will be lit until the selected temperature is reached or when temp. is being maintained. PANEL PLUG – Fills hole in panel where oven Infinite switch would mount on 208 & 240 volt units.
BEFORE FIRST USE Cleaning Clean the range and all accessories with water and a mild detergent. Rinse thoroughly and wipe dry with a soft clean cloth. Griddle Seasoning (SL, FL and XL Models) A new griddle surface must be seasoned to do a good cooking job. The metal surface of the griddle is porous. Food tends to get trapped in these pores and stick; therefore, it is important to "season" or "fill up" these pores with cooking oil before cooking.
Some DO'S and DO NOT'S of Surface Cooking DO use utensils to fit the tops (9" to 10" [229 to 254 mm] inside diameter). DO use flat-bottomed, straight-sided pots and pans. DO use covers for stock pot work. Water will boil much sooner and much less heat is required for cooking in a covered container. Less water may be used, thereby retaining vitamins and minerals in the food. DO turn off plates a few minutes before cooking is completed to use the heat stored in the plate.
BROILER (Accessory) The high-shelf broiler is available on Models E36L and E60L except those models supplied with hot top sections. The broiler is equipped with 2 tubular 3000 W. heating elements independently controlled by two infinite heat switches. The switches are located on the switch panel at the right of the broiler. The top switch controls the element for the left half of the broiler, and the bottom switch controls the element for the right half of the broiler.
Roasting Place meat on a rack in an open pan with sides sufficiently high to retain the drippings. Roasting may be done on the oven rack or the deck. For best results, roast at the low temperatures of 200°F (93°C) to 325°F (163°C) recommended by the Department of Agriculture and the American Meat Institute. Most meats may be roasted with the infinite heat switch set at HI. If heavy browning on poultry is not desired, the switch should be set between MED-LO and VERY-LO.
Broiler Empty grease collector as often as necessary. It is recommended that the grease collector be emptied whenever it is 3/4 filled. Remove grease collector slowly and be careful of liquid wave action. After each day's use, empty and wash the grease collector and wash the grid and drip shield. Clean the inside bottom, back and sides of the broiler compartment as often as necessary, with special care to clean the inside surface of the baffle across the front top of the broiler.
MAINTENANCE WARNING: THE RANGE AND ITS PARTS ARE HOT. BE VERY CAREFUL WHEN OPERATING, CLEANING OR SERVICING THE RANGE. SERVICE AND PARTS INFORMATION To obtain service and parts information concerning this range, contact the Vulcan-Hart Service Department in your area or Service Department at the address or phone number shown on the front cover of this manual.
FORM 30968 Rev. A (02-04) – 16 – PRINTED IN U.S.A.