INSTALLATION & OPERATION MANUAL GHF SERIES HEAVY DUTY RANGE MATCHING GAS FRYERS MODELS GHF91 GHF90 ML-135503 ML-135504 GHF91 For additional information on Vulcan-Hart Company or to locate an authorized parts and service provider in your area, visit our Web site at www.vulcanhart.com VULCAN-HART COMPANY, P.O. BOX 696, LOUISVILLE, KY 40201-0696, TEL.
IMPORTANT FOR YOUR SAFETY THIS MANUAL HAS BEEN PREPARED FOR PERSONNEL QUALIFIED TO INSTALL GAS EQUIPMENT, WHO SHOULD PERFORM THE INITIAL FIELD START-UP AND ADJUSTMENTS OF THE EQUIPMENT COVERED BY THIS MANUAL. POST IN A PROMINENT LOCATION THE INSTRUCTIONS TO BE FOLLOWED IN THE EVENT THE SMELL OF GAS IS DETECTED. THIS INFORMATION CAN BE OBTAINED FROM THE LOCAL GAS SUPPLIER.
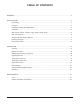
TABLE OF CONTENTS GENERAL .............................................................................................................................................4 INSTALLATION ....................................................................................................................................4 Unpacking .................................................................................................................................4 Location .............................................
Installation, Operation and Care of MODEL GHF91 GAS FRYERS PLEASE KEEP THIS MANUAL FOR FUTURE REFERENCE GENERAL Vulcan fryers are produced with quality workmanship and material. Proper installation, usage and maintenance of your fryer will result in many years of satisfactory performance. Standard equipment on the fryer includes 6" (15 cm) adjustable legs, a lift-off backsplash, twin baskets and a stainless steel fry tank.
The installation location must allow adequate clearances for servicing and proper operation. A minimum front clearance of 36" (91 cm) is required. Do not obstruct the flow of combustion and ventilation air. Adequate clearance for air openings into the combustion chamber must be provided. Make sure there is an adequate supply of air in the room to replace air taken out by the ventilating system. This will prevent fryer function from being affected by a reduced atmospheric pressure.
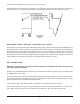
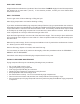
Attach the restraining device at the rear of the fryer (Fig.1). If disconnection of the restraint is necessary, turn off the gas supply before disconnection. Reconnect this restraint prior to turning the gas supply on and returning the fryer to its installation position. Fig. 1 GHF SERIES FRYERS - BATTERY TYPE (HEAVY DUTY STYLE) Set all fryers in line with each other and adjacent ranges (16" [40 cm] clearance required between fryer and open top flame units).
WARNING: PRIOR TO LIGHTING, CHECK ALL JOINTS IN THE GAS SUPPLY LINE FOR LEAKS. USE SOAP AND WATER SOLUTION. DO NOT USE AN OPEN FLAME. After piping has been checked for leaks, fully purge all piping receiving gas to remove air. TESTING THE GAS SUPPLY SYSTEM When test pressures exceed 1/2 psig (3.45 kPa), the fryer and its individual shutoff valve must be disconnected from the gas supply piping system. When test pressures are 1/2 psig (3.
OPERATION WARNING: HOT OIL AND PARTS CAN CAUSE BURNS. CLEANING AND SERVICING THE FRYER. USE CARE WHEN OPERATING, WARNING: SPILLING HOT OIL CAN CAUSE SEVERE BURNS. WITHOUT DRAINING ALL OIL FROM THE TANK. DO NOT MOVE FRYER CONTROLS - "G" MODELS Thermostat — Turns fryer on or off, and maintains temperature of oil in tank. BEFORE FIRST USE Cleaning Using a non-corrosive, grease-dissolving commercial cleaner, clean the protective metal oils from all surface parts and the fry tank interior.
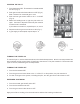
LIGHTING THE PILOT 1. Turn thermostat OFF. Thermostat is located behind the door (Fig. 4). 2. Push gas control valve knob and turn to OFF (Fig. 5). Wait 5 minutes for unburned gas to vent. 3. Push and turn gas control valve to the "I" in PILOT (Fig. 6). 4. While still holding knob in, light the pilot with a lit taper. Continue to depress knob until pilot remains lit when knob is released. If pilot does not remain lit, repeat Steps 2, 3, and 4. 5. Depress and turn gas control knob to ON (Fig. 7). 6.
HIGH LIMIT DEVICE A high limit device will shut the fryer down if the oil overheats. DO NOT relight pilot until oil temperature has lowered to at least 350°F (176°C). If the situation persists, contact your local Vulcan-Hart authorized servicer. DAILY FILTERING Turn the gas valve off when draining or filling the fryer. Allow frying compound to cool before draining or filling.
CLEANING CAUTION: Do not spray with hose or steam cleaner. Doing so will cause extensive damage (not covered under warranty). Daily Clean your fryer regularly. If regular cleaning is neglected, grease will be burned on and discolorations may form. These may be removed by washing with detergent or soap and water. Particularly stubborn discolorations may be removed with a self-soaping scouring pad or a paste made of water and a mild scouring powder applied with a plastic open pad or sponge.
Fingerprints Fingerprints are sometimes a problem on highly polished surfaces of stainless steel. They can be minimized by applying a cleaner that will leave a thin, oily or waxy film. Wipe cleaner on and remove excess with a soft dry cloth. After using, subsequent fingerprints will usually disappear when wiped lightly with a soft cloth containing a little of the cleaner. If the surface is especially dirty to start with, wash first with soap or detergent and water.