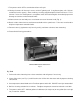
INSTALLATION & OPERATION MANUAL SPER1 & SPER2 ELECTRIC FRYERS MODEL SPER1 SPER2 SPER0 Frymate ML-52918 ML-52919 ML-52920 SPER1 & 2 VULCAN-HART COMPANY, FORM 30729 Rev. A (1-95) P.O. BOX 696, LOUISVILLE, KY 40201-0696, TEL.
Installation, Operation and Care of MODEL SPER1 & SPER2 ELECTRIC FRYERS PLEASE KEEP THIS MANUAL FOR FUTURE REFERENCE GENERAL Your Vulcan fryer is produced with quality workmanship and material. Proper installation, usage and maintenance of your fryer will result in many years of satisfactory performance. Vulcan-Hart Company suggests that you thoroughly read this entire manual and carefully follow all of the instructions provided.
INSTALLATION CODES AND STANDARDS Your Vulcan fryer must be installed in accordance with: 1. State and local codes. 2. The National Electrical Code, ANSI/NFPA No. 70 (latest edition). Copies may be obtained from The National Fire Protection Association, Batterymarch Park, Quincy, MA 02269. 3. NFPA Standard #96. LEVELING Place a carpenter's level on top of the fryer and level the fryer front-to-back and side-to-side by turning the adjustable legs.
OPERATION WARNING: HOT OIL AND PARTS CAN CAUSE BURNS. CLEANING AND SERVICING THE FRYER. USE CARE WHEN OPERATING, BEFORE FIRST USE Cleaning Clean the fryer thoroughly, following the procedures described in this manual under CLEANING — WEEKLY OR AS REQUIRED. Clean all fryer accessories. Rinse all parts thoroughly after cleaning and wipe dry. Seasoning Light seasoning of the backsplash area is required to avoid possible surface corrosion.
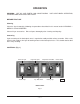
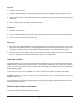
POWER SWITCH — Controls electric supply to fryer (Optional - hood ventilator to interlock.) POWER ON LIGHT — Indicates when electric supply is on. TEMPERATURE CONTROLLER — Maintains frying temperature by controlling power supply. HEATING LIGHT — When on, indicates temperature control is calling for power to the elements. FRY/MELT SWITCH — Controls melting or frying cycle. Use MELT cycle position to melt solid shortening.
Split Vat 1. Remove crumb screens. 2. Divide a 50-pound block of shortening into two equal halves (approximately 25 pounds each). 3. Place each half of the shortening directly on the heating elements in each well of the fry tank and slide back. 4. Place crumb screens on top of shortening in tank. Single Vat 1. Remove crumb screen. 2. Place 50-pound block of shortening directly on the heating elements in the tank and slide back. 3. Place crumb screen on top of shortening. Melt Cycle 1.
1. Allow shortening to cool before draining or filling. 2. Consult the operating instructions supplied by the manufacturer of your filtering system before filtering the shortening. 3. Firmly screw the fryer drain nipple (supplied) into the fryer drain valve (Fig. 2). Position your filtering container under the drain nipple mouth before opening the drain valve. 4. Completely open the drain valve. Let the shortening drain into the filter container.
SHORTENING MAINTENANCE Shortening life may be extended by following these important procedures. Do not salt foods over the fryer. Use good quality shortening. Filter shortening daily at a minimum. Keep equipment and surroundings clean. Set thermostats correctly. Do not use excessively high temperatures. Remove excess moisture and particles from food products before placing in fryer. Dip out several cups of shortening from fry tank every day and add fresh shortening to replace it.
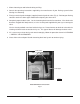
7. Turn power switch OFF at termination of burn-off cycle. 8. Heating elements will heat up in excess of 600°F glowing red. If any do not glow, call a Vulcanauthorized service agency. Some smoking, crackling sound and puffs of flame will occur. This is normal. If excessive flaming occurs, turn power switch OFF and extinguish immediately to prevent damage to elements and thermostat bulbs. 9. Allow elements to cool and press reset button on rear of element head (Fig. 3). 10.
6. Drain solution and discard. Close drain valve and fill tank half full with water. 7. Scrub entire inside of tank with a stiff bristle nylon brush. 8. Drain solution and rinse tank thoroughly with clean water. 9. Close drain valve and refill tank with clean hot (minimum 140°F) water. Add 1 cup of vinegar to neutralize alkaline left by the cleaner. Turn power switch ON and boil again for 15 minutes. 10.
MAINTENANCE WARNING: HOT OIL AND PARTS CAN CAUSE BURNS. CLEANING AND SERVICING THE FRYER. USE CARE WHEN OPERATING, WARNING: DISCONNECT ELECTRICAL POWER SUPPLY BEFORE PERFORMING ANY MAINTENANCE. CALIBRATION PROCEDURES 1. Monitor shortening temperature 1" below the surface with an accurate temperature measuring device. 2. Turn power switch ON, and when coming up from lower temperature, set temperature control knob to frying temperature. 3.
FORM 30729 Rev. A (1-95) — 12 — PRINTED IN US.A.