INSTALLATION & OPERATION MANUAL V SERIES HEAVY DUTY SECTIONAL GAS RANGE WITH STANDARD OVEN OR SNORKEL® CONVECTION OVEN MODELS V36 Standard Oven W/ Standing Pilot V36 Standard Oven W/ Spark Ignition V36 Convection Oven ML-44905Z ML-44906Z ML-44907Z MODEL V3HT36 VULCAN-HART COMPANY, FORM 31165 (Jan. 2001) P.O. BOX 696, LOUISVILLE, KY 40201-0696, TEL. (502) 7 7 8 - 2 7 9 1 www.vulcanhart.
IMPORTANT FOR YOUR SAFETY THIS MANUAL HAS BEEN PREPARED FOR PERSONNEL QUALIFIED TO INSTALL GAS EQUIPMENT, WHO SHOULD PERFORM THE INITIAL FIELD START-UP AND ADJUSTMENTS OF THE EQUIPMENT COVERED BY THIS MANUAL. POST IN A PROMINENT LOCATION THE INSTRUCTIONS TO BE FOLLOWED IN THE EVENT THE SMELL OF GAS IS DETECTED. THIS INFORMATION CAN BE OBTAINED FROM THE LOCAL GAS SUPPLIER.
TABLE OF CONTENTS CONFIGURATIONS OF MODEL V SERIES HEAVY DUTY RANGES ............................................ 4 GENERAL ............................................................................................................................................ 8 INSTALLATION .................................................................................................................................... 8 Unpacking ......................................................................................
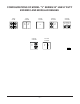
CONFIGURATIONS OF MODEL "V" SERIES HEAVY DUTY RANGES WITH STANDARD AND CONVECTION OVENS AND MODULAR RANGES.
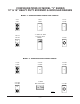
CONFIGURATIONS OF MODEL "V" SERIES 12" & 18" HEAVY DUTY EXPANDO & MODULAR RANGES MODEL "V" SERIES EXPANDO RANGES WITH CABINETS V212S V218S V1HT12S V1HT18S V1H12S V1H18S V1G12S V1G18S HT G "V" SERIES 18" WIDE FULL BODY WITH CABINET V13018S HT MODEL "V" SERIES MODULAR EXPANDO RANGES V212M V218M V1HT12M V1HT18M V1H12M V1H18M V1G12M V1G18M HT G 18" WIDE MODULAR RANGE V13018M HT PL-53599 —5—
CONFIGURATIONS OF MODEL "V" SERIES 24" HEAVY DUTY EXPANDO AND MODULAR RANGES V424S V424M V2H24 V2H24M 12" HT V1G24S V1G24M 12" HT V21H24S V21H24M 12" HT G V1G224S V1G224M V2HT24S V2HT24M 12" HT 12" HT V1G1H4S V1G1H4M 12" G 12" G 12" HT PL-53600 —6—
CONFIGURATIONS OF "V" SERIES HEAVY DUTY OVENS VO36 SINGLE OVEN WORK TOP VIEW VO36C SINGLE CONVECTION OVEN OVEN ON MODULAR STAND VO236 DOUBLE STACKED OVEN PL-53601 —7—
Installation, Operation and Care Of MODEL V SERIES HEAVY DUTY SECTIONAL GAS RANGES WITH STANDARD OVEN OR SNORKEL® CONVECTION OVEN PLEASE KEEP THIS MANUAL FOR FUTURE REFERENCE GENERAL Vulcan ranges and ovens are produced with quality workmanship and material. Proper installation, usage and maintenance of your range will result in many years of satisfactory performance. The manufacturer suggests that you thoroughly read this entire manual and carefully follow all of the instructions provided.
LOCATION CAUTION: The equipment area must be kept free and clear of combustible substances.
In Canada: 1. Local codes. 2. CAN/CGA-B149.1 Natural Gas Installation Code (latest edition). 3. CAN/CGA-B149.2 Propane Installation Code (latest edition), available from The Canadian Gas Association, 178 Rexdale Blvd., Etobicoke, Ontario, Canada M9W 1R3. 4. Canadian Electrical Code, CSA C22.2 No. 3 (latest edition). Copies may be obtained from The Canadian Standard Association, 178 Rexdale Blvd., Etobicoke, Ontario, Canada M9W 1R3.
Snorkel Oven Remove lower front kick plate. Remove two screws holding electric gas valve and move valve off to the side. Pull oven burner out of compartment through opening. Adjust four corner bolts to level range. Replace burner valve and kick plate. Floor Installation on Legs The 6" (15 cm) adjustable legs must be tightened securely. Level each range by turning the foot portion of the adjustable legs.
INSTALLING OVERLAPPING GRIDDLE TOP 1. Bolt ranges together and level per instructions in this manual. 2. Remove chrome bull noses from ranges receiving overlapping griddle tops. Bull noses are held by bolts on the bottom side. 3. MANUAL CONTROLS ONLY — Set griddle tops in place and level with bolts located under the griddle top in both rear corners. Should you desire griddle plate to slope forward, adjust accordingly. Make sure hole in front gutter fits into cast iron drain in range. Reinstall bull noses.
FLUE CONNECTIONS DO NOT obstruct the flow of flue gases from the flue duct located on the rear of the range. It is recommended that the flue gases be ventilated to the outside of the building through a ventilation system installed by qualified personnel. A minimum of 18" (45 cm) must be maintained between the ventilation system and the cooking surface. Information on the construction and installation of ventilating hoods may be obtained from the standard for "Vapor Removal from Cooking Equipment," NFPA No.
Standard Oven With Standing Pilot (Fig. 2) 1. Turn Thermostat and Shut-off Valve to the OFF position. SHUT-OFF VALVE 2. Wait 5 minutes. 3. Remove lower panel. THERMOSTAT 4. Depress Red Button on safety valve and light pilot through observation hole. RED BUTTON (SAFETY) 5. Hold down Red Button for at least 30 seconds. 6. When button is released, pilot should remain lit. Pilot flame may be adjusted with screw on pilot adjustment valve on pilot supply tubing located behind the control panel.
Snorkle Convection Oven with Standing Pilot (Fig. 4) 1. Turn Thermostat and Shut-off Valve to OFF position. Wait 5 minutes. SHUT-OFF VALVE 2. Turn Shut-off Valve to ON position. 3. Remove the lower front panel. Flip up the window that covers the pilot lighting hole and light the pilot with a lit taper. Flip window back in place and replace lower front panel. THERMOSTAT FAN SWITCH FAN 4. Turn Thermostat to desired setting. 5. Turn Fan Switch to ON position. 6. Oven burner lights automatically.
OPERATION WARNING: THE RANGE AND ITS PARTS ARE HOT. BE CAREFUL WHEN OPERATING, CLEANING OR SERVICING THE RANGE. BEFORE FIRST USE Griddle Tops: Before using your Vulcan griddle, the protective coating that was applied at the factory must be completely removed with a commercial degreaser. After a thorough cleaning, apply a high temperature, salt-free frying oil and you are ready to use your Vulcan griddle. The griddle requires no "breaking-in" or "seasoning.
A GUIDE FOR COOKING TIME & TEMPERATURES The following lists are suggested cooking times and temperatures for convection and standard ovens. These guidelines, which will vary depending on product temperature, size, shape, etc., are suggestions only and should be adjusted to suit your operation. (CONVECTION OVEN ONLY) Suggested Temperature °F (°C) Suggested Time Your Time Your Temp. °F (°C) MEAT, POULTRY, FISH Roasting Braising Cafeteria Beef Rounds (45 lb.
A GUIDE FOR COOKING TIME AND TEMPERATURES Baking Times at Preheated Oven Temperatures PRODUCT TEMPERATURE Standard Oven °F (°C) MEAT Braised Meats Meat in Casserole Meat Pie with Crust (meat previously cooked) Rare Medium Well Done Pork Fresh (always well done) Smoked Lamb and Mutton Medium Well Done Veal Poultry Chicken Duck, Goose Turkey Fish Small or Fillets Large Lobster, Stuffed VEGETABLES Beans with Pork Eggplant, Stuffed Mushrooms Onions, Whole (Stuffed) Onions, Sliced Peppers, Stuffed Potatoes, W
CLEANING WARNING: DISCONNECT ELECTRICAL POWER SUPPLY BEFORE CLEANING. Open Top Burners Daily Remove grates and clean under and around open burners. Weekly 1. Clean each burner thoroughly. Clean stainless steel or chromed surfaces with a damp cloth and polish with a soft dry cloth. A detergent may be used for cleaning. To remove discolorations, use a non-abrasive cleaner, always rubbing with the grain of the metal. 2. Clean bottom drip pan. To remove drip pan, reach under and lift rear of pan about 1" (2.
Exterior Daily Clean exterior finish with a mild solution of soap or grease-dissolving cleaner. Range Tops Daily 1. Wipe top while still warm with a soft cloth. 2. Clean drip pan under burners. Weekly Boil open top grates and burners in a solution of washing soda and water. Range Ovens Daily Clean oven and door daily. Do not use scouring powder on finishes. Scouring powder is extremely difficult to remove completely.
Burned-On Foods and Grease Soaking with hot soapy water will help greatly to remove burned-on foods and grease. Heat Tint Straw-colored or slightly darkened areas may appear on stainless steel in and around ovens and ranges where temperatures reach 500°F (260°C) or more. This "heat tint" is caused by a slight oxidation of the stainless steel and is not harmful. To control or minimize this condition, never use more heat than is absolutely necessary. Commercial heat tint remover products may be used.
MAINTENANCE WARNING: DISCONNECT ELECTRICAL POWER SUPPLY BEFORE PERFORMING ANY MAINTENANCE OPERATIONS. PILOT LIGHTS Pilot lights are to be adjusted at the proper flame height. LUBRICATION All moving parts must be checked for wear and lubricated. Contact your local Vulcan authorized servicer. All valves and controls should be lubricated by your local Vulcan authorized servicer, using a hightemperature grease. Motors in Vulcan convection ovens are permanently lubricated and require no additional maintenance.
TROUBLESHOOTING OVEN PROBLEM PROBABLE CAUSES Too Much Bottom Heat. Insufficient heat input. Overactive flue. Too low temperature. Improper operation. Improper bypass setting. Fluctuating gas pressure. Uneven Bake Side Burning Too Much Top Heat Too high temperature. Faulty ventilation. Excessive heat input. Thermostat needs calibration. Uneven Bake - Side to Side Range not level side to side. Oven burner, bottom or baffles improperly installed. Pulling to Edge of Pan Warped pans. Oven not level.
TOP BURNER OPERATION PROBLEM PROBABLE CAUSES Improper Burner Combustion Excessive Valve Handle Temperatures Sticking Top Burner Valves Improper ventilation. Poor door fit. Oven door left open. Poor Ignition Insufficient gas input. Poor air-to-gas adjustment. Restriction in pilot orifice. Restriction in main burner ignition port. Restriction in control valve. Restriction in gas orifice. FORM 31165 (Jan. 2001) — 24 — PRINTED IN U.S.A.