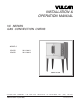
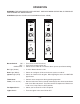
INSTALLATION & OPERATION MANUAL VC SERIES GAS CONVECTION OVENS MODELS VC4GD VC6GD ML-126611 ML-126613 MODEL VC4GD VULCAN-HART COMPANY, FORM 31123 Rev. C (Feb. 2002) P.O. BOX 696, LOUISVILLE, KY 40201-0696, TEL. (502) 778-2791 www.vulcanhart.
IMPORTANT FOR YOUR SAFETY THIS MANUAL HAS BEEN PREPARED FOR PERSONNEL QUALIFIED TO INSTALL GAS EQUIPMENT, WHO SHOULD PERFORM THE INITIAL FIELD START-UP AND ADJUSTMENTS OF THE EQUIPMENT COVERED BY THIS MANUAL. POST IN A PROMINENT LOCATION THE INSTRUCTIONS TO BE FOLLOWED IN THE EVENT THE SMELL OF GAS IS DETECTED. THIS INFORMATION CAN BE OBTAINED FROM THE LOCAL GAS SUPPLIER.
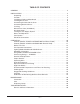
TABLE OF CONTENTS GENERAL . . . . . . . . . . . . . . . . . . . . . . . . . . . . . . . . . . . . . . . . . . . . . . . . . . . . . . . . . . . . . 4 INSTALLATION . . . . . . . . . . . . . . . . . . . . . . . . . . . . . . . . . . . . . . . . . . . . . . . . . . . . . . . . Unpacking . . . . . . . . . . . . . . . . . . . . . . . . . . . . . . . . . . . . . . . . . . . . . . . . . . . . . . . . . Location . . . . . . . . . . . . . . . . . . . . . . . . . . . . . . . . . . . . . . . . . . . . . . . . . . . .
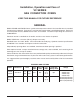
Installation, Operation and Care of VC SERIES GAS CONVECTION OVENS KEEP THIS MANUAL FOR FUTURE REFERENCE GENERAL Models VC4GD and VC6GD feature a solid state temperature control. One hour dial timer is standard; five hour timer is optional. Two-speed 1/2 HP (0.37 kw) electric motor is standard equipment. Each oven is furnished with 5 racks; additional oven racks are available. The burner input rating for each oven is 44,000 BTU/hr.
INSTALLATION Before installing, verify that the electrical service and type of gas supply (natural or L.P.) agree with the specifications on the rating plate, located behind the top trim panel on the front of the oven. If the supply and equipment requirements do not agree, do not proceed with the installation. Contact your dealer or Vulcan-Hart Company immediately. UNPACKING This oven was inspected before leaving the factory.
INSTALLING BASIC OVEN The basic oven must be installed on legs or be mounted on a modular stand. Installations on concrete bases or other supports restricting air circulation underneath the oven is not advisable and may void the warranty. Ovens Mounted on Casters If the oven is to be installed on casters, you must use a flexible connector (not supplied) that complies with the Standard for Connectors for Movable Gas Appliances, ANSI-Z21.69 (latest edition) and CAN/CGA 6.
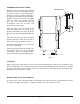
ASSEMBLING STACKED OVENS STACKING FLUE Unpack the ovens and stack kit. Position the oven to be used as the bottom oven on its back for access to the oven bottom, taking care not to scratch or damage it. The gas pipe protrudes beyond the back; provide for this when the oven is tipped back by resting it on suitable spacers (2 x 4's, etc.). Attach the four leg assemblies with the 24 bolts and lockwashers (six per leg). Place the lower oven (with legs) on the floor and remove two 7/16 inch (1.
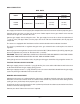
GAS CONNECTION GAS DATA INPUT RATING MODEL VC4GD VC6GD MANIFOLD PRESSURE Natural L.P. Gases (Propane) Natural L.P. Gases (Propane) 44,000 BTU/hr 44,000 BTU/hr 3.5" W.C. (0.9 kPa) 10" W.C. (2.5 kPa) Gas supply connections and any pipe joint compound must be resistant to the action of propane gases. Location of the gas inlet is at the rear of the oven. Codes require that a gas shutoff valve must be installed in the gas line ahead of the oven. Connect gas supply after leveling the oven.
VENT SYSTEM DO NOT obstruct the flow of flue gases from the flue located on the rear of the oven. It is recommended that the flue gases be ventilated to the outside of the building through a ventilation system installed by qualified personnel. Ovens may use an optional down-draft diverter flue method. This optional down-draft diverter must be purchased from the oven manufacturer and vented to the outside; otherwise, the installation of any such device will void all oven certifications and warranties.
OPERATION WARNING: THE OVEN AND ITS PARTS ARE HOT. USE CARE WHEN OPERATING, CLEANING OR PERFORMING ANY MAINTENANCE.
CONTROLS (Models VC4GD and VC6GD With Roast & Hold) MASTER SWITCH ON OFF MASTER SWITCH ON OFF OVEN COOL OVEN COOL ON HEAT ON HEAT IGNITION IGNITION THERMOSTAT 350 325 150 THERMOSTAT 200 375 350 400 300 100 C 150 F 450 250 475 500 250 225 425 275 450 250 400 300 425 275 200 375 325 150 475 500 250 225 100 C 150 F OFF OFF 0 0 5 4 1 5 2 4 1 2 3 3 R & H TIMER R & H TIMER TIMER 0 OFF 0 5 OFF 10 60 1 5 15 55 20 50 40 35 2 4 25 45 30 3 TIMER NORMA
BEFORE FIRST USE Before using the oven for the first time, it must be "burned in" to release any odors that might result from heating the new surfaces in the chamber. 1. Using a clean, damp cloth, wipe the inside of the oven including the racks. 2. Close the oven doors. 3. Push the Master Switch to ON. 4. Turn the Thermostat to 300°F (149°C) and allow the oven to cycle for 2 hours or until no odor is detected before pushing the Master Switch to OFF. PRE-OPERATION INSTRUCTIONS 1.
Cooking 1. Open doors and load the product into the oven. Place pans in the center of the racks. Close doors. 2. Set the Timer. After the preset time lapses, turn Timer to OFF position to stop alarm. 3. When product is done, open doors and carefully remove cooked product from the oven. Care should be taken when wiping up spills, as oven is still hot. Roast & Hold (When Equipped) 1. Turn the oven ON. 2. Set the Thermostat to the desired setting. 3. Position the Function switch to R & H. 4.
ROAST & HOLD OPERATION — (When Equipped) Roast & Hold cooks the product in two stages. During first-stage cooking, the oven temperature is regulated by the temperature setpoint and the R & H Timer setting. After the time counts down to 00:00, second-stage cooking begins. During second-stage cooking, the heating elements are off as the temperature in the oven declines to the hold temperature. The doors should remain closed during second-stage cooking.
RACK ARRANGEMENTS All models are supplied with five racks and have a maximum operating capacity of six racks per oven. The 11-position rack supports provide for maximum flexibility and proper rack spacing. The following arrangements are recommended. The position numbers are in numerical sequence starting at the bottom (Fig. 4). #11 #10 #9 Arrangement #1 — Five racks in positions #2, #4, #6, #8 and #10 for cookies or reconstitution of frozen lunches at maximum capacity.
RECOMMENDED TEMPERATURES AND TIMES FOR ROASTING Meat roasting is most satisfactory at temperatures of 225 to 325°F (107 to 163°C) for beef, lamb, poultry and ham; 325°F (163°C) for fresh pork as recommended by USDA and American Meat Institute. A pan, approximately 12 x 20 x 1" (30.4 x 50.8 x 2.5 cm) full of water, may be placed in the oven bottom. This water supplies humidity to reduce shrinkage. Water should be added if necessary during roasting.
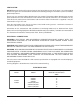
RECOMMENDED TEMPERATURES, TIMES AND NUMBER OF RACKS FOR BAKING PRODUCT Cakes Sheet Cakes 18 x 26 x 1" (45.7 x 66 x 2.5 cm) pan Scaled 41/2 to 6 lb (2 to 2.7 kg)/pan Scaled 6 to 71/2 lb (2.7 to 3.4 kg)/pan Sheet Cakes 18 x 26 x 2" (45.7 x 66 x 5 cm) pan Scaled 10 to 12 lb (4.5 to 5.4 kg)/pan Or, two 12 x 18 x 2" (30.5 x 45.7 x 5 cm) pans Scaled 5 to 6 lb (2.3 to 2.7 kg)/pan TEMPERATURE °F (°C) TIME IN MINUTES NO.
REHEATING PREPARED FOODS PRODUCT TEMPERATURE °F (°C) Frozen French Fries 400-450 Frozen TV Dinners Frozen Entrees 3 /4 to 1" (1.9 to 2.5 cm) thick Frozen Meals, 8 oz Foil Pkg. Fish Sticks & Portions Frozen Breaded, 1 oz 21/2 to 3 oz Chicken Pieces Broiled or Oven Fried 2 to 21/2 lb (0.9 to 1.1 kg)/bird 21/2 to 3 lb (1.1 to 1.4 kg)/bird Lobsters — 1 to 11/2 lb (0.45 to 0.7 kg) Lobster Tails — Frozen 1 /2 to 3/4 lb (0.2 to 0.3 kg) Hamburger Patties 8 per lb, med.
CLEANING WARNING: DISCONNECT ELECTRICAL SUPPLY AND PLACE A TAG AT THE DISCONNECT SWITCH TO INDICATE THAT YOU ARE WORKING ON THE OVEN BEFORE CLEANING. Allow the oven to cool before cleaning. Snorkel The snorkel (heat circulation tube), located in the back of oven cavity, should never be blocked. The snorkel should be kept clean at all times for proper operation of the oven. Clean with standard oven cleaner at least once a week.
MAINTENANCE WARNING: THE OVEN AND ITS PARTS ARE HOT. USE CARE WHEN OPERATING, CLEANING OR PERFORMING ANY MAINTENANCE. WARNING: DISCONNECT ELECTRICAL SUPPLY AND PLACE A TAG AT THE DISCONNECT SWITCH TO INDICATE THAT YOU ARE WORKING ON THE OVEN BEFORE PERFORMING ANY MAINTENANCE. LUBRICATION The fan motor comes with sealed bearings and requires no lubrication. VENT Periodically check the flue, when the oven is cool, to be sure it is free of obstructions. REPLACING LAMPS 1. Allow oven to cool. 2.