INSTALLATION & OPERATION MANUAL VFBMW SERIES FLASHBAKE® MICROWAVE OVENS MODELS VFBMW2 VFBMW3 ML- 126807 Model VFBMW VULCAN-HART COMPANY, FORM 31174 (Nov. 2000) P.O. BOX 696, LOUISVILLE, KY 40201-0696, TEL. (502) 778-2791 www.vulcanhart.com P/N.
IMPORTANT SAFETY INSTRUCTIONS When using electrical appliances, basic safety precautions must be followed, including the following: WARNING: TO REDUCE THE RISK OF BURNS, ELECTRIC SHOCK, FIRE, INJURY TO PERSONS, OR EXPOSURE TO EXCESSIVE MICROWAVE ENERGY: 1. Do not use metal utensils in this oven. 2. Read all instructions before using oven. 3. Read and follow the “Precautions to Avoid Possible Exposure to Excessive Microwave Energy” on the next page. 4. This oven must be grounded.
PRECAUTIONS TO AVOID POSSIBLE EXPOSURE TO EXCESSIVE MICROWAVE ENERGY 1. Do not attempt to operate this oven with the door open since open-door operation can result in harmful exposure to microwave energy. It is important not to defeat or tamper with the safety interlocks. 2. Do not place any object between the oven front face and the door. 3. Do not operate the oven if it is damaged. It is particularly important that the oven door close properly and that there is no damage to the: a. Door (bent). b.
TABLE OF CONTENTS GENERAL. . . . . . . . . . . . . . . . . . . . . . . . . . . . . . . . . . . . . . . . . . . . . . . . . . . . . . . . . . . . . . . . . . . . . . . 5 INSTALLATION . . . . . . . . . . . . . . . . . . . . . . . . . . . . . . . . . . . . . . . . . . . . . . . . . . . . . . . . . . . . . . . . . . 5 Unpacking . . . . . . . . . . . . . . . . . . . . . . . . . . . . . . . . . . . . . . . . . . . . . . . . . . . . . . . . . . . . . . . . . 5 Location . . . . . . . . . . . . . . . . . . . .
INSTALLATION, OPERATION AND CARE OF MODEL VFBMW FLASHBAKE® MICROWAVE OVEN GENERAL Your Vulcan FlashBake® Microwave oven is a versatile oven that employs a revolutionary high quality, high-speed cooking technology. This new technology cooks the outside of foods, while also penetrating the surface so the inside cooks simultaneously. Foods cook evenly and fast, retaining their natural moisture. Bread products brown and become crisp while vegetables retain their color and texture.
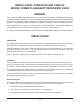
Tip Bracket The tip bracket is a safety feature designed to help keep the oven stable when the door is open. Proper installation is important! • Position the oven in its final location. • As you are looking at the back of the oven, position the tip bracket on the bottom back right side of the oven (Fig. 1). • Use the existing hole on the back of the oven to secure the tip bracket to the oven back. • Anchor the bracket to the counter surface.
ELECTRICAL CONNECTIONS WARNING: ELECTRICAL AND GROUNDING CONNECTIONS MUST COMPLY WITH THE APPLICABLE PORTIONS OF THE NATIONAL ELECTRICAL CODE AND/OR OTHER LOCAL ELECTRICAL CODES. WARNING: DISCONNECT ELECTRICAL POWER SUPPLY AND PLACE A TAG AT THE DISCONNECT SWITCH TO INDICATE YOU ARE WORKING ON THE CIRCUIT. WARNING: APPLIANCES EQUIPPED WITH A FLEXIBLE ELECTRIC SUPPLY CORD ARE PROVIDED WITH A FOUR-PRONG GROUNDING PLUG.
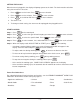
OPERATION WARNING: THE OVEN AND ITS PARTS ARE HOT. USE CARE WHEN OPERATING, CLEANING, OR SERVICING THE OVEN. CONTROLS (Fig. 2) ON OFF Press to turn the oven control pad on and off. MICRO WAVE Press to operate the microwave cooking mode. COMBI COOK Press to set your own cooking program. MENU COOK Press to access the preset cooking menu. ENTER START Press to enter food selections and start cooking. -- + POWER LEVEL MICRO EXPRESS SAVE RECIPE CLEAR Press to scroll through menu categories.
SETTING THE CLOCK When the oven is plugged in, the display will prompt you to set the clock. The clock must be set before using the oven for the first time. 1. Press -- + to set the hour. Press 2. Press -- + to set the minutes. Press 3. Press -- + to set AM or PM. Press to enter selection. ENTER START to enter selection. ENTER START ENTER START to enter selection. 4. The clock is set. 5. To change to clock setting, the oven must be unplugged then plugged back in.
Cooking Trays (Fig. 3) The VFBMW FlashBake® Microwave Oven is supplied with three cooking trays which are specifically designed for use in this oven. Fig. 3 • The oven rack turntable must be in place for all cooking. Be sure it seats securely over the square spindle in the center of the oven. • Place the selected tray or cookware directly on the oven rack turntable. • Cooking trays and containers can become hot. Oven mitts or pot holders should be used.
COOKING FEATURES Repeat Last Use this feature for cooking repetitive items like cookies or appetizers. The last program is stored for two hours. 1. Press and hold MENU COOK for about 3 seconds. 2. The last preset food will be displayed. 3. Press ENTER START to start cooking. Resume For cooking foods longer than the programed time. 1. After a cooking program has timed out, press 2. Press ENTER START or open and close the oven door. CLEAR . RESUME COOKING will be displayed. 3.
Power Level Guidelines Each power level gives you halogen lamp power and microwave energy for a certain percentage of the time. For example: • U=07 Upper halogen lamp on 70% of the time. • L=07 Lower halogen lamp on 70% of the time. • M=05 Microwave on 50% of the time. Follow these general standards when selecting the best upper, lower and micro power settings. Be careful when adjusting power levels so that you do not over or undercook your food.
RECIPE OPTIONS Create and store up to 30 custom recipes, or customize an existing recipe. Entering and Saving a Recipe 1. Press MENU COOK 2. Press -- + on the control pad. until RECIPE appears on the display. Press to enter selection. ENTER START -- + to select a blank entry to 3. SELECT CUSTOM RECIPE appears on the display. Press store recipe. Press ENTER to enter selection. START 4. The oven will ask you to select COOKING TIME, UPPER, LOWER and MICRO power levels. Press -- + to select values.
Deleting a Recipe 1. Press MENU COOK on the control pad. 2. Press -- + until RECIPE appears on the display. Press ENTER START to enter selection. 3. SELECT CUSTOM RECIPE appears on the display. 4. Press -- + until the recipe you want to change is displayed. Press selection. ENTER START to enter COMBI 5. When the display reads ADJUST TIME or START, press and hold COOK for 3 seconds. This deletes the recipe. SELECT COOK TIME appears on the display.
MICROWAVE COOKING • Be sure to follow all precautions on page 2 and 3 of this manual. • Make sure the oven rack turntable and white ceramic tray are in place. Step 1: Press MICRO WAVE Step 2: Press -- + to select the type of food you want. Press Step 3: Press -- + to select amount and weight. Press on the control pad. ENTER START ENTER START to enter selection. to enter each selection. Step 4: When the display reads ADJUST TIME or START, press ENTER START to start cooking.
Power Level The power level is automatically set on high or 10. You can change the power level before or during a cooking program (except when using MICRO EXPRESS). To adjust power level before cooking: 1. Press MICRO WAVE and select food category, amount and weight. Press 2. When the display reads ADJUST TIME or START, press ENTER START after each selection. . POWER LEVEL 3. SELECT MICRO POWER appears on the display. 4. Press -- + to increase or decrease power level. Press 5.
Finding and Using a Recipe 1. Press MICRO WAVE 2. Press -- + until RECIPE appears on the display. Press on the control pad. ENTER START to enter selection. ENTER START to enter selection. 3. SELECT CUSTOM RECIPE appears on the display. 4. Press -- + until the recipe you want is displayed. Press 5. When the display reads ADJUST TIME or START, press ENTER START to start cooking. Adjusting or Changing a Recipe 1. Press MICRO WAVE 2. Press -- + on the control pad.
DEFROSTING Auto Defrost Automatically sets the defrosting times and power levels to give even defrosting results for meats, poultry and fish weighing up to six pounds. 1. Remove food from the package and place it on a microwave safe dish. 2. Press MICRO WAVE on the control pad. 3. Press -- + until DEFROST (AUTO) appears on the display. Press ENTER START to enter selection. 4. SELECT FOOD WEIGHT appears on the display. Press -- + to increase or decrease food weight (see Conversion Guide).
Time Defrost Use this feature to defrost for a selected length of time. 1. Remove food from the package and place it on a microwave safe dish. 2. Press MICRO WAVE 3. Press -- + until DEFROST (TIME) appears on the display. Press on the control pad. ENTER START to enter selection. 4. SELECT DEFROST TIME appears on the display. Press -- + to increase or decrease defrost time. Press ENTER to enter selection. START 5. When the display reads ADJUST TIME or START, press ENTER START to start defrosting. 6.
CLEANING WARNING: DISCONNECT (UNPLUG) ELECTRICAL POWER SUPPLY BEFORE CLEANING. WARNING: THE OVEN AND ITS PARTS ARE HOT. USE CARE WHEN OPERATING, CLEANING AND SERVICING THE OVEN. The interior cleanliness of the VFBMW oven is essential to ensure maximum cooking efficiency. Keeping the oven clean and free of food debris will minimize the possibility of smoke and odors from food stuck on the lamp shields and interior walls.
Cleaning Procedures It is recommended that you clean the oven after each shift. If your operation is extremely busy, it may be necessary to wipe out the oven during a shift until you are able to perform the detailed cleaning. 1. Allow the oven to cool before starting the cleaning process. 2. Open the door. 3. Remove the oven rack turntable and wash carefully in warm, sudsy water. 4. Use a cloth dampened with one of the recommended cleaners. Be sure that the soap is noncaustic.
MAINTENANCE WARNING: THE OVEN AND ITS PARTS ARE HOT. USE CARE WHEN OPERATING, CLEANING AND SERVICING THE OVEN. WARNING: DISCONNECT (UNPLUG) THE ELECTRICAL SUPPLY BEFORE PERFORMING ANY MAINTENANCE ON THE OVEN. Do not remove the oven covers or attempt to open the control cabinet. Doing so will void the warranty. There are no user serviceable parts inside. INSPECTING THE OVEN At least once each day, when the oven is cool, visually inspect the inside of the oven.
TROUBLESHOOTING Problem Possible Causes What to Do The display is blank. The control pad has been turned off. Press ON/OFF to turn the control pad on. Control display is lighted yet oven will not start. Clock is not set. Set the clock. Door is not securely closed. Open the door and close securely. ENTER/START not pressed after entering cooking selection. Press ENTER/START. Another selection is already entered on control pad and CLEAR was not pressed. Press CLEAR.
VFBMW FLASHBAKE® OVEN FOOD PRODUCT GUIDELINES Preset Food Selections The VFBMW FlashBake® oven is already preset to cook over 100 popular dishes. Use this guide as a quick reference.
APPETIZERS & SNACKS Food Settings Time Pieces Temperature Pan Cheese Sticks U= 10, L=03, M= 03 U= 10, L=03, M= 03 4:30 6:30 8 24 Frozen, Precooked Frozen, Precooked Black Pan Black Pan Chicken Fingers U= 10, L=03, M= 03 U= 10, L=03, M= 03 4:00 6:00 8 24 Frozen, Precooked Frozen, Precooked Black Pan Black Pan Chicken Tenders U= 10, L=03, M= 05 U= 10, L=03, M= 05 6:00 8:00 3-4 5-6 Thawed, Raw Thawed, Raw Black Pan Black Pan Wings U= 05, L=04, M= 10 U= 05, L=04, M= 10 4:00 8:00 8 24
BREAKFAST Food Settings Time Pieces Temperature Pan Breakfast Burrito U= 10, L=08, M= 09 U= 10, L=08, M= 09 2:00 3:00 1 3 Frozen Frozen Black Pan Black Pan Breakfast Pizza U= 10, L=04, M= 05 U= 10, L=04, M= 05 3:30 6:00 1 4 Frozen Frozen Black Pan Black Pan Breakfast Sandwich U= 08, L=06, M= 10 U= 08, L=06, M= 10 2:30 3:30 1 3 Frozen Frozen Black Pan Black Pan French Toast U= 10, L=05, M= 08 U= 10, L=05, M= 08 2:30 3:30 1-2 3-4 Frozen Frozen Black Pan Black Pan Pancakes U= 10,
FISH & SEAFOOD Food Settings Time Pieces Temperature Pan Breaded Fish U= 10, L=05, M= 03 U= 10, L=05, M= 03 3:30 6:00 1 4 Frozen Frozen Black Pan Black Pan Salmon Steaks U= 10, L=10, M= 05 U= 10, L=10, M= 05 5:00 9:00 1 4 Thawed Thawed Black Pan Black Pan U= 10, L=10, M= 00 U= 10, L=10, M= 00 6:00 7:00 1 Cup 10 Ct. Thawed Thawed Black Pan Black Pan U= 10, L=10, M= 10 U= 10, L=10, M= 10 1:30 2:00 /2 lb. 1 lb.
MEATS Food Settings Time Pieces Temperature Pan Filet Mignon 1" Medium 1" Well Done U= 10, L=10, M= 03 U= 10, L=10, M= 05 5:00 4:30 1-2 1-2 Thawed, Raw Black Pan 1" Medium 1" Well Done U= 10, L=10, M= 03 U= 10, L=10, M= 05 5:15 6:00 3 3 Thawed, Raw Black Pan 1" Medium 1" Well Done U= 10, L=10, M= 03 U= 10, L=10, M= 05 6:30 7:00 4 4 Thawed, Raw Black Pan 11/2" Medium 11/2" Well Done U= 10, L=10, M= 05 U= 10, L=10, M= 05 7:00 8:00 1 1 Thawed, Raw Black Pan 11/2" Medium 11/2" Well
MEATS Food Settings Time Pieces Temperature Pan U= 10, L=10, M= 00 U= 10, L=10, M= 00 4:00 5:00 1 1 Thawed, Raw Black Pan U= 10, L=10, M= 00 U= 10, L=10, M= 00 5:00 6:00 2 2 Thawed, Raw Black Pan U= 10, L=10, M= 00 U= 10, L=10, M= 00 6:00 7:00 1 1 Thawed, Raw Black Pan U= 10, L=10, M= 00 U= 10, L=10, M= 00 8:00 9:00 2 2 Thawed, Raw Black Pan 1" Medium 1" Well Done U= 10, L=10, M= 03 U= 10, L=10, M= 03 8:00 9:00 1 1 Thawed, Raw Black Pan 1" Medium 1" Well Done U= 10, L=10, M=
MEATS Food Settings Time Pieces Temperature Pan U= 10, L=10, M= 05 U= 10, L=10, M= 05 6:00 7:00 1 1 Thawed, Raw Black Pan /2" Medium /2" Well Done U= 10, L=10, M= 05 U= 10, L=10, M= 05 7:00 8:00 2 2 Thawed, Raw Black Pan /4" Medium /4" Well Done U= 10, L=10, M= 05 U= 10, L=10, M= 05 9:00 10:00 1 1 Thawed, Raw Black Pan U= 10, L=10, M= 05 U= 10, L=10, M= 05 10:00 11:00 2 2 Thawed, Raw Black Pan 1" Medium 1" Well Done U= 10, L=10, M= 05 U= 10, L=10, M= 05 9:00 10:00 1 1 Thawed,
SANDWICHES Food Settings Time Pieces Temperature Pan Burritos U= 10, L=00, M= 10 U= 10, L=00, M= 10 3:30 8:00 1 4 Frozen Frozen Black Pan Black Pan Hamburger & Bun U= 08, L=06, M= 10 U= 08, L=06, M= 10 2:30 3:30 1 3 Frozen Frozen Black Pan Black Pan Corn Dogs U= 10, L=01, M= 03 U= 10, L=01, M= 03 4:00 6:00 1 4 Frozen Frozen Black Pan Black Pan Grilled Meat Cheese U= 08, L=08, M= 00 U= 08, L=08, M= 00 4:15 5:15 1 4 Thawed Thawed Black Pan Black Pan Hot Sub U= 10, L=06, M= 03 U=
NOTES FORM 31174 (Nov.