
Hot Beverage Maker User Manual


ELECTRIC COUNTER TOP TILTING KETTLES - REMOVAL AND REPLACEMENT OF PARTS
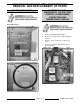
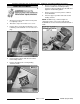
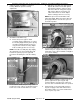
C. Remove kettle support and bearing
housing assembly from support shaft.
10. Pull kettle assembly away from control box to
disengage support shaft from inner bearing and
pivot stop collar. Slide kettle onto the 2x4
blocks.
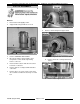
A. Pull lead wire bundle thru inner bearing
and pivot stop collar during removal.
NOTE: If support shaft of kettle assembly does
not easily disengage, apply force between
control box housing and kettle assembly to
release pivot stop collar. The support shaft
should slide out of inner bearing easily.
11. If re-installing kettle assembly, proceed to
Installation in this section. If installing a
replacement kettle assembly, remove
components as outlined below from old kettle
assembly for re-use.
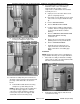
A. Open pressure relief valve until reservoir
jacket is completely vented.
B. Place kettle on floor with the pressure relief
valve and reservoir jacket fill elbow facing
up.
C. Remove BOTTOM COVER.
D. Remove WATER LEVEL PROBE.
E. Position kettle assembly to drain fluid into
container. Remove 1/2" pipe plug from the
reservoir jacket fill elbow to facilitate
draining.
F. Remove TEMPERATURE SENSOR AND
PRESSURE SWITCH including
condensate coil.
G. Remove pressure relief valve assembly
plumbing and reservoir jacket fill elbow.
H. Remove HEATING ELEMENT.
I. Install all removed components onto
replacement kettle. Clean threads and
apply sealant before re-installing pipe
fittings.
Installation
NOTE: Bearings and shaft seal are self aligning for
easy installation. Bearings do not require lubrication.
1. Place kettle assembly on 2x4 blocks and align
support shaft to shaft seal. Pull lead wire bundle
thru shaft seal and inner bearing.
2. Push kettle assembly support shaft thru shaft
seal and inner bearing.
F35496 (August 2009)Page 9 of 28