
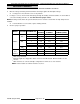
User Guide


ELECTRIC COUNTER TOP TILTING KETTLES - REMOVAL AND REPLACEMENT OF PARTS
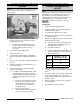
NOTE: Allow cleaner to fully evaporate before
applying primer. Spay primer on the threads and
allow to dry for 60 seconds. Shake Loctite 242 bottle
thoroughly to mix then apply several drops of the
threadlocker to threads. Do not allow the tip of bottle
to touch a primed surface as it will activate the
Loctite 242 in the bottle.
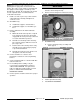
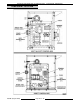
9. Install set screws on pivot stop collar. Hold the
collar against inner bearing and tighten set
screws to secure.
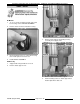
10. On K20ETT only.
A. Install kettle support to shaft and base.
B. Install kettle support cover and tilt stop to
base.
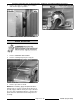
11. Remove 2x4 blocks from underneath kettle
assembly.
A. With kettle in full vertical position, verify tilt
lock operation. The pivot stop pin should
engage with the slot in pivot stop collar and
not catch or bind when operated.
B. Tilt kettle to horizontal position and verify
pivot stop pin engages with the next slot in
pivot stop collar.
C. Return kettle to full vertical position. Verify
the kettle pour stop pin engages properly
to prevent backwards tilt.
D. Tilt kettle and verify pour stop pin does not
rub against control box housing.
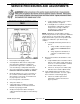
12. Connect lead wires to contactors and
temperature control then connect 4 pin wiring
harness.
13. Secure lead wire bundle to control box with wire
tie then install cover.
14. If re-installing kettle assembly, verify the
reservoir jacket is maintaining a vacuum as
outlined under VENTING. If a replacement
kettle assembly was installed, fill the reservoir
jacket as outlined under FILLING THE
RESERVOIR JACKET.
15. Connect power to machine and check for proper
operation.
BEARINGS
1. Remove KETTLE ASSEMBLY (procedure
includes outer bearing removal).
2. Remove inner bearing from control box housing.
3. On K20ETT Only.
A. Remove bearing housing assembly from
kettle support.
4. Install replacement bearing.
5. Install KETTLE ASSEMBLY.
F35496 (August 2009)Page 11 of 28