
User Guide


ELECTRIC COUNTER TOP TILTING KETTLES - SERVICE PROCEDURES AND ADJUSTMENTS
SERVICE PROCEDURES AND ADJUSTMENTS
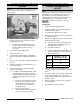
TEMPERATURE CONTROLLER
TEST
1. Place kettle in full upright position.
2. Set temperature dial to lowest setting. Kettle
must be below 110°F before verifying the
potentiometer output to the controller is good
over the full range of temperature dial travel.
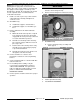
3. Access the temperature controller as outlined in
REMOVAL AND REPLACEMENT OF PARTS.
4. Check all lead wires for secure connections to
the controller terminals. Wiring harness lead
wires must be connected to T1-T2 and T3-T4
for proper input to controller.
5. Re-connect power to the machine.
6. Turn power switch on.
7. Verify temperature controller is receiving
120VAC at terminals T1-T2 and T3-T4 and
machine is properly grounded.
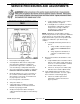
8. Slowly turn temperature dial to the highest
setting and monitor heat light over the full range
of travel.
A. Verify heat light (amber) comes on and
heating element is energized.
B. If heat light does not remain on or flashes
momentarily as temperature setting is
slowly increased, verify condition of
potentiometer as outlined under
POTENTIOMETER TEST.
NOTE: Temperature controller will de-energize
internal relay and turn off the output status LED if the
circuitry detects an open thermocouple. LED will
begin to flash 3 times, pause, then repeat the flash
sequence to indicate the open thermocouple
condition.
C. If heat light and heating element do not
turn on.
1) Verify condition of thermocouple as
outlined under THERMOCOUPLE
TEST.
2) Verify output from terminal T8 on
controller as outlined in the steps
below.
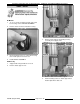
9. Disconnect lead wire from terminal T7 on the
controller.
A. Verify 120VAC between lead wire from T7
and X1 on the output of main transformer.
If correct, re-connect lead wire to terminal
T7 and continue with procedure.
B. If incorrect, check pressure switch (1PS)
and water level controller (WLC LLCO).
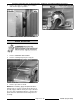
10. Verify 120VAC between T8 and X1 on the
output of main transformer. If correct, output
from controller is functioning properly.
A. If incorrect, install a replacement
temperature controller and check for
proper operation.
F35496 (August 2009) Page 14 of 28