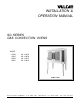
INSTALLATION & OPERATION MANUAL SG SERIES GAS CONVECTION OVENS MODEL SG4D SG4C SG6D SG6C ML-114875 ML-114876 ML-114877 ML-114878 MODEL SG4D VULCAN-HART COMPANY, FORM 31024 Rev. B (Aug. 2000) P.O. BOX 696, LOUISVILLE, KY 40201-0696, TEL. (502) 7 7 8 - 2 7 9 1 www.vulcanhart.
IMPORTANT FOR YOUR SAFETY THIS MANUAL HAS BEEN PREPARED FOR PERSONNEL QUALIFIED TO INSTALL GAS EQUIPMENT, WHO SHOULD PERFORM THE INITIAL FIELD START-UP AND ADJUSTMENTS OF THE EQUIPMENT COVERED BY THIS MANUAL. POST IN A PROMINENT LOCATION THE INSTRUCTIONS TO BE FOLLOWED IN THE EVENT THE SMELL OF GAS IS DETECTED. THIS INFORMATION CAN BE OBTAINED FROM THE LOCAL GAS SUPPLIER.
TABLE OF CONTENTS GENERAL . . . . . . . . . . . . . . . . . . . . . . . . . . . . . . . . . . . . . . . . . . . . . . . . . . . . . . . . . . . . 4 INSTALLATION . . . . . . . . . . . . . . . . . . . . . . . . . . . . . . . . . . . . . . . . . . . . . . . . . . . . . . . 4 Unpacking . . . . . . . . . . . . . . . . . . . . . . . . . . . . . . . . . . . . . . . . . . . . . . . . . . . . . Location . . . . . . . . . . . . . . . . . . . . . . . . . . . . . . . . . . . . . . . . . . . . . . . . . . . . . . .
Installation, Operation and Care of SG4D, SG4C, SG6D & SG6C GAS CONVECTION OVENS KEEP THIS MANUAL FOR FUTURE USE GENERAL Model SG4D, SG4C, SG6D and SG6C are equipped with a two-speed 1/2 HP (0.37 kw) electric motor, porcelain interior, and two 30,000 BTU/hr burners as standard equipment. A power level control permits variable burner input from 15,000 BTU/hr to 60,000 BTU/hr. Ovens are furnished with five nickel plated oven racks and have eleven rack positions. Oven cool switch allows rapid cool down.
Carefully unpack oven and place in a work-accessible area as near to its final installed position as possible. Do not use the doors or their handles to lift the oven. LOCATION The equipment area must be kept free and clear of combustible substances. When installed, minimum clearance from combustible construction must be 1" (2.5 cm) at the left side, 4" (10 cm) at the right side, and 6" (15 cm) at the rear.
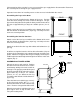
If disconnection of the restraint is necessary, turn off the gas supply before disconnection. Reconnect the restraint prior to turning the gas supply back on. Separate instructions for installing casters to the oven are included with the casters. Assembling the Legs to the Oven BACK The legs must be installed on the bottom of the oven. Position oven on its back, taking care not to scratch or damage it.
Remove the rear panel from the upper oven. Install the two-piece stacking common flue (Fig. 3) with the four screws provided. Replace the upper oven's rear panel. Connect the piping between the upper and lower oven. Pipe compound must be resistant to the action of propane gases. The manual gas valve, located behind the small door in the lower front panel, should remain off until all electrical and gas connections are made and the ovens are ready to be used.
Natural gas pressure regulators are preset for 3.5" W.C. (Water Column) (0.9 kPa); propane gas pressure regulators are preset for 10" W.C. (2.5 kPa). WARNING: PRIOR TO LIGHTING, CHECK ALL JOINTS IN THE GAS SUPPLY LINE FOR LEAKS. USE SOAP AND WATER SOLUTION. DO NOT USE AN OPEN FLAME. After piping has been checked for leaks, all piping receiving gas should be fully purged to remove air. TESTING THE GAS SUPPLY SYSTEM When gas supply pressure exceeds 1⁄2 psig (3.
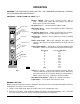
OPERATION WARNING: THE OVEN AND ITS PARTS ARE HOT. USE CARE WHEN OPERATING, CLEANING, OR PERFORMING ANY MAINTENANCE. CONTROLS — Models SG4D and SG6D (Fig. 4) Master Switch • Turns oven control circuits ON or OFF. • OVEN COOL allows the fan motor to run with the doors ajar to speed oven cooling. MASTER SWITCH ON LIGHT HEAT LIGHT NO IGNITION LIGHT MASTER SWITCH OVEN COOL ON OFF ON HEAT IGNITION THERMOSTAT 350 325 THERMOSTAT On Light (Amber) • Lit when Master Switch is ON.
LIGHTING THE SG4D AND SG6D OVENS 1. Turn the main gas supply ON. 2. Turn the gas control valve (located behind the small door on the lower front panel) ON. 3. Push the Master Switch ON and turn Thermostat to its maximum setting. Both the ON and HEAT lights should come on. If HEAT light is not on, make sure the oven door(s) are closed. 4. If the oven fails to light, the red No Ignition light will be lit and remain on. Push the Master Switch OFF. Turn gas off. 5.
CONTROLS — Models SG4C and SG6C Built before October 1999 (Fig. 5) THERMOSTAT CONTROL TEMPE RATU RE THERMOSTAT CONTROL HEAT READ Y Temperature Display (When not timing product, displays set cook temperature while roast temperature LED is lit and the actual oven temperature for 10 seconds after the Thermometer Button is pushed). ROAST HOLD TIME /P OWER LEVEL COOK TIME TIME / POWER LEVEL CONTROL START STOP POWE R LEVEL GENTL E BAKE 2 SPEED FAN - HI / LO FAN SPEED 1.
3. When the power level indicator is lit, the roast power setting will be displayed and can be adjusted. Power level settings are changed using the Time / Power Level Knob. 4. Cook time cannot be adjusted using the Time / Power Level Knob, if the power level indicator is not lit. 5. It is not possible to select the Hold mode using the Hold Button. 6. The time displayed is the time counted down from the initial cook time set. Roast Button 1. Lights the roast mode indicator.
Power Level Indicator • When lit, indicates the power level can be changed. 1. Displays roast power level when in the Roast mode (Roast Button indicator is lit). 2. Displays hold mode power level when in the hold mode (Hold Button indicator is lit). Gentle Bake Button • Use when cooking delicate product, such as strudel, muffins, cupcakes, meringue pies, etc., to keep product from forming waves on the top. Toggles between the selection of gentle bake mode and no gentle bake mode.
LIGHTING THE SG4C AND SG6C OVENS 1. Turn gas supply ON (if required). 2. Turn the gas control valve (located behind the small door on the lower front panel) ON. 3. Push Master Switch to the ON position and set Thermostat to its maximum setting. The Heat light should come on. If Heat light is not on, make sure door is closed. 4. If the oven fails to light, push Master Switch to the OFF position. Wait 5 minutes before retrial.
CONTROLS — Models SG4C and SG6C Built after October 1999 Always displays [HR:Min] when setting the Time. Displays [HR:Min] if the countdown time is more than 1 Hour. Displays [Min:Sec] if the countdown time is less than 1 Hour. Displays Temperature in °F. R&H MODE Indicates the oven is in the Roast and Hold Mode. OVEN READY Indicates the oven is preheated and ready for cooking.
MANUALLY SETTING THE COOK TIME, TEMPERATURE, AND POWER LEVEL To Set the Cook Time • Press the SET button. Press the TIME button. Tine displays to indicate TIME. • Use the Up and Down Arrow keys to increase or decrease the displayed Cook Time (HR:min). • Press the SET button again to save the Time setting in the computer. To Set the Temperature • Press the SET button. Press the TEMPERATURE button; StPt displays to indicate Setpoint.
Always Set the Temperature Before Setting the Time • Press the SET button. Press the TEMPERATURE button; StPt displays. Use the Up and Down Arrow keys to increase or decrease the Temperature. To save, press the SET button again. At startup, the display will initially show a GROWING BAR. When the oven temperature reaches the Set Point, the set temperature displays.
ROAST AND HOLD OPERATION Roast and Hold cooks the product in two stages. During First Stage Cooking, the oven temperature is regulated by the Roast thermostat for the amount of time set on the Timer. After the lapsed time counts down to 00:00, Second Stage Cooking begins. During Second Stage Cooking, the burners are off as the temperature in the oven declines to the Hold Temperature. The doors should remain closed during Second Stage Cooking. When the Hold Temperature is reached, cooking is done.
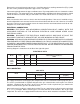
RACK ARRANGEMENTS All models are supplied with five racks and have a maximum operating capacity of six racks per oven. The eleven-position rack supports provide for flexibility and proper rack spacing. The following arrangements are recommended. The position numbers are in numerical sequence starting at the bottom (Fig. 6). Arrangement #1 — Five racks in Positions #2, #4, #6, #8, and #10 are for oven broiling, cookies or reconstitution of frozen lunches at maximum capacity.
RECOMMENDED TEMPERATURE, TIME, AND POWER LEVEL SETTINGS FOR BAKING PRODUCT TEMP. °F (°C) TIME IN MINUTES NO. OF RACKS 325-360 (162-182) 335-350 (168-177) 20 to 23 22 to 25 300-325 (149-162) POWER LEVEL SETTINGS SG4D, SG6D SG4C, SG6C 5 4 7 to 4 6 to 4 68 to 45% 60 to 45% 25 to 35 4 6 to 4 60 to 45% 300-325 (149-162) 25 to 35 3 6 to 4 60 to 45% Angel Food or Sponge Cakes Sheet Pans 18x26x1" (45.7x66x 2.5 cm) Scaled 5 to 6 lb. (2.3 to 2.
RECOMMENDED TEMPERATURE, TIME, AND POWER LEVEL SETTINGS FOR BAKING TEMP. °F (°C) TIME IN MINUTES NO. OF RACKS Sweet Rolls & Danish Pastry 325-375 (162-190) 5 to 15 Biscuits — Rolled 1⁄2" (1.3 cm) Thick 350-400 (177-204) 5 to 15 Muffins 325-375 (162-190) 6 to 18 335-400 (168-204) PRODUCT Corn Bread 18x26x1" (46 x 66 x 2.5 cm) Pan, 5-7 lb. (2.3-3.2 kg) per pan 18x26x2" (46 x 66 x 5 cm) Pan, 8-20 lb. (3.
CASSEROLES & MISCELLANEOUS PRODUCTS PRODUCT Food Service Pans 2" to 3" (5.1 to 7.6 cm) deep 3" to 4" (7.6 to 10.1 cm) deep Ramekins or Foil Pans Up to 11⁄ 2" (3.8 cm) deep Frozen TIME IN MINUTES NO. OF RACKS 325-375 (162-190) 325-375 (162-190) 15 to 25 20 to 35 350-400 (177-204) 5 to 6 °F TEMP. (°C) POWER LEVEL SETTINGS SG4D, SG6D SG4C, SG6C 2 to 4 7 to 4 68 to 45% 4 to 5 2 to 4 10 to 7 7 to 6 100 to 68% 68 to 60% 10 to 15 Baked Potatoes 120 count per 50 lb. (22.7 kg) 100 count per 50 lb.
CLEANING WARNING: DISCONNECT THE ELECTRICAL POWER SUPPLY AND PLACE A TAG AT THE DISCONNECT SWITCH INDICATING THAT YOU ARE WORKING ON THE OVEN BEFORE CLEANING. Allow the oven to cool before cleaning. Snorkel Tube The Snorkel tube opening should never be blocked. If usage of aluminum foil is a common practice during the operation of this oven, be sure to periodically check the Snorkel tube for foil particles. The Snorkel tube should be kept clean at all times for proper operation of the oven.
TROUBLESHOOTING PROBLEM POSSIBLE CAUSE SUGGESTED CORRECTIVE Uneven browning or overcooking at edges of pans. 1. Power level control setting too high. 1. Reduce power level control setting. (Refer to Cooking Guidelines.) 2. Too many racks used. 2. Reduce number of racks used. Product pulling to edge of pan or spilling. 1. Oven out of level. 2. Sheet pans warped. 1. Level oven, on the racks, from side to side and front to back.