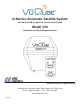
In-Motion Automatic Satellite System with built-in DVB for positive satellite identification Model V30 Installation and Operating Instructions ® Satellite Solutions for Mobile Markets 11200 Hampshire Avenue South, Bloomington, MN 55438-2453 Phone: (800) 982-9920 Fax: (952) 922-8424 www.kingcontrols.
IMPORTANT! The satellite TV market is expanding and changing. The information in this manual was accurate at the time of printing. If your VuQube does not operate as outlined in this manual please call King Controls at (800) 982-9920 or visit our website at www.kingcontrols.com. This VuQube is factory pre-set for DIRECTV® standard digital programming broadcast from the 101° W satellite.
SECTION 1 INTRODUCTION The VuQube V30 Automatic Satellite System provides simple, one-touch operation for easy access to all your favorite satellite TV channels. It is a full featured dish system with automatic satellite acquisition, satellite switching and in-motion capabilities.
SECTION 2 INSTALLATION TOOLS AND MATERIALS REQUIRED 1. Read thru the instructions and make sure you have all the tools and materials required to complete the installation, including: • mounting bracket (sold separately - for more information call King Controls at 800-982-9920 or visit our website at www.kingcontrols.
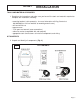
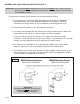
ANTENNA UNIT LOCATION AND INSTALLATION (FIG 3.) IMPORTANT! The antenna unit MUST be mounted to the air ride cab, NEVER to any structure mounted directly to the frame (for example the headache rack). Mounting directly to the frame will void the VuQube warranty. 3.
Note: The installer is responsible for determining the most appropriate fasteners to secure the mounting bracket to the cab, and they should always be used in combination with a cab compatible sealant. IMPORTANT! The installer is responsible for weatherproofing all holes with sealant. 4. Mount the bracket to the cab (see bracket instructions-bracket sold separately). Remove the nuts from the threaded studs on the bottom of the antenna unit.
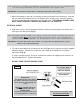
7. Run wiring from the antenna unit to the location where it will be fed into the vehicle. Make sure external wiring is tied down securely (to a hand rail for example) (Fig. 5). 8. Drill 3/4” hole through the cab or use an existing hole to feed the wiring inside the cab. Seal opening with cab compatible sealant so that it is entirely waterproof (inside and outside of the hole). Fig.
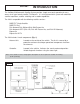
INTERNAL WIRING 9. Inside the vehicle, make the connections as shown in (Fig. 6), keeping in mind the following important points: a) The connection between the antenna unit and the receiver must be a direct connection with no devices in between. b) Power connection must be a non-shared circuit. Excessive current draw on the circuit will cause the unit to operate improperly. Power and ground connections must be made after the main harness is plugged into the antenna unit.
This page intentionally left blank.
SECTION 3 VUQUBE ANTENNA CONFIGURATION The VuQube Model V30 Automatic Satellite System is factory pre-set for DIRECTV standard digital programming broadcast from the 101° W satellite. If you also receive your local channels from DIRECTV’s 119 satellite or if you subscribe to Dish Network or ExpressVu programming, you must use the VuQube hand held controller to re-configure the antenna to work with your satellite service.
STEP 1: SATELLITE SERVICE OPTIONS DIRECTV Single Satellite 101 Receive programming from the DIRECTV 101 satellite only. DIRECTV Plus: 101, 119 Automatically switch between the 101 and 119 satellites for DIRECTV. IMPORTANT! This VuQube is factory ready to receive available HDTV programming from DIRECTV Ku band satellites at 101° and 119°. It will not receive channels broadcast from DIRECTV’s Ka band satellites at 99° and 103°.
STEP 1: SATELLITE SERVICE OPTIONS DISH NETWORK Dish 500 Automatically switch between the 110 and 119 satellites for Dish Network by using the receiver’s remote control. Dish 500 Eastern Arc Automatically switch between the 62 and 72 satellites for Dish Network by using the receiver’s remote control.
STEP 2: DIRECTV ANTENNA CONFIGURATION Single Satellite 101 The VuQube is factory pre-set for the DIRECTV 101 satellite. Unless the antenna has been configured for another option since leaving the factory, PERFORM STEP 5 ONLY. 1. On the VuQube controller, press and release the ON button. Wait for the status light to flash orange, and then WAIT 4 MORE SECONDS. 2. Press and release the ON button 16 times. The status light starts rapidly flashing green and red. 3. Press and hold the button for 4 seconds.
STEP 2: DISH NETWORK ANTENNA CONFIGURATION DISH 500 (satellites 110, 119) 1. On the VuQube controller, press and release the ON button. Wait for the status light to flash orange, and then WAIT 4 MORE SECONDS. 2. Press and release the ON button 12 times. The status light starts rapidly flashing green and red. 3. Press and hold the button for 4 seconds. The status light will turn orange for 1 second, and then start flashing green or red. 4. Press OFF. 5.
DISH NETWORK ANTENNA CONFIGURATION-continued DISH HD (satellites 110, 119, 129) 1. On the VuQube controller, press and release the ON button. Wait for the status light to flash orange, and then WAIT 4 MORE SECONDS. 2. Press and release the ON button 20 times. The status light starts rapidly flashing green and red. 3. Press and hold the button for 4 seconds. The status light will turn orange for 1 second, and then start flashing green or red. 4. Press OFF. 5.
DISH HD Alternate (satellites 62, 110, 119) 1. On the VuQube controller, press and release the ON button. Wait for the status light to flash orange, and then WAIT 4 MORE SECONDS. 2. Press and release the ON button 16 times. The status light starts rapidly flashing green and red. 3. Press and hold the button for 4 seconds. The status light will turn orange for 1 second, and then start flashing green or red. 4. Press OFF. 5.
STEP 2: BELL EXPRESSVU ANTENNA CONFIGURATION Standard Digital (satellite 91) 1. On the VuQube controller, press and release the ON button. Wait for the status light to flash orange, and then WAIT 4 MORE SECONDS. 2. Press and release the ON button 8 times. The status light starts rapidly flashing green and red. 3. Press and hold the button for 4 seconds. The status light will turn orange for 1 second, and then start flashing green or red. 4. Press OFF. 5.
This page intentionally left blank.
STEP 3: DISH AND EXPRESSVU CHECK SWITCH PROCEDURE IMPORTANT! YOU MUST HAVE COMPLETED THE ANTENNA CONFIGURATION BEFORE RUNNING THE CHECK SWITCH. For automatic satellite switching, King Controls recommends using a Dish Network model 311 receiver for Dish 500, and a Dish Network model VIP211 or a VIP211k HDTV receiver for Dish HD/HD Eastern Arc/HD Alternate. Do not use dual tuner receivers or recorders. If you do not have a clear view of the satellites, the switch will not load.
7. When test is complete, a screen similar to one of the following should appear: (Screen graphics may vary.) DISH 500 DISH 500 EASTERN ARC MUST SHOW “SW21” NO “X”s DISH HD DISH HD EASTERN ARC NO “X”s MUST SHOW “SW64” EXPRESSVU 91 EXPRESSVU HDTV 82/91 MUST SHOW “SW21” NO “X”s “NO SWITCH DETECTED” or “INSTALLED DEVICE UNKNOWN” If indicated results are not obtained, go back to Step 3 and run test again. Contact King Controls if the check switch fails to load after 4 attempts. 8.
SECTION 4 OPERATION IMPORTANT: There must be a clear “line of sight” to the southern sky. Mountains, buildings, trees, telephone poles, etc. can all block the satellite signal from reaching the dish. The distance driven since last performing a search may affect how long it takes the VuQube to find the satellite. Satellite TV and receiver technology are constantly changing. If you experience difficulty go to www.kingcontrols.com or contact the King Controls Service Department at (800) 982-9920.
IN-MOTION OPERATION 1. Perform a stationary search as shown on the previous page. 2. Allow your programming to download. 3. Press STATUS LIGHT SYSTEM STATUS alternating colors initializing GREEN-flashing potential satellite found GREEN-steady target satellite found (tracking) When the status light is steady green, the target satellite is found and the unit is tracking. ALTERNATE SEARCH METHOD (Above method is the manufacturer’s preferred method) 1. Press ON. 2. Press .
DISH NETWORK HDTV: Changing the Satellite Trio Dish HD Trio and Dish HD Eastern Arc Trio IMPORTANT! Perform this procedure only if you are unable to receive all of your HD programming in a particular area of the country. You cannot change trios if the antenna has not been initially configured for Dish HD or Dish HD Eastern Arc (page 14). You can only switch between the Dish HD and Dish HD Eastern Arc Trios. The Dish HD Alternate Trio is not included in this function.
Change from: DISH HD Eastern Arc Trio (62, 72, 77) To: DISH HD Trio (110, 119, 129) 1. On the VuQube controller, press and release the ON button. Wait for the status light to flash orange, and then WAIT 4 MORE SECONDS. 2. Press and release the ON button 4 times. The status light starts rapidly flashing green and red. 3. Press and hold the button for 4 seconds. The status light will turn orange for 1 second, and then start flashing green or red. 4. Press OFF. GO TO PAGE 18 AND RUN THE CHECK SWITCH.
SECTION 5 SYMPTOM TROUBLESHOOTING POSSIBLE REASON COURSE OF ACTION VuQube does not find satellite. (STATUS light flashes red or green.) Did not hold ON button for 3 FULL SECONDS. Hold ON button for 3 FULL SECONDS. STATUS light flashes orange. Before search: bad coax connection. Call King Controls. After unsuccessful search (approximately 25 minutes): obstruction in line of sight between VuQube and satellite. Move vehicle so VuQube has unobstructed view of southern sky.
SECTION 6 MAINTENANCE The VuQube Satellite System has been designed to be maintenance and trouble free. For optimum signal strength, keep the enclosure clean from dirt, bugs, and other debris. Periodic washing of the enclosure with mild soap and water is recommended. If you plan on not using your VuQube for long periods of time, it is recommended that the system be put through a search procedure on a quarterly basis to keep all moving parts in good working order.
SECTION 7 LIMITED WARRANTY Every VuQube Satellite System is thoroughly inspected and tested before leaving the factory. It is covered by a one year parts limited warranty from the date of original purchase. This warranty does not cover installation and external wiring or refurbished units. Should any trouble develop during the warranty period, contact King Controls. Only King Controls may perform warranty evaluations and repairs.
Notes: Page 27
Notes: Page 28
11200 Hampshire Avenue South, Bloomington, MN 55438-2453 Phone: (800) 982-9920 Fax: (952) 922-8424 www.kingcontrols.