Portable Automatic Satellite TV Antenna VQ2100 Owner’s Manual 11200 Hampshire Avenue South, Bloomington, MN 55438 PH 952.922.6889 || FAX 952.922.8424 || kingcontrols.
IMPORTANT! The satellite TV market is expanding and changing. The information in this manual was accurate at the time of printing. If your KING™ Flex® Portable Satellite Antenna does not operate as outlined in this manual, please call KING at (952) 922-6889 or visit our website at www.kingcontrols.com. KING is not responsible for changes outside of its control. Please read the appropriate sections of this manual before using your new KING Flex. ...
This page intentionally left blank.
DIRECTV THANK YOU for your purchase of the KING Flex Portable Automatic Satellite TV Antenna! The KING Flex portable satellite antenna will easily lock onto the appropriate satellites necessary to receive your favorite SD programming from DIRECTV. DIRECTV subscribers, please use the information in this section to operate your system. You will also find helpful information on troubleshooting, security, the warranty, and KING Flex mounting brackets in the Appendix at the end of this manual.
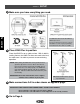
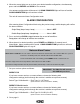
Section 1 SETUP 1 Make sure you have everything you need. 2 DIRECTV The KING Flex will not work with DIRECTV SWM only receivers. Do not use dual tuner receivers or receivers with built-in recorders if your programming is broadcast from more than one satellite. 2 Place KING Flex in position. lace the KING Flex on a stable surface. With its built-in P leveling feature, the KING Flex does not need to be level, but make sure it is stable to prevent movement during operation.
B C D E DIRECTV A 3
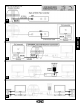
Section 2 ANTENNA AND ALARM CONFIGURATION NOTE: If you have DIRECTV SD service you do not need to configure your antenna. Go to step 7 on next page. If you wish to disable the alarm feature, complete all of the steps on these two pages. ANTENNA CONFIGURATION The KING Flex is factory pre-set for DIRECTV standard digital programming broadcast from the 101° W satellite (DIRECTV SD).
4. When the correct lights turn on to show your desired satellite configuration, simultaneously press and hold POWER and SCAN for five seconds. Your antenna configuration will be saved. All SCAN PROGRESS lights will turn off and the COAX CONNECTION light will continue to flash. The unit will now enter Alarm Configuration mode. ALARM CONFIGURATION After entering Alarm Configuration Mode using the previous steps, audible beeping will confirm the alarm condition: Single Beep (beep...beep...beep)...........
Section 3 OPERATION IMPORTANT! T he KING Flex will not receive channels broadcast from DIRECTV’s Ka band satellites at 99° and 103°. The KING Flex will not work with SWM only receivers. NOTE: Your local channels may not be available when traveling outside your home area. IMPORTANT! The antenna unit requires a “direct line of sight” to the satellites for signal reception. Any tall objects can block the signal from reaching the antenna. DIRECTV 6 POWER UP 1.
SCAN FOR SATELLITES 4. Press and hold SCAN for 3 seconds. • The antenna will scan for the selected satellites. The four SCAN PROGRESS lights will cycle on and off to indicate a scan is in progress. • As satellites are located, the corresponding SCAN PROGRESS lights will turn on (see below). • When scan is complete, the appropriate lights will turn on to show which satellites were found. • Wait for the program guide to download and then select your desired channel.
This page intentionally left blank.
DISH THANK YOU for your purchase of the KING Flex Portable Automatic Satellite TV Antenna! The KING Flex portable satellite antenna is easily configured to lock onto the appropriate satellites necessary to receive your favorite SD and HD programming from DISH. DISH subscribers, please use the information in this section to operate your system. You will also find helpful information on troubleshooting, security, the warranty, and KING Flex mounting brackets in the Appendix at the end of this manual.
Section 1 SETUP 1 Make sure you have everything you need. Do not use dual tuner receivers or receivers with built-in recorders if your programming is broadcast from more than one satellite. 2 Place KING Flex in position. DISH 2 lace the KING Flex on a stable surface. With its built-in P leveling feature, the KING Flex does not need to be level, but make sure it is stable to prevent movement during operation.
A B DISH 3 C If using a second receiver, it will be connected in Section 5 on page 12. (2nd receiver not recommended for Tailgater Mode.
Section 2 ANTENNA AND ALARM CONFIGURATION ANTENNA CONFIGURATION You must configure the antenna to work with your DISH satellite service. Doing this will allow the KING Flex to lock on the correct satellites to receive your programming and also enable automatic satellite switching via the receiver’s remote control for multi-satellite service. Antenna configuration is a one time procedure that MUST BE COMPLETED before using your KING Flex antenna. To configure your antenna, do the following: 1.
4. When the correct lights turn on to show your desired satellite configuration, simultaneously press and hold POWER and SCAN for five seconds. Your antenna configuration will be saved. All SCAN PROGRESS lights will turn off and the COAX CONNECTION light will continue to flash. The unit will now enter Alarm Configuration mode. ALARM CONFIGURATION After entering Alarm Configuration Mode using the previous steps, audible beeping will confirm the alarm condition: Single Beep (beep...beep...beep)...........
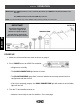
Section 3 RECEIVER CONFIGURATION IMPORTANT! Y OU MUST HAVE COMPLETED THE ANTENNA CONFIGURATION ON PAGES 4-5 BEFORE CONTINUING BELOW. NOTE: For automatic satellite switching, KING recommends using a DISH model 311 receiver for DISH SD. For DISH SD and HD, you can use receiver models ViP211z, ViP211k, ViP211, and 411, but we highly recommend using Tailgater mode with these receivers for simplified operation with the receiver’s built in Tailgater interface.
3. On the receiver remote, press MENU, 6, 1, 1. 4. Highlight “Check Switch.” Press SELECT on your remote. ome receivers may prompt you to select NOTE: S “Check Switch” a second time to initiate the test. Screen graphics may vary. 5. Make sure “SuperDISH” and “Alternate” boxes are NOT selected. ot all receivers will display a screen with NOTE: N options that include “SuperDISH” and “Alternate” boxes. 6. Highlight “Test.” Press SELECT on your remote. 7.
DISH SD and HD DISH SD and HD Alternate NO “X”s MUST SHOW “SW64” If the indicated results are not obtained, go back to Step 3 and run test again. Contact KING if the check switch fails to load after 4 attempts. 8. When the installation summary shows the successful check switch test results, save the settings, exit to the main menu screen and wait for programming to download. ISH SD and HD and DISH SD and HD Alternate only: Verify that your saved settings show 9. D your desired satellite trio: 61.
This page intentionally left blank.
Section 4 OPERATION IMPORTANT! I f you chose Tailgater Mode do not use these operating instructions. Go to page 14. Your local channels may not be available when traveling outside your home area. IMPORTANT! The antenna unit requires a “direct line of sight” to the satellites for signal reception. Any tall objects can block the signal from reaching the antenna. POWER UP 10 1. Make sure all connections are made as shown on page 3. DISH 2. Press POWER to turn on KING Flex controller.
SCAN FOR SATELLITES 4. Press and hold SCAN for 3 seconds. • The antenna will scan for the selected satellites. The four SCAN PROGRESS lights will cycle on and off to indicate a scan is in progress. • As satellites are located, the corresponding SCAN PROGRESS lights will turn on (see below). • When scan is complete, the appropriate lights will turn on to show which satellites were found. • Wait for the program guide to download and then select your desired channel.
Section 5 2ND RECEIVER OPERATION INITIAL SETUP FOR SECOND RECEIVER 1. With the second receiver disconnected from the antenna unit’s AUX port coax, use your DISH remote control and press MENU, 6, 1, 1 to display the Point Dish screen. Second receiver must be disconnected during initial check switch test. 2. Use the arrow buttons on the remote to highlight “Check Switch.” Press SELECT on your remote. DISH 12 3. Verify “SuperDISH” and “Alternate” are not selected. Verify “Test” is highlighted.
5. When test is complete, highlight “Save.” Press SELECT on your remote. Connect to AUX port. 6. After successfully saving the results, connect the second receiver to the AUX port. DOWNLOADING PROGRAMMING TO THE SECOND RECEIVER 1. With the second receiver now connected, and the antenna locked on (see OPERATION section), re-set the second receiver by pressing the POWER button on the front panel for 10 seconds. The TV picture will go away and should reappear within two minutes.
Section 6 TAILGATER MODE IMPORTANT! You must have chosen Tailgater Mode on pages 4-5. Your local channels may not be available when traveling outside your home area. Use these steps if your receiver is NEW AND UNACTIVATED. If it is not new, go to page 20. IMPORTANT! The antenna unit requires a “direct line of sight” to the satellites for signal reception. Any tall objects can block the signal from reaching the antenna. 14 DISH 1.
4. Point your receiver’s remote at the front of the receiver and press SAT. Press RECORD. When a number appears in the box, verify “CONTINUE” is highlighted. Press SELECT on your remote. The Portable Antenna Setup screen will display. DISH 15 5. Use the arrow buttons on your remote to highlight the letter group that includes the first letter of the state you are currently in. Press SELECT.
6. Highlight the state you are currently in from the state menu. Press SELECT. 7. Verify “Scan” is highlighted. Press SELECT. The scan will begin and may take up to several minutes to complete. DISH 16 The receiver will update software for DISH programming This step may take 20-25 minutes.
8. The receiver will reset and the Mobile Antenna Setup Screen will appear. Choose your location again and initiate a second scan. The unit will scan a second time. When the scan is complete, the “Acquiring Signal” message will display. Acquiring the signal may take up to 5 minutes to complete.
9. After your receiver has acquired the signal, it is ready to be activated. If your receiver packaging has a specific phone number displayed, be sure to call this number to activate your service. Otherwise, call 1-800-333-DISH (3474) to activate. After your receiver is activated, the electronic program guide will download. This may take up to 5 minutes to complete (potentially longer if an external hard drive is connected). DISH 18 This completes the setup for new receivers.
This page intentionally left blank.
STANDARD TAILGATER OPERATION IMPORTANT! You must have chosen Tailgater Mode on pages 4-5. Your local channels may not be available when traveling outside your home area. If your receiver is NEW AND UNACTIVATED, start on page 14. IMPORTANT! The antenna unit requires a “direct line of sight” to the satellites for signal reception. Any tall objects can block the signal from reaching the antenna. DISH 20 1.
The Mobile Antenna Setup screen will be displayed on your TV. NOTE: If the Mobile Antenna Setup screen does not display, press MENU, 6, 1, 1 on your DISH remote. Highlight “Check Switch.” Press SELECT on your remote. 21 DISH The Mobile Antenna Setup screen should now display. 4. Use the arrow buttons on your remote to highlight the letter group that includes the first letter of the state you are currently in. Press SELECT on your remote.
5. Highlight the state you are currently in from the state menu. Press SELECT. 6. Verify “Scan” is highlighted. Press SELECT. DISH 22 The scan will begin and may take up to several minutes to complete. This screen will display during the scan. 7. When the scan is complete, the “Acquiring Signal” message will display. Acquiring the signal may take up to 5 minutes to complete.
8. After your receiver has acquired the signal, the electronic program guide will download. This may take up to 5 minutes to complete (potentially longer if an external hard drive is connected). OPERATING NOTES To turn the unit off at any time press POWER for 3 seconds. If your system is inactive for an extended period of time, you may need to call DISH Customer Service at 1-800-333-DISH (3474) to re-authorize your receiver.
This page intentionally left blank.
Bell TV THANK YOU for your purchase of the KING Flex Portable Automatic Satellite TV Antenna! The KING Flex portable satellite antenna is easily configured to lock onto the appropriate satellites necessary to receive your favorite SD and HD programming from Bell TV. Bell TV subscribers, please use the information in this section to operate your system. You will also find helpful information on troubleshooting, security, the warranty, and KING Flex mounting brackets in the Appendix at the end of this manual.
Section 1 SETUP 1 Make sure you have everything you need. Do not use dual tuner receivers or receivers with built-in recorders if your programming is broadcast from more than one satellite. 2 Place KING Flex in position. lace the KING Flex on a stable surface. With its built-in P leveling feature, the KING Flex does not need to be level, but make sure it is stable to prevent movement during operation.
A B If using a second receiver, it will be connected in Section 5 on page 10.
Section 2 ANTENNA AND ALARM CONFIGURATION ANTENNA CONFIGURATION You must configure the antenna to work with your Bell TV satellite service. Doing this will allow the KING Flex to lock on the correct satellites to receive your programming and also enable automatic satellite switching via the receiver’s remote control for multi-satellite service. Antenna configuration is a one time procedure that MUST BE COMPLETED before using your KING Flex antenna. To configure your antenna, do the following: 1.
4. When the correct lights turn on to show your desired satellite configuration, simultaneously press and hold POWER and SCAN for five seconds. Your antenna configuration will be saved. All SCAN PROGRESS lights will turn off and the COAX CONNECTION light will continue to flash. The unit will now enter Alarm Configuration mode. ALARM CONFIGURATION After entering Alarm Configuration Mode using the previous steps, audible beeping will confirm the alarm condition: Single Beep (beep...beep...beep)...........
Section 3 RECEIVER CONFIGURATION IMPORTANT! Y OU MUST HAVE COMPLETED THE ANTENNA CONFIGURATION ON PAGES 4-5 BEFORE CONTINUING BELOW. NOTE: If you do not have a clear view of the satellites, the switch will not load correctly. The SW21 switch is a receiver software configuration that is loaded into the receiver after successfully running a check switch test with the dish locked on and configured for the appropriate service.
3. On the receiver remote, press MENU, 6, 1, 1. 4. Highlight “Check Switch.” Press SELECT on your remote. ome receivers may prompt you to select NOTE: S “Check Switch” a second time to initiate the test. 5. Make sure “SuperDISH” and “Alternate” boxes are NOT selected. ot all receivers will display a screen with NOTE: N options that include “SuperDISH” and “Alternate” boxes. 6. Highlight “Test.” Press SELECT on your remote. The receiver will perform a check switch test.
Section 4 OPERATION NOTE: Dual tuner receivers or receivers with built-in recorders are not recommended and will not have full functionality when used with the KING Flex antenna. Your local channels may not be available when traveling outside your home area. IMPORTANT! The antenna unit requires a “direct line of sight” to the satellites for signal reception. Any tall objects can block the signal from reaching the antenna. POWER UP 1. Make sure all connections are made as shown on page 3. 2.
SCAN FOR SATELLITES 4. Press and hold SCAN for 3 seconds. • The antenna will scan for the selected satellites. The four SCAN PROGRESS lights will cycle on and off to indicate a scan is in progress. • As satellites are located, the corresponding SCAN PROGRESS lights will turn on (see below). • When scan is complete, the appropriate lights will turn on to show which satellites were found. • Wait for the program guide to download and then select your desired channel.
Section 5 2ND RECEIVER OPERATION INITIAL SETUP FOR SECOND RECEIVER 1. With the second receiver disconnected from the antenna unit’s AUX port coax, use your DISH remote control and press MENU, 6, 1, 1 to display the Point Dish screen. Second receiver must be disconnected during initial check switch test. 2. Use the arrow buttons on the remote to highlight “Check Switch.” Press SELECT on your remote. 3. Verify “SuperDISH” and “Alternate” are not selected. Verify “Test” is highlighted.
5. When test is complete, highlight “Save.” Press SELECT on your remote. Connect to AUX port. 6. After successfully saving the results, connect the second receiver to the AUX port. DOWNLOADING PROGRAMMING TO THE SECOND RECEIVER 1. With the second receiver now connected, and the antenna locked on (see OPERATION section), re-set the second receiver by pressing the POWER button on the front panel for 10 seconds. The TV picture will go away and should reappear within two minutes.
This page intentionally left blank.
APPENDIX TROUBLESHOOTING Page 2 Section 2 MOUNTING BRACKETS Page 3 Section 3 SECURITY FEATURE Page 4 Section 4 FCC GUIDELINES Page 4 Section 5 LIMITED WARRANTY Page 5 1 APPENDIX Section 1
Section 1 SYMPTOM No lights turn on. TROUBLESHOOTING POSSIBLE CAUSE No power to controller. COURSE OF ACTION Verify power supply is properly connected to KING Flex controller. Verify power supply is plugged into a 110-120 VAC power source. ERROR light and all 4 SCAN lights flash slowly. No satellites found. Line of sight obstructions. Move unit to have a better view of southern sky and rescan. Inclement weather can occasionally cause loss of signal. Wait till weather improves and rescan.
Section 2 MOUNTING BRACKETS NOTE: All brackets sold separately. For more information call KING at (952) 922-6889 or visit www.kingcontrols.com. IMPORTANT! KING Flex must not be on bracket while vehicle is in motion. IMPORTANT! KING Flex must not be on bracket while vehicle is in motion. The MB100 and MB101 VuQube Mounting Brackets are NOT compatible with the KING Flex without the use of the MB100-RETROFIT Kit. USE OF THESE BRACKETS WITHOUT THE MB100-RETROFIT KIT WILL VOID THE PRODUCT WARRANTY.
Section 3 SECURITY FEATURE The KING Flex can be secured to an object using a padlock and cable (not included) to deter theft. Section 4 FCC GUIDELINES This device complies with Part 15, sub-part B, of the FCC Rules. Operation is subject to the following two conditions: 1) This device must not cause harmful interference, and 2) This device must accept any interference received, including interference that may cause undesired operation.
Section 5 LIMITED WARRANTY Every new KING Flex Satellite System is thoroughly inspected and tested before leaving the factory, and is covered by the following one year parts limited warranty from the date of original purchase: • One year parts warranty: The customer is not responsible for the cost of replacement parts if the original part is determined to be defective under the terms of the warranty. The customer is responsible for the cost of replacement parts after one year.
APPENDIX NOTES 6
11200 Hampshire Avenue South, Bloomington, MN 55438 PH 952.922.6889 || FAX 952.922.8424 || kingcontrols.