/ 13
1. 2. 3. 4. 5. 6. 7. 8. Introduction .......................................................................................................... 3 Installation............................................................................................................ 4 2.1. 2.2. 2.3. 2.4. Providing a Power Source ...................................................................................................... 4 Providing an RS-232 Source ..........................................................
1. Introduction The world of home automation and integration has been growing at an enormous rate in recent years. Control has been integrated using everything from a universal remote control to a complete home automation system to a personal computer. The R2D7 is an interface that bridges from the RS-232 protocol to a single or multiple RP-Busses. RS-232 is a common protocol that is “spoken” by every personal computer and most home automation systems.
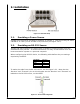
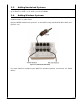
2. Installation Figure 2.0.1: Basic R2D7 Setup 2.1. Providing a Power Source A power source must be provided to the R2D7 on system 1. This source may be either a DCPM or an “EYE” port of and RP or RQ controller (see figure 2.0.1). 2.2. Providing an RS-232 Source The RS-232 source may be any device that is capable of communicating using the standard RS-232 protocol. As mentioned before, this may include devices such as a home automation system or a personal computer.
2.3. Adding Hardwired Systems When going from system ports other than system 1 on the R2D7, the connection may go to either an “EYE” or an “AUX” port on the RP60. 2.4. Adding Wireless Systems The R2D7 has the ability to control motors wirelessly using Radio Frequency (RF) modules when in radio mode. Plug the RFTM module into system 7 on the R2D7 using standard RP-Bus cable (see figure 2.4.1). Figure 2.4.
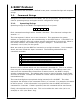
3. R2D7 Protocol Communication with the R2D7 is defined in two parts: command strings and response strings. 3.1. Command Strings Strings are not cases sensitive to the R2D7, but for our purposes, we will use lower case for operating strings and upper case for configuration strings. 3.1.1. Operating Strings Operating strings for the R2D7 are segmented into 5 or 6 parts: * 1 o 04 020 ; Each command must begin with a “header” character.
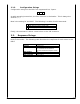
3.1.2. Configuration Strings Configuration strings for the R2D7 are segmented into 3 parts: * V ; As with operating instructions, the first character is the header. This is always the asterisk (“*”). Next is the setting for the R2D7. The following is a table of valid commands: V Print Version (followed by mode: R = Radio, B = Bus) R B Radio Mode (put system 7 in Radio mode) Bus Mode (put system 7 in Bus mode) Finally, the terminator is either a semi-colon or the “CR” character. 3.2.
4. Operating Mode – System 7 By default, system 7 is configured for radio mode. 4.1. Radio Mode As previously mentioned, the R2D7 is capable of controlling up to 420 unique motors. When using RF, this becomes 5940 motors. See “RR24 User’s Guide” and “RFTM User’s Guide” for more information on radio products. 4.1.1. Training the RR433 As with all other radio transmitters, before the RR433 will respond to commands from the R2D7’s RFTM, each RR433 that will be controlled by the R2D7 must be trained.
In our example from the previous section, we identified systems 12, 13, and 14. So, if we wanted to close all motors on system 13, we would send the command “*13c00;” Note: When sending a command to all systems (such as “*0c00;”), the command will not be sent to wireless systems. Each system will have to be addressed individually. 4.2. Bus Mode When in bus mode, system 7 on the R2D7 operates identically to the other ports.
5. As a Programming Device Before attempting to program any devices using the R2D7, read and understand the section “Programming” in the “RP60’s User Guide.” Devices connected to the R2D7, whether hardwired or wireless, may be programmed using RS-232. This is accomplished by emulating the button sequence performed by hand.
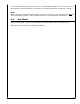
6. Appendix A: Specifications 6.1. RS-232 Port Pin Configuration When looking at the face of the R2D7, the RS-232 port configuration is: 6.2.
7. Appendix B: Quick Reference 7.1. 7.2. 7.3. 7.4.
8. Appendix C: Examples 8.1. 8.2.