
User's Manual


Getting Started
1–18
VX1410A & VX1420A IntelliFrame Mainframe Instruction Manual
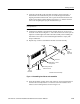
13. Slide the mainframe back until it stops.
14. Push to release the button latches, located on the outside of each track, and
continue to slide the mainframe all the way back into the rack cabinet.
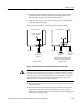
15. Tighten the four screws that you left loose at the rear of the rack when you
performed step 8, and pull the mainframe part way out of the rack. (Tighten
the 10-32 screws using 28 inch-lbs of torque.)
16. Be sure that the screws that you left loose at the front of the rack are loose
enough to allow the slide-out track assemblies to seek the normal positions.
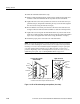
17. Tighten the screws and push the mainframe all the way into the rack. If the
tracks do not slide smoothly, readjust the level using the method described in
steps 15 and 16. (Tighten the 10-32 screws using 28 inch-lbs of torque.)
18. Install the proper power cord at the rear of the mainframe.
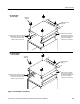
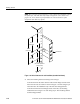
NOTE. To ensure the mainframe is properly mounted in the rack do not tighten
the screws while installing the chassis track to the rack front rails. After all the
mounting screws have been installed shift the mainframe to the far right of the
rack, then tighten all the mounting screws. Refer to Figure 1–10 for screw
positions. Depending on the rack manufacturer it may be necessary to use an
additional spacer plate, refer to the Replaceable Parts on page 9–15.
Left rack rail & chassis
slide assembly
Right rack rail &
chassis slide assembly
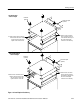
Rack
front rail
Chassis
slide
assemblies
Rack front
rail
Chassis
slide
assemblies
Shift the mainframe to the far right. Do not tighten the screws
until all all screws are touching the left side of the slots.
Spacer
plate
Figure 1–10: R1 or R2 rackmounting screw positions (front view).