
User's Manual


Getting Started
VX1410A & VX1420A IntelliFrame Mainframe Instruction Manual
1–7
The IntelliFrame Mainframe is designed to operate on a bench or in a rackmount
environment. For proper cooling, allow at least 2 in (5.1 cm) of clearance on the
rear and sides of the mainframe. Determine how you will use your mainframe
with cable trays, and then follow the appropriate installation instructions. If you
ordered your mainframe with a cable tray option and rackmount option, install
the cable tray before installing the rackmount.
WARNING. To avoid personal injury, use care when lifting or moving the
mainframe to avoid personal injury while performing the installation proce-
dures.
The IntelliFrame Mainframe comes a with a 0.75-inch cable access area on the
bottom of the mainframe. Use the following procedure to install your cable tray
option:
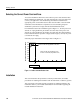
You will need a T-20 Torx and Phillips driver to install Options 1U or 2U.
Options 1U and 2U can be installed three different ways; without rails, with
rails, or with rails installed at 90
_.
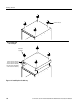
Figure 1–2 on page 1–8 and Figure 1–3 on page 1–9 show how to install
Option 1U (without rails, with rails, rails at 90
_) to provide a cable tray depth of
1.75, 2.50, or 4.25 inches.
Figure 1–4 on page 1–10 and Figure 1–5 on page 1–11 show how to install
Option 2U (without rails, with rails, rails at 90
_) to provide a cable tray depth of
3.50, 4.25, or 6.00 inches.
Both options come with butch plates to mount cable connectors at the rear of the
cable trays. The butch plate will not fit on Option 1U when the foot rails are not
used. You can modify the butch plate to accept cable connectors at the rear of the
mainframe. Specific instructions for modifying the butch plate are not given
since the locations, types, and size of connectors vary with each application.
Site Considerations
Cable Tray Installation