
User manual

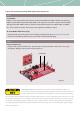


Connect the control card to the computer and the power supply to the power board
›
Connect the USB cable to your computer and to the control card. Debugger part of the control card is
galvanically isolated from the power board. Place the jumper (Figure 3) into XMC1000 only if external
slope is needed (i.e. peak current control with XMC1000 set up). Otherwise use XMC4000 position.
›
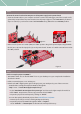
Make sure the "power on" switch (SW4) is in "OFF" position. Plug in the power adapter supplied with
the kit (12 V, 2 A), into the input jack (J2) on the power board. "Power on" switch can now be moved to
the "ON" position
STEP 3
Load an example project into DAVE™
›
Start DAVE™ 4 IDE. You can find the DAVE™ icon on your desktop once you complete the installation
described in STEP 1.
›
Define a new workspace or use existing one
›
Download a XMC™ digital power explorer kit project to your workspace by one of these 2 means:
– Download the example directly from DAVE™ 4 through the
"Help" menu → "Install Dave App/Example Library"
•
Select "Work with: Dave Project Library Manager" and choose the right example form the list
•
Click "Next". Accept terms of license agreement and click "Finish"
•
Import the project into workspace by clicking on "Finish"
– You can alternatively download projects from www.infineon.com/DAVE
•
Extract .zip file into your new or existing workspace directory
•
Import the project into DAVE™ through the "File" → "Import",
select "Infineon" → "Dave Project" and browse the workspace directory
STEP 4
Figure 2
Figure 4
Figure 3