7-inch face temperature intelligent terminal an instruction manual Revision No.: v1.
Document update record Update content date edition the organization number of pages Create document, match version 0316 2020/3/17 V1.0 18 Lin bin Modify the document and add the function description of version 0509 2020/5/8 V1.1 35 Lin bin catalog Instructions for use......................................................................................................3 Initial startup................................................................................................................
.3.6 Date display format setting.............................................................. 31 3.3.7 network configuration....................................................................... 32 3.3.8 Display information settings.............................................................33 3.3.9 Opening setting................................................................................. 34 3.3.10 Fill light setting.................................................................................
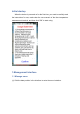
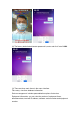
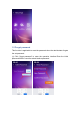
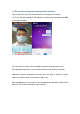
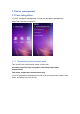
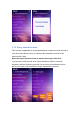
Initial startup When the device is powered on for the first time, you need to carefully read the instructions for use, make clear the use scenario of the face temperature measurement terminal, and then click "OK" to start using. 1.Management interface 1.1 Manage menu (1) Click the date position in the interface to enter the menu interface.
(2) The factory default administrator password is, enter and click "enter".6666 (3) There are three main items in the menu interface. Face entry: view face database information. Device management: includes personalization options for devices. Equipment information: you can view the number of equipment faces, attendance data, terminal IP address, software version number and equipment number.
1.2 Forget password This function is applicable to reset the password when the administrator forgets the set password. (1) Click "forget password" to enter the operation interface.Enter the initial password 6666 to reset the administrative password.
1.3 Secondary equipment management interface This function can enter the secondary device management interface, (1) Click in the date position of the interface, and then enter the password 8888 to enter the interface. (2) There are four items in the secondary equipment management menu: Face algorithm activation: used to input activation code (factory activated). Application allowed background running time: the app is closed for other reasons, and the interval of automatic restart is set.
2.Face entry This menu interface can view the face information in the terminal. (1) After entering the menu interface, click "face entry" to enter the face management interface to view the face database information.
3. Device management 3.1 Face recognition (1) Click "equipment management" to enter the equipment management page.Then click face recognition. 3.1.1 Temperature measurement mode This function can select precise mode or fast mode. Accurate mode: first face recognition, then body temperature measurement. Fast mode: temperature measurement only. (1) Click "temperature measurement mode" to check the accurate mode or fast mode, and select one from the two.
3.1.2 Query attendance data This function is applicable to querying attendance records when the terminal is used as a stand-alone version or exporting the attendance records of the terminal with U disk. Note: the export function needs to prepare an empty U disk first. (1) Insert the U disk first and click "export attendance data" to enter the operation interface.Guessing provides five screening criteria based on time period, user type, body temperature range, department and name.
(2) Filter "start time" and "end time", and click OK.Query types filter user types (all, internal, or visitors). (3) You can manually input the minimum temperature and the maximum temperature to screen the temperature range, and then click OK.
(4) Click "department" to filter the personnel of a single department. (5) Click "name" to filter by single user or multiple name users. (6) View attendance record: after setting the filter criteria, click view to view the local attendance record.Click "view details" to view the details of a single attendance record..
(7) Export attendance form: click "export form" and insert a USB port at the bottom left of the screen into the hole USB disk to export the attendance record to the excel file.
(8) When viewing the exported files in the computer, you can see the folder named "export" in the USB flash disk, (8) Corresponding to the equipment number, click enter. (9) Double click to open excel file to view attendance record.
(10) Export table and photo: after the filter conditions are set, insert the USB port at the bottom left of the screen into the hole U disk, click "export table and photo", then the attendance data of the terminal can be exported to the U disk, and a folder named "export" will be generated, including the attendance data excel file and the folder named "photo".
3.1.3 Import face information This function is applicable to importing face database with U disk when the terminal is used as a stand-alone version.Note: the U disk must put the face database exported by the PC management software in advance. For example: Insert the U disk and click "import face information".After the progress bar is completed, you can unplug the USB stick.It can be seen that the face data in the face database has been uploaded. 3.1.
(1) Click "gate is applicable" to set whether the switch is on according to the user's applicable scenario. Switch on: attendance data will be uploaded only when the gate returns a signal. Switch off: no need to trigger, upload attendance data normally. 3.1.5 Visitor report switch This function can be used to set whether the terminal uploads the visitor temperature measurement record.
If it is closed, only registered personnel records will be uploaded, and visitor records will not be sent; (1) Click "visitor report switch" to determine whether to turn on the switch according to the use scenario. 3.1.6 Visitor identification switch This function can be used to set whether to turn on the guest function.
3.1.7 Failed image capture This function is only used by developers. It is closed by default under normal use.Turn on the switch to grab the failed photos for development and analysis. (1) Click "failed image capture" to decide whether to turn on the switch according to the user's requirements.
3.1.8 Capture function This function can turn on or off the function of capturing user's photos during temperature measurement. It is turned on by default in the factory, and the captured photos can be viewed by the management personnel.If it is used in occasions where users' privacy needs to be protected, the administrator can close it by himself. (1) Click "capture function" to select whether to turn on the capture switch according to the use scenario. 3.2 Temperature 3.2.
3.2.2 Temperature display format switch This function is used to set the display format of temperature value, which can display Fahrenheit or Celsius. (1) Click "temperature display format switch" to enter, select Celsius or Fahrenheit display according to the use demand.
(2) Select "Fahrenheit" as shown below. 3.3.System settings 3.3.1 Interface baseurl configuration This function is used to configure the IP address of the management computer under Networking conditions. (1) Click "interface baseurl configuration" and "manual configuration".
(2) The input information must be "http: / / + IP address of management computer +: 30000". For example: if the IP address of management computer is 192.168.1.178, the input information is "http://192.168.1.178:30000", which is the same as the top address of the management software on the PC.After input, click "save" and the software will restart.
3.3.2 Broadcast voice settings The default broadcast voice of the system is "normal temperature" and "abnormal temperature". Users can select other broadcast voice content in this setting. (1) Normal temperature measurement prompt voice setting: click "broadcast voice setting", click "normal broadcast voice", select from the optional voice, such as "healthy clock in", and click "OK" to save the setting.
(2) Voice setting of temperature measurement abnormal prompt: click "abnormal broadcast voice", select from the optional voice, for example, select "short alarm", and click "OK" to save the setting. (3) Import custom voice: first create a folder named "face voice" in the U-disk root directory, and then create two folders named "normal" and "abnormal" in the "face voice" folder directory.
(4) After the voice configuration is completed, insert the U disk into the USB port at the bottom left of the terminal, click "U disk import voice", wait for 2-3 seconds, and you can see "import completed". (5) Click to enter "normal broadcast voice" and you can see that the imported voice is already in the list. Click to select it as the normal custom broadcast voice for temperature measurement.
(6) It can also set the broadcast voice of abnormal temperature. (7) Delete custom voice: click the delete icon to delete the custom voice. 3.3.3 Prompt text settings The user can set the corresponding prompt text on the display according to the voice prompt content here. (1) Click "prompt text setting" to enter and set the text content to be displayed.
(2) Input the required prompt text and click "save". 3.3.4 Distance switch This function can be used to turn the distance switch on or off.
Turn off the temperature measuring switch: when the distance measuring switch fails to display the distance value, it needs to turn off the switch manually. (1) Turn on the ranging switch, and the recognition interface will display the human body distance prompt. (2) Turn on or off the recognition effect of the distance switch.
3.3.5 Change administrator password (1) Click "modify administrator password" to enter, input the old password, then input the new password twice, and click "confirm" to save. 3.3.6 Date display format setting This function can be used to change the date display format of standby interface and identification interface. (1) Click "date display format setting" to enter and select according to customer demand.The factory default display format is year month day.
(2) The display formats of the British "day month year" and the American "month day year" are as follows. 3.3.7 network configuration This function can be used to set the IP address of the terminal when building a local area network. Note: one terminal can only be managed by one management computer, and one management computer can manage multiple terminals at the same time.
(2) After configuration, the IP address of the terminal can be viewed in the device information. 3.3.8 Display information settings This function can be used to set the company name and notification content of the standby interface.
Click "display information settings" to enter company name and notice content, and then click "confirm modification" to finish. 3.3.9 Opening setting (1) Opening switch of visitors: it is suitable for connecting the gate or access control. The temperature measurement of unregistered users is normal, and the switch signal is output. (2) High temperature opening switch on: it is suitable for connecting the alarm.
alarm trigger signal will be output.The signal duration can be set for 1-15 seconds. Note: the face machine has no alarm function. The requirements for connecting the alarm are voltage ≤ DC 30V and current ≤ 1a 3.3.10 Fill light setting This function can set the working mode of the fill light. (1) Click "fill light setting" and check auto, normally on or off as required.
3.3.11 System upgrade This function can be used to upgrade the terminal software. (1) Place the interrupt upgrade package (zip file of the package named "upgrade") in the root directory of the U disk. (2) When the terminal is powered on, insert the U-disk into the USB port at the bottom left of the terminal, and you can see that "in the process of upgrading, please do not remove the U-disk".
(1) Click "device information" to view face number, attendance record, IP, gateway, version number and device number. 5.FCC Caution. This device complies with part 15 of the FCC Rules. Operation is subject to the following two conditions: (1) This device may not cause harmful interference, and (2) this device must accept any interference received, including interference that may cause undesired operation.
-Reorient or relocate the receiving antenna. -Increase the separation between the equipment and receiver. -Connect the equipment into an outlet on a circuit different from that to which the receiver is connected. -Consult the dealer or an experienced radio/TV technician for help. *RF warning for Mobile device: This equipment complies with FCC radiation exposure limits set forth for an uncontrolled environment.