
Installation Sheet

WAC Lighting retains the right to modify the design of our products at any time as part of the company's continuous improvement program. JULY, 2016
waclighting.com
Phone (800) 526.2588
Fax (800) 526.2585
Headquarters/Eastern Distribution Center
44 Harbor Park Drive
Port Washington, NY 11050
Central Distribution Center
1600 Distribution Ct
Lithia Springs, GA 30122
Western Distribution Center
1750 Archibald Avenue
Ontario, CA 91760
INSTALLATION INSTRUCTION
Tube Architectural - LED Wall Mount
DS-WS05, WS06, WS08, DS-WD05, WD06, WD08
OVERVIEW
It is surface mount down light, included ceiling mount, pendant mount, single direction wall wash and up-down direction wall wash.
Check catalog for various mount type, size, beam angle and color choices.
FIXTURE INSTALLATION
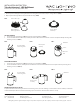
1. Carefully unpack your new xture and lay out all the parts on a clear area. Be carefully not to lose any small parts necessary for installation.
(See FIG.1)
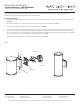
2. Remove the screw holding mounting plate to xture, and remove mounting plate from xture. (See FIG.2)
3. Secure mounting plate to the junction box in wall provided by others. (See FIG.2)
4. Pull power supply wires out of junction box through mounting plate. Connect black xture wire to hot wire, white xture wire to neutral
wire and green xture wire to ground. This xture oers 0-10V dimming capability. To utilize, connect purple xture wire to hot dimming
wire and gray xture wire to neutral dimming wire. If not utilizing dimming, terminate the dimming wires by capping them separately. After
wires are connected securely, tuck them carefully inside the junction box . (See FIG.2)
5. Put the xture to the mounting plate, and secure with screws and gasket.(See FIG.2)
Mount Plate
Ground Wire
ScrewGasket
Junction Box
FIG.2