
Installation & Assembly


WAC Lighting
www.waclighting.com
Phone (800) 526.2588 • Fax (800) 526.2585
Headquarters/Eastern Distribution Center
44 Harbor Park Drive • Port Washington, NY 11050
Phone (516) 515.5000 • Fax (516) 515.5050
Western Distribution Center
1750 Archibald Ave • Ontario, CA 91761
Phone (800) 526.2588 • Fax (800) 526.2585
WAC Lighting retains the right to modify the design of our products at any time as part of the company's continuous improvement program. JULY, 2014
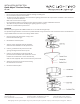
TO INSTALL/ SHORTEN PENDANT:
Feed the cable end through the Top Conical section and the metal nial. If cable needs to be shortened, make the cut now.
To install the top conical section, follow the step-by-step instructions bellow. NOTE: PENDANT CABLES ARE CO-AXIAL, IF THE
LOWER SCREW IN STEP 4 IS MADE TOO TIGHT, THE INNER AN OUTER WIRE WILL SHORT. A SHORT CIRCUIT WILL
RENDER THE ENTIRE SYSTEM IN-OPERATIVE AND POSSIBLY DAMAGE THE TRANSFORMER. CHECK ALL PENDANT
SPLICES FOR CONTINUITY BEFORE INSTALLING.
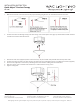
CHECK SPLICE:
There should now be continuity, indicating
a completed circuit.
Install with power o.
Make a clean cut. Slide brass
collar over wire.
Trim 1/8” of insulation from the
inner wire. Position the collar so
that a small section (1/16”) of
braided wire protrudes from the
top of the collar.
Feed inner wire until it reaches
the top set screw position.
Feed braided outer wire and
collar into bottom portion.
Tighten top setscrew rst then
lower. Smooth out any bulges in
braided wire. Perform continuity
check before mounting.
INSTALLATION INSTRUCTION
900 Series LED Quick Connect™ Socket Set
QP-LED903