
Installation Sheet


WAC Lighting
www.waclighting.com
Phone (800) 526.2588 • Fax (800) 526.2585
Headquarters/Eastern Distribution Center
44 Harbor Park Drive • Port Washington, NY 11050
Phone (516) 515.5000 • Fax (516) 515.5050
Western Distribution Center
1750 Archibald Ave • Ontario, CA 91761
Phone (800) 526.2588 • Fax (800) 526.2585
WAC Lighting retains the right to modify the design of our products at any time as part of the company's continuous improvement program. APRIL, 2015 1
INSTALLATION INSTRUCTION
Exterminator II LED Track Luminaires
H-1014/1035/1052, L-1014/1035/1052, J-1014/1035/1052
WARNING
IMPORTANT: NEVER attempt any work without shutting off the electricity.
- Read all instructions before installing.
- System is intended for installation by a qualified electrician in accordance with the National Electrical Code and local
regulations.
- Go to the main fuse box, or circuit breaker. Place the main power switch in the “OFF” position and unscrew the fuse(s) or
switch ”OFF” the circuit breaker switch(es) that control the power to the fixture or room that you are working on.
- Place the wall switch in the “OFF” position.
AVERTISSEMENT
IMPORTANT : Coupez l’électricité avant TOUTE manipulation.
- Lisez toutes les instructions avant d’installer.
- Système est destiné à être installé par un électricien qualifié en conformité avec le code national de l’électricité et les
règlements locaux.
- Accédez au panneau central de disjoncteurs ou de fusibles de votre demeure et placez l’interrupteur principal en
position d’arrêt (« OFF »).
- Placez l’interrupteur mural en position d’arrêt (« OFF »).
Overview:
Fixtures are designed for use on WAC Lighting’s track systems. They may also be used on other manufacturer’s brand of track
(consult factory for compatibility).
LED TRACK LUMINAIRE TRACK SYSTEM
H-1014/H-1035/H-1052 Series 120V H Track
L-1014/L-1035/L-1052 Series 120V L Track
J-1014/J-1035/J-1052 Series 120V J or J2 Track
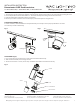
Fixture installation for H/ L/ J Track: (1014) (Fig.1)
1. The track has a groove running its length to indicate polarity and the locking tab has an arrow indicating locking direction.
2. Insert adapter into track slot and rotate it 90°. The arrow should point to the grooved side of the track.
3. Press the locking tab on the adaptor and reverse the procedure to remove track fixture may be positioned anywhere
along the track.
Fig.1
locking tab