
Installation Sheet

4/4
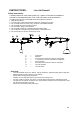
Rail mounting:
Rail can be mounted on a flat surface, a sloped
ceiling, or a suspended ceiling.
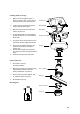
1. Use three standoffs for every 8ft of straight
rail. Curved rail requires more supports.
2. Make a floor lay out with rail or string etc,
then use a plumb line to mark standoff
locations.
3. For drywall, drill 5/8” holes and insert
ceiling anchors (supplied) through the
bases of the standoffs.
4. For wood surfaces use wood screws
through the standoff bases.
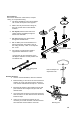
5. For “T” bars (It is recommended that “T”
bars be reinforced with Caddy® clips to
the ceiling structure) Twist “T” bar clip onto
the “T” bar.
6. For support at a ceiling panel install a
support frame between two T-bars
Unscrew the cap from the bottom of the
rail adapter. Raise the rail into position and
re-install the cap.
T-bar ceiling panel
support.
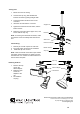
Bending Flexrail1:
1. Hand or machine bendable, minimum radius23”.
2. Before bending: If rail is to be cut and connected to
another rail, a 7/8” end space from the aluminum
core must be maintained to accept an “I” connector.
3. Bend the rail a little at a time starting from the mid
point. Work the rail in stages until you reach the
desired radius.
4. Once rail is bent the wires may become regressed
from the ends. If no other rails are to be connected,
install end caps.
5. If rail is to be connected to another rail, it is
necessary to cut each end flush. This ensures bus
wires will make contact with the connector.
T-bar ceiling
Supported on T-bars
Sloped ceiling
Flat ceiling
Bending tool
Field cut adapter for
suspension rods