
Installation Sheet

WAC Lighting
www.waclighting.com
Phone (800) 526.2588 • Fax (800) 526.2585
Headquarters/Eastern Distribution Center
44 Harbor Park Drive • Port Washington, NY 11050
Phone (516) 515.5000 • Fax (516) 515.5050
Western Distribution Center
1750 Archibald Ave • Ontario, CA 91761
Phone (800) 526.2588 • Fax (800) 526.2585
WAC Lighting retains the right to modify the design of our products at any time as part of the company's continuous improvement program. JUNE, 2014
INSTALLATION INSTRUCTION
1” LEDme Mini Recessed - New Construction
HR-LED211, HR-LED251
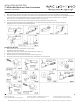
MOUNTING FOR REMODEL HOUSING:
1. When installing in drywall, cut appropriate a hole 2 1/2” in the drywall, pull ceiling wire through the hole(as Fig.8).
2. Pull out the junction box cover and connect xture wires to building wires, insert each supply wire into appropriate junction
box connector. Connect black xture wire to hot, white xture wire to neutral and green xture wire to ground.
When connect in series xture, use a spread conduit connector (as Fig.9, 10).
3. Place all wiring and connectors back in wiring box and replace junction box door (as Fig.11).
4. Pivot the J box up through the hole, followed by the can, until the trim ring is ush to the ceiling (as Fig.12,13)
(Framing kit is for new construction mounting only)
TO REPLACE LED LENS:
1. Remove two sides the screws of the can (as Fig.14).
2. Cut o the connector (as Fig.15).
3. Remove two sides the screws and take o the panel (as Fig.16, 17).
4. Replace the lens you choose (as Fig.18, 19).
5. Put on the panel and secure two sides the screws (as Fig.20, 21).
6. Secure the connection and secure two sides the screws of the can (as Fig.22, 23).