
Installation Sheet


WAC Lighting retains the right to modify the design of our products at any time as part of the company's continuous improvement program. DECEMBER, 2014 2
WAC Lighting
www.waclighting.com
Phone (800) 526.2588 • Fax (800) 526.2585
Headquarters/Eastern Distribution Center
44 Harbor Park Drive • Port Washington, NY 11050
Phone (516) 515.5000 • Fax (516) 515.5050
Western Distribution Center
1750 Archibald Ave • Ontario, CA 91761
Phone (800) 526.2588 • Fax (800) 526.2585
TRANSFORMERS/ACCESSORIES:
NOTE: All transformers and accessories are sold separately.
TRANSFORMERS:
Use to power the LINE™ xtures. Below is a list of compatible transformer models and descriptions
Model Number Description
EN-2460-P-AR-S 60W plug-in transformer, 120V AC
EN-24100-P-AR-S 96W plug-in transformer, 120V AC
EN-2460-RB2-S 60W remote transformer, 120V AC
EN-24100-RB2-S 96W remote transformer, 120V AC
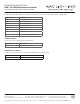
The maximum number of LINE™ xtures that can be interconnected together is shown on the chart below.
Model Number EN-2460-P-AR-S
(60W)
EN-24100-P-AR-S
(96W)
EN-2460-RB2-S
(60W)
EN-24100-RB2-S
(96W)
LN-LED06P 6 11 6 11
LN-LED12P 3 6 3 6
LN-LED18P 2 4 2 4
LN-LED24P 2 3 2 3
LN-LED30P 1 2 1 2
WIRING:
Connecting a Single Fixture:
Insert the plug at the end of transformer cord into either socket on the LINE™ xture.
Interconnecting Fixtures with Jumper Wires:
Insert the end plug of the jumper wires into each LINE™ xture socket. See accessories below for dierent lengths and
congurations of jumper wires.
Remote Transformer
Plug
Socket
INSTALLATION INSTRUCTION
LINE™ 2.0 LED With Remote Transformer
LN-LED06P/LED12P/LED18P/LED24P/LED30P