
Installation Sheet

WAC Lighting
www.waclighting.com
Phone (800) 526.2588 • Fax (800) 526.2585
Headquarters/Eastern Distribution Center
44 Harbor Park Drive • Port Washington, NY 11050
Phone (516) 515.5000 • Fax (516) 515.5050
Western Distribution Center
1750 Archibald Ave • Ontario, CA 91761
Phone (800) 526.2588 • Fax (800) 526.2585
WAC Lighting retains the right to modify the design of our products at any time as part of the company's continuous improvement program. JUNE, 2014
INSTALLATION INSTRUCTION
Low Voltage - MR16 Multiple Spots
MT-116HS, MT-216HS, MT-316HS
CAUTION:
• Always turn o power at the circuit breaker panel or fuse box prior to installation to prevent electrical shock.
• Do not install insulation within 3” of housing.
Designed for installation in dropped grid ceilings or to joist members in new construction ceilings.
NOTE: FOR TRIMLESS INSTALLATION, PLEASE INSTALL THE BRACKET WITH SCREWS PROVIDED.
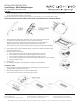
1. Supplied with two hanger bars, (24” max). Bars can be used on both sides and
are notched on the ends to t over “T” bars in suspended ceilings.
Hanger bars include a captive mounting “screw-nail” for ease of installation.
Align the bottom of the hanger bar with the bottom of the wood joist.
Secure the “screw-nail” on each end by screwdriver (as g A), or by hammer (as g B).
2. Draw supply wire (½” trade size exible metal conduit or non-metallic sheathed cable)
from ceiling to xture site.
3. To make electrical connections:
a. Route supply wire to junction box opening with suitable connector.
b. Connect black transformer wire to black supply wire with wire nut.
c. Connect white transformer wire to white supply wire with wire nut.
d. Connect Green grounding wires with wire nut. (Wire may be green or un-insulated)
e. Close junction box cover.
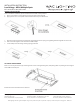
4. Install ceiling.
5. Use template supplied to make appropriate cutout for trim installation
TO INSTALL TRIM
a. Raise the trim to the housing and attach by squeezing the torsion springs and
guiding them through the anchor cleats.
b. Pull sockets through the holes and attach to MR16 lamps.
c. Secure lamps onto trim using retaining springs provided.