
Installation Sheet

2WAC Lighting retains the right to modify the design of our products at any time as part of the company's continuous improvement program. JULY, 2016
waclighting.com
Phone (800) 526.2588
Fax (800) 526.2585
Headquarters/Eastern Distribution Center
44 Harbor Park Drive
Port Washington, NY 11050
Central Distribution Center
1600 Distribution Ct
Lithia Springs, GA 30122
Western Distribution Center
1750 Archibald Avenue
Ontario, CA 91760
INSTALLATION INSTRUCTION
Volta 4.5” LED - Recessed Housing
R4S Series (Trim)
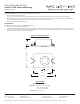
HOUSING INSTALLATION:
1. Housing features mounting bracket that can be used with
hanger bars or various channel supports (See FIG. 1-5).
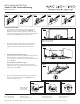
Adjust the brackets to proper height by loosening the wing
screw such that the bottom of housing is ush to top of nished
ceiling plane (See FIG. 6). Retighten screws securely.
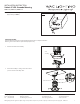
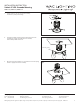
2. Pinch the two anges of the brackets towards each other.
Slide the male and female hanger bars or other channel
supports through the appropriate hole in the brackets.
3. A. For hanger bar installation on joists:
Install the hanger bar and housing assembly such that the lip of
the hanger bar rests on the bottom surface of the joist.
Use a screw-driver or hammer to secure the “screw-nail” into the
wood (See FIG. 7).
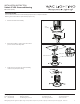
B. For hanger bar installation on grid:
Hanger bars are notched on the ends to t over “T” bars in
suspended ceilings. Support with tie wires (by others) to upper
ceiling structure (See FIG. 8).
4. Pinch the adjustable bracket and slide the housing along the
hanger bars to the desired position (See FIG. C). Release to
secure the housing in place.
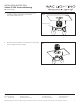
FIG. 6
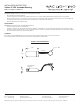
FIG. 7
FIG. 8
C
A, B
Bottom of housing
ush to top of ceiling
FIG. 1
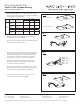
HANGER BAR
2” CHANNEL w” CHANNEL 12” CHANNEL
ROUND CHANNEL
FIG. 2 FIG. 3 FIG. 4 FIG. 5
Hanger bar lip to
rest on bottom
surface of joist
FIG. A FIG. B FIG. C