
Installation Sheet

2WAC Lighting retains the right to modify the design of our products at any time as part of the company's continuous improvement program. DECEMBER, 2018
waclighting.com
Phone (800) 526.2588
Fax (800) 526.2585
Headquarters/Eastern Distribution Center
44 Harbor Park Drive
Port Washington, NY 11050
Central Distribution Center
1600 Distribution Ct
Lithia Springs, GA 30122
Western Distribution Center
1750 Archibald Avenue
Ontario, CA 91760
INSTALLATION INSTRUCTION
R4ERDR, R6ERDR
INSTALLATION
1.
At the point of installation, cut a round hole for a round trim (See
).
For R4ERDR cut the hole Ø4 1/4" diameter
For R6ERDR cut the hole Ø6 1/4" diameter
2.
Ceiling thickness range is ½” to 1
”.
3.
xture from packaging box.
4. Pull building supply wires through the
xture junction box door. (See
)
Remove desired housing knockout and feed building wires into housing using appropriate connector.
5.
xture wires to building wires (See FIG. 3):
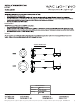
Connect each supply wire with appropriate junction box wire connector.
xture features electronic low voltage (ELV) or TRIAC
dimming capabilities.
To utilize ELV or
ations.
x x xture wire to ground. Leave all
other wires capped individually.
6. Place all wiring and connectors back in driver box and replace the box’s cover.
8
.
Fold
torsion secure
(See FIG.
).
FIG. 1 FIG. 2
FIG. 4
FIG. 3
FIG.
ROUND: CUT OUT
R4ERDR: Ø4 1/4"
R6ERDR: Ø6 1/4"
7.
Insert driver box through the mounting hole and secure to ceiling joist. (See FIG. 4).
Black − Hot
Green − Ground
White − Neutral
Power supply
Cable to fixture