
Installation Guide

2WAC Lighting retains the right to modify the design of our products at any time as part of the company's continuous improvement program. FEBRUARY, 2017
waclighting.com
Phone (800) 526.2588
Fax (800) 526.2585
Headquarters/Eastern Distribution Center
44 Harbor Park Drive
Port Washington, NY 11050
Central Distribution Center
1600 Distribution Ct
Lithia Springs, GA 30122
Western Distribution Center
1750 Archibald Avenue
Ontario, CA 91760
INSTALLATION AND WIRING
STEP 1:
• Install 2" x 4" junction box, and ensure it is water-tight
for outdoor use.
STEP 2:
•
Connect the fixture wires to the junction box wires using the
provided wire nuts as follows:
Black fixture wire to black (Hot) Junction Box wire
White fixture wire to white (Neutral) Junction Box wire
Green fixture wire to Ground
• Place all wiring and connectors back in the junction box
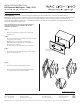
STEP 3:
•
Use the provided junction box mounting screws to install
fixture onto the junction box.
J
U
NCTION BOX: 2” x 4” boxes to have minimum inside dimensions of 3”H x 2”W x 2”D in order to accommodate fixtures.
Note:
Actual depth of box to be determined in accordance with the NEC and local ordinances. Indoor or outdoor frame mounted
junction box: Raco 2” x4”
(16.5 cu. In) or equivalent recommended. Outdoor surface mounted junction box: Red Dot deep
weatherproof box Model S103E or equiv. recommended. Mortar or poured concrete installation: Use appropriate junction box
suitable for that particular application
Junction Box
Mounting Screw
INSTALLATION INSTRUCTION
LED Step and Wall Lights - 120V / 277V
WL-LED110, 120, 130, 140, 210, 220
STEP 5:
•
Hook the cover plate onto the LED light engine.
•
Push the cover plate towards the light engine until the
cover magnetically secures to the installation.
WL-LED130 used as reference.
Note: Determine junction box and step light orientation
(vertical/horizontal) prior to installation. Horizontal
installation shown below.