
Installation Sheet

WAC Lighting retains the right to modify the design of our products at any time as part of the company's continuous improvement program. DECEMBER 2018
waclighting.com
Phone (800) 526.2588
Fax (800) 526.2585
Headquarters/Eastern Distribution Center
44 Harbor Park Drive
Port Washington, NY 11050
Central Distribution Center
1600 Distribution Ct
Lithia Springs, GA 30122
Western Distribution Center
1750 Archibald Avenue
Ontario, CA 91760
INSTALLATION INSTRUCTION
METRO
WS-180120, WS-180127, WS-180137
Fixture Wires
Black or
Smooth
Fixture Wires
White or
Ribbed
Fixture Wires
Bare wire
(Ground)
House Wires
Black
(Hot)
House Wires
White
(Neutral)
House Wires
Green or Bare Copper
(Ground)
Fig.2 Wiring
PREPARATION
1.
Shut off the power at the circuit breaker and remove existing fixture, including the mounting hardware.
2.
Carefully unpack your new fixture and lay out all the parts on a clear area. Be careful not to lose any small parts necessary for installation.
Installation
4.
Drill holes in the drywall aligned with the anchor hole in the mounting plate and insert mounting anchors.
Install the provided mounting plate to the junction box using the junction box screws provided.
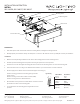
6. Provide electrical service according to the “National Electrical Code” or your local electrical code to the outlet box.
7. Connect supply wires to fixture wires and insulate with proper wire nuts (Fig. 2):
8. Raise the fixture to the junction box until the fixture screw holes are lined
up with the screw holes on the mounting plate.
9. Secure the fixture to the mounting plate using the fixture screws
provided.
FIG 1
Junction Box
Mounting Plate
Junction Box Screws
Wire Nuts
Fixture Screws
Connect incoming ground wire to mounting plate ground wire
(green or bare).
Connect incoming common wire to fixture common (white).
Connect incoming hot wire to fixture black wire.
3.
5.
Fasten the wood screws through the mounting plate anchor holes into the mounting anchors to secure the mounting plate .
Mounting Anchor