
Instructions / Assembly


Maintenance PST2/PSTF2 400
wc_tx000112_orig_gb.fm 30
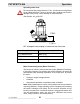
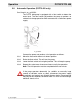
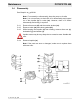
3.6 Impeller Reassembly
See Graphic: wc_gr000411
Note: If, upon inspection and testing, a pump component requires
replacement, use only original manufacturer’s replacement parts.
3.6.1 Turn pump on its side.
3.6.2 Pre-assemble the dust seal (u) and sleeve (v). Slide the two pieces
(u & v) onto the rotor shaft. DO NOT apply oil to the surface where the
dust seal (u) contacts the sleeve (v).
3.6.3 Align keyway of impeller (w) with keyway of rotor (not shown) and push
impeller (w) onto rotor shaft.
3.6.4 Secure with washer (x), lockwasher (y) and stirrer nut (z).
3.6.5 While holding the impeller from rotating, tighten stirrer nut (z).
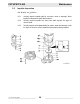
3.6.6 Position volute (aa) on suction strainer (ac), aligning with the three
bolts (ab) protruding from the suction strainer (ac).
3.6.7 Replace gasket (ah) on top of volute (aa).
3.6.8 Lift and hold remaining pump assembly in an upright position, align
three mounting flanges and lower into place.
3.6.9 Assemble and secure three nuts (af).
3.6.10 Tighten three nuts (af).
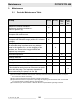
3.6.11 Pre-test pump to verify proper operation.
3.6.12 Performance test pump. Test results should be:
Maximum head > 10.06m (33ft)
Maximum volume > 170.3 ltr/min (45gpm)