
Operators Manual


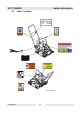
Table Of Contents
- 1. Foreword 3
- 2. Safety Information 4
- 3. Technical Data 11
- 4. Operation 13
- 5. Maintenance 16
- 5.1 Periodic Maintenance Schedule 16
- 5.2 Spark Plug 17
- 5.3 Air Cleaner 18
- 5.4 Engine Oil 19
- 5.5 Adjusting Engine Speed 19
- 5.6 Carburetor Adjustment 20
- 5.7 Cleaning Sediment Cup 20
- 5.8 Drive Belt 21
- 5.9 Exciter Lubrication 22
- 5.10 Cleaning the Plate 22
- 5.11 Lifting Machine 23
- 5.12 Transporting Machine 24
- 5.13 Storage 24
- 5.14 Troubleshooting 25
- 1. Foreword
- 2. Safety Information
- 2.1 Laws Pertaining to Spark Arresters
- 2.2 Operating Safety
- 2.2.1 NEVER allow anyone to operate this equipment without proper training. People operating this equipment must be familiar with the risks and hazards associated with it.
- 2.2.2 NEVER touch the engine or muffler while the engine is on or immediately after it has been turned off. These areas get hot and may cause burns.
- 2.2.3 NEVER use accessories or attachments that are not recommended by Wacker. Damage to equipment and injury to the user may result.
- 2.2.4 NEVER operate the machine with the beltguard missing. Exposed drive belt and pulleys create potentially dangerous hazards that can cause serious injuries.
- 2.2.5 NEVER leave the machine running unattended.
- 2.2.6 ALWAYS be sure operator is familiar with proper safety precautions and operation techniques before using machine.
- 2.2.7 ALWAYS wear protective clothing appropriate to the job site when operating the machine.
- 2.2.8 ALWAYS wear hearing protection when operating equipment.
- 2.2.9 ALWAYS close fuel valve on engines equipped with one when machine is not being operated.
- 2.2.10 ALWAYS store the machine properly when it is not being used. The machine should be stored in a clean, dry location out of the reach of children.
- 2.2.11 ALWAYS operate machine with all safety devices and guards in place and in working order. DO NOT modify or defeat safety devices. DO NOT operate machine if any safety devices or guards are missing or inoperative.
- 2.2.12 ALWAYS read, understand, and follow procedures in the Operator’s Manual before attempting to operate the machine.
- 2.3 Operator Safety while using Internal Combustion Engines
- 2.3.1 DO NOT run the machine indoors or in an enclosed area such as a deep trench unless adequate ventilation, through such item...
- 2.3.2 DO NOT smoke while operating the machine.
- 2.3.3 DO NOT smoke when refueling the engine.
- 2.3.4 DO NOT refuel a hot or running engine.
- 2.3.5 DO NOT refuel the engine near an open flame.
- 2.3.6 DO NOT spill fuel when refueling the engine.
- 2.3.7 DO NOT run the engine near open flames.
- 2.3.8 ALWAYS refill the fuel tank in a well-ventilated area.
- 2.3.9 ALWAYS replace the fuel tank cap after refueling.
- 2.3.10 ALWAYS check the fuel lines and the fuel tank for leaks and cracks before starting the engine. Do not run the machine if fuel leaks are present or the fuel lines are loose.
- 2.4 Service Safety
- 2.4.1 DO NOT attempt to clean or service the machine while it is running. Rotating parts can cause severe injury.
- 2.4.2 DO NOT crank a flooded engine with the spark plug removed on gasoline-powered engines. Fuel trapped in the cylinder will squirt out the spark plug opening.
- 2.4.3 DO NOT test for spark on gasoline-powered engines if the engine is flooded or the smell of gasoline is present. A stray spark could ignite the fumes.
- 2.4.4 DO NOT use gasoline or other types of fuels or flammable solvents to clean parts, especially in enclosed areas. Fumes from fuels and solvents can become explosive.
- 2.4.5 ALWAYS keep the area around the muffler free of debris such as leaves, paper, cartons, etc. A hot muffler could ignite the debris and start a fire.
- 2.4.6 ALWAYS replace worn or damaged components with spare parts designed and recommended by Wacker Corporation.
- 2.4.7 ALWAYS disconnect the spark plug on machines equipped with gasoline engines, before servicing, to avoid accidental start-up.
- 2.4.8 ALWAYS keep the machine clean and labels legible. Replace all missing and hard-to-read labels. Labels provide important operating instructions and warn of dangers and hazards.
- 2.5 Label Locations
- 2.6 Warning and Informational Labels
- 3. Technical Data
- 4. Operation
- 5. Maintenance
- 5.1 Periodic Maintenance Schedule
- 5.2 Spark Plug
- 5.3 Air Cleaner
- 5.3.1 Remove air cleaner cover (a). Remove both elements and inspect them for holes or tears. Replace damaged elements.
- 5.3.2 Wash foam element (b) in solution of mild detergent and warm water. Rinse thoroughly in clean water. Allow element to dry thoroughly. Soak element in clean engine oil and squeeze out excess oil.
- 5.3.3 Tap paper element (c) lightly to remove excess dirt. Replace paper element if it appears heavily soiled.
- 5.4 Engine Oil
- 5.4.1 Drain the oil while the engine is still warm.
- 5.4.2 Remove the oil filler plug (a) and the drain plug (b) to drain the oil.
- 5.4.3 Install the drain plug.
- 5.4.4 Fill the engine crankcase with the recommended oil up to the level of the plug opening (c). See Technical Data for oil quantity and type.
- 5.4.5 Install the oil filler plug.
- 5.5 Adjusting Engine Speed
- 5.6 Carburetor Adjustment
- 5.6.1 Start the engine and allow it to warm up to operating temperature.
- 5.6.2 Set the pilot screw (a) two turns out. See Note.
- 5.6.3 With the engine idling, turn the pilot screw (a) in or out to the setting that produces the highest rpm.
- 5.6.4 After the pilot screw is adjusted, turn the throttle stop screw (b) to obtain the standard idle speed. See Technical Data.
- 5.7 Cleaning Sediment Cup
- 5.8 Drive Belt
- 5.8.1 Loosen the two screws (a) on the beltguard, then remove the beltguard, keeping the screw assemblies captured on the beltguard.
- 5.8.2 Loosen the four nuts (b) which hold the engine to the console, and the screw (c) which holds the beltguard back to the console.
- 5.8.3 Slide the engine backward (towards the handle) to tighten the belt, forward to loosen the belt.
- 5.8.4 Adjust the belt so that it deflects 10-13 mm (3/8in-1/2in) (d) when pressed midway between the belt pulleys.
- 5.8.5 Make sure that the clutch pulley (f) and the exciter pulley (e) are in alignment. Place a straight edge against the exciter pulley (e) and move the engine so that the two pulleys are parallel.
- 5.8.6 Torque all nuts and screws to 20.5 Nm (15 ft.lbs.) as you reassemble the machine.
- 5.9 Exciter Lubrication
- 5.10 Cleaning the Plate
- 5.11 Lifting Machine
- 5.12 Transporting Machine
- 5.13 Storage
- 5.13.1 Remove loose stones and dirt from plate.
- 5.13.2 Clean engine cylinder cooling fins.
- 5.13.3 Clean or replace air filter.
- 5.13.4 Change exciter oil.
- 5.13.5 Change engine oil and follow procedures described in engine manual for engine storage.
- 5.13.6 Cover plate and engine and store in a clean, dry area.
- 5.14 Troubleshooting
- 2. Safety Information
