Contents Index 1 Software User’s Manual CONTENTS About the manual Navigating the manual 2 3 CUSTOMIZING Opening the control panel Control panel overview Calibrating the pen display Adjusting pitch and phase (VGA only) Customizing the pen Adjusting tip feel and double-click Adjusting eraser feel Advanced tip and eraser pressure settings Customizing tool buttons Customizing tilt sensitivity Customizing pen display functions Customizing ExpressKeys Customizing the Touch Strips Button functions Contents
Contents Index 2 ABOUT THE MANUAL This document provides quick access to information about your interactive pen display. Click on a navigation button or highlighted word to move through the document. The information is common to Windows and Macintosh computers and Windows screen captures are shown, unless otherwise noted. Note: This manual does not contain information for installing Cintiq. Please see your product installation guide for details.
Contents Index 3 NAVIGATING THE MANUAL Use the navigation controls to move through the manual: Go to front page. Contents Index Go to table of contents. Go to index. Go back to previous view. Page back, or page forward. topic Go to topic. Topic continued. Adobe® Reader® provides additional tools for using and printing the manual. See the Adobe Reader help for more information.
Contents Index 4 CUSTOMIZING After mastering the basics of using your pen on the interactive pen display, you may want to customize the way Cintiq works. This chapter describes how to use the Wacom Tablet control panel to adjust your pen display and input tool settings. Advanced users can learn how to further optimize Cintiq by creating application-specific settings.
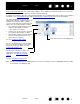
Contents Index 5 CONTROL PANEL OVERVIEW Use the Wacom Tablet control panel to customize your Cintiq or input tools. The upper portion of the control panel displays icons representing your TABLET, TOOL, and APPLICATION settings. Closes the control panel. TOOL settings Choose FUNCTIONS to customize your ExpressKeys, Touch Strips, and Radial Menu settings. Choose GRIP PEN to customize your pen settings. Tabs display customizable settings for the selected TOOL.
Contents Index 6 Control panel lists and tabs: The control panel TABLET, TOOL, and APPLICATION lists allow you to select the tablet, tool, or application for which you want to change settings. To change tool settings, open the control panel and either choose tablet FUNCTIONS or the tool you want to customize. See customizing the pen and customizing pen display functions for more information.
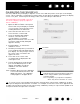
Contents Index 7 CALIBRATING THE PEN DISPLAY You must calibrate the pen display to align the screen cursor with the position of the pen on the display screen. This is required to compensate for viewing angle, and to adjust for parallax caused by the display screen cover glass. Set Cintiq in its working position, then follow the procedure below. Important: When using a VGA connection, be sure the display is properly adjusted before calibrating. 1. Open the Wacom Tablet control panel.
Contents Index 8 ADJUSTING PITCH AND PHASE (VGA ONLY) Some computers and video cards may not allow the auto-sync function to fully work when the interactive pen display is first connected. If some portion of text appears blurred, use the pen display AUTO ADJUST option to automatically synchronize to the incoming signal. If the image is still blurred, adjust pitch and phase. For optimum display quality, set your video card to the maximum (native) resolution that can be used with your pen display.
Contents Index 9 CUSTOMIZING THE PEN Use the pen to open the Wacom Tablet control panel. The pen will be selected in the TOOL list and the appropriate tabs will be displayed. If the pen is not automatically selected, choose it from the TOOL list. Select a tab and choose from the available options.
Contents Index 10 ADJUSTING TIP FEEL AND DOUBLE-CLICK To adjust the tip sensitivity of your pen, select the PEN tab. Customizes the amount of pressure needed to click, draw, or ink. Drag the slider to a softer or firmer setting. To create broad brush strokes or to click with a light touch, use a SOFT tip setting. For maximum control while drawing thin lines, use a FIRM tip setting. Displays the tip FEEL DETAILS dialog box where you can further customize the tip sensitivity.
Contents Index 11 ADJUSTING ERASER FEEL To adjust the eraser sensitivity of your pen, select the ERASER tab. Customizes the amount of pressure needed to erase. Select the function to perform when using the eraser. Displays the eraser FEEL DETAILS dialog box where you can further customize the eraser sensitivity. With your screen cursor positioned over an empty area of the control panel, press down on the pen display screen with your pen’s eraser to test the current eraser feel setting.
Contents Index 12 CUSTOMIZING TOOL BUTTONS Select the PEN tab to change the functions assigned to the side switches and tip of your pen. Select the function to perform when pressing the upper or lower side switch. When you bring the pen tip within 5 mm (0.20 inch) of the tablet surface without touching the tablet and press the upper or lower side switch, the selected function occurs. Tip: To make double-clicking easier, set the side switch to double-click automatically by selecting DOUBLE CLICK.
Contents Index 13 CUSTOMIZING TILT SENSITIVITY To adjust the tilt sensitivity of your pen, select the PEN tab. Tilt sensitivity determines how far you have to tilt the tool to produce the maximum tilt effect; you need to tilt the pen less at high sensitivity than at low sensitivity. Drag the slider to increase or decrease TILT SENSITIVITY. Then test your new setting in an application that supports tilt. The tilt setting applies to both the tip and eraser of your tool.
Contents Index 14 CUSTOMIZING EXPRESSKEYS When you select the EXPRESSKEYS tab, the current functions are shown in the corresponding pull-down menu. Each key can be customized to perform a display toggle, modifier, keystroke, or other function. Select LEFT or RIGHT to define which set of ExpressKeys to customize. Use the pull-down menus to choose a function that will be performed when the key is pressed. Your choice is displayed either within the pull-down menu or beneath the menu.
Contents Index 15 CUSTOMIZING THE TOUCH STRIPS When you select the TOUCH STRIP tab, the currently set Touch Strip functions are displayed. Each Touch Strip can be customized to issue zooming, scrolling, or custom keystroke actions. You can also set Touch Strip functions to DISABLED. See your hardware manual for information on working with the Touch Strips. Touch Strip functions can be defined for use with specific applications.
Contents Index 16 BUTTON FUNCTIONS The following options are available for tool button, tablet control, or Radial Menu settings. Not all options are available for all controls or pen display models. FUNCTION NAME DESCRIPTION CLICKS • CLICK Simulates a primary mouse button click. Be sure at least one button performs this function so you can always navigate and click. • RIGHT CLICK Simulates a right mouse button click, which displays a context menu.
Contents Index 17 FUNCTION NAME DESCRIPTION MODIFIER... Enables you to simulate modifier key(s) (such as SHIFT, ALT, or CTRL for Windows, or SHIFT, OPTION, COMMAND, and CONTROL for Macintosh). Many applications use modifier keys to constrain the size or placement of objects. Choose one or more modifier key options. Select the CLICK box if you want a mouse click to occur whenever you press the pen button. RADIAL MENU Displays a Radial Menu on your screen.
Contents Index 18 FUNCTION NAME DESCRIPTION SHOW DESKTOP Minimizes all open windows to display a clean desktop. SWITCH APPLICATION Brings up the application switching dialog with focus on the next open application. On Windows 7 or Vista systems running Aero, Flip 3D will be activated with focus on the next open applications. OPEN/RUN... Opens a dialog box where you can select a specific application, file, or script to launch. Click BROWSE... to locate an application, file, or script to launch.
Contents Index 19 FUNCTION NAME DESCRIPTION MODE TOGGLE... Toggles between pen mode and mouse mode. When first setting a pen button to MODE TOGGLE..., the MOUSE MODE dialog box is displayed where you can adjust the mouse acceleration and speed. Sets the screen cursor tracking speed when in mouse mode. Sets the screen cursor acceleration when in mouse mode. Mouse mode settings can be accessed from a number of different locations within the control panel.
Contents Index 20 USING AND CUSTOMIZING THE RADIAL MENU The Radial Menu is a circular pop-up menu that provides quick access to editing, navigation, media control functions, and more. • To display the Radial Menu, set a tool button or ExpressKey to the RADIAL MENU function. Whenever you press that button, the Radial Menu is displayed centered at the screen cursor position. • The hierarchical Radial Menu appears in circular format, extending over the entire desktop.
Contents Index 21 WORKING WITH DISPLAY TOGGLE DISPLAY TOGGLE is available only on multiple monitor systems. The feature allows you to use your pen on the interactive pen display to navigate the screen cursor to any display on your system. After setting an ExpressKey or a pen side switch to the DISPLAY TOGGLE function, you can then press that button to toggle the screen cursor between Cintiq and your other displays.
Contents Index 22 WORKING WITH MULTIPLE MONITORS When you are working with Cintiq and additional monitors on the same system, the screen cursor movement on the standard monitors will depend on your system configuration. If a second monitor is connected in mirror mode, both Cintiq and the other monitor will show identical images and screen cursor movement.
Contents Index 23 APPLICATION-SPECIFIC SETTINGS You can customize your tools for use with a particular application. For example, you may prefer a firm pen tip pressure setting in one application and a soft pressure setting in another. The APPLICATION list enables you to add an individual application to the list and then customize your tool settings for that application.
Contents Index 24 CREATING AN APPLICATION-SPECIFIC SETTING First choose the pen display and input tool for which you want to create an application-specific setting. Then click on the APPLICATION list’s [ + ] button to display the ADD APPLICATION FOR CUSTOM SETTINGS dialog box. Choose from one of two methods to select an application: • Open the application for which you want to create custom settings, and then select that application from the CURRENTLY OPEN APPLICATIONS box.
Contents Index 25 WORKING WITH MULTIPLE TOOLS The Wacom Tablet control panel is designed to help you customize and keep track of the settings for your Cintiq tools. The tool you use to open the control panel is automatically selected, and the appropriate tabs for that tool are displayed. Select a tool to change its settings. The TOOL list displays an icon for the tablet FUNCTIONS and the different tools that have been used on the pen display. Removes the selected tool.
Contents Index 26 CHANGING THE TABLET MODE Within the control panel’s TABLET list, double-click on the pen display icon to display the TABLET dialog box. The TABLET mode settings apply to all tools and applications. Note: This option may not be available for all pen display models. If desired, enter a new name to be used for the pen display icon. STANDARD MODE is recommended for graphics applications. Choose RECOGNITION MODE for the maximum data rate. Required by some handwriting recognition software.
Contents Index 27 MANAGING PREFERENCES Use the Wacom tablet preferences utility to manage your pen display preferences for a single or multiple users. For Windows, first close any open applications. Then open the utility by clicking the START icon and selecting ALL PROGRAMS. Select WACOM TABLET and WACOM TABLET PREFERENCE FILE UTILITY. • To remove preferences for the current user, click on the REMOVE button under MY PREFERENCES.
Contents Index 28 USING APPLICATIONS INTEGRATED FOR TABLET CONTROL Some software applications may be designed to directly control the pen tablet ExpressKeys or Touch Strip function(s). When working in an application that has been integrated in this manner, the ExpressKeys or Touch Strips may perform a different function than what is currently set in the Wacom Tablet control panel.
Contents Index 29 IMPORTING EXPERT SETTINGS The import expert settings feature enables you to import customized Wacom Tablet control panel settings that have been specified in an XML (Extensible Markup Language) file. • Some software developers may create custom settings files which are specifically designed to provide optimum performance when using your Wacom product with their applications.
Contents Index 30 GLOSSARY Active area. The area of the pen display where your Cintiq input tools are detected. Application-specific settings. Cintiq tool and tablet settings that have been customized for individual applications. The Wacom Tablet control panel enables you to customize a tool to behave uniquely in different applications. Application-specific settings are in effect whenever you use the application. Aspect.
Contents Index 31 Pen mode. A method of positioning the screen cursor. Wherever you place your Cintiq input tool on the pen display tablet, the screen cursor will jump to the corresponding point on the screen. This is known as absolute positioning, and is the default setting for the pen. Also, pen mode allows you to quickly position the screen cursor without having to first find it and then move it across the desktop. See also mouse mode. Pixel. The smallest unit of measure on your display screen.
Contents Index 32 INDEX About the manual Adding a new tool Applications, integrated for tablet control Application-specific settings changing settings creating removing working with Button functions Calibrating, pen display Control panel features lists opening tabs Customizing double-click eraser feel advanced ExpressKeys pen Radial Menu tablet ExpressKeys Touch Strips tilt sensitivity tip feel advanced tool buttons Touch Strips Display Toggle, working with Double-click, customizing Eraser feel, customiz
Contents Index 33 Wacom Cintiq® Software User’s Manual Version 5.0, Rev L2809 Copyright © Wacom Co., Ltd., 2009 All rights reserved. No part of this manual may be reproduced except for your express personal use. Wacom reserves the right to revise this publication without obligation to provide notification of such changes. Wacom does its best to provide current and accurate information in this manual.