Contents Index 1 Professional Hybrid Creative Tablet User’s manual About the Cintiq Companion Hybrid Parts and Accessories Getting Started Mobile Mode Using the pen The multi-touch feature Desktop Mode Customizing your Cintiq Troubleshooting Support options Contents Index 1
Contents Index 2 Cintiq Companion Hybrid User’s Manual Version 1.0, Rev H0413 Copyright © Wacom Co., Ltd., 2013 All rights reserved. No part of this manual may be reproduced except for your express personal use. Wacom reserves the right to revise this publication without obligation to provide notification of such changes. Wacom does its best to provide current and accurate information in this manual.
Contents Index 3 TABLE OF CONTENTS ABOUT THE MANUAL 5 ABOUT THE CINTIQ COMPANION HYBRID Parts and Accessories Unpacking Front view Rear view Attaching the stand 6 7 7 8 8 9 GETTING STARTED Step 1: Connect the Cintiq to your computer Step 2: Complete the Mobile Mode Setup wizard Step 3: Complete Driver Installation for Desktop Mode Rocker Ring and Center Button Desktop Center and Mobile Center Features Setting up your work area 14 14 15 17 MOBILE MODE Pen and touch File management Using the Wacom Mo
Contents FREQUENTLY ASKED QUESTIONS 77 CARE AND MAINTENANCE Caring for the Cintiq Replacing the pen nib 79 79 80 OTHER USEFUL INFORMATION Uninstalling Cintiq Managing preferences Installing multiple tablets Using applications integrated for tablet control Importing expert settings Pen and digital ink capabilities in Windows Product information Product specifications Battery specifications Warranty Service in the U.S.A. and Canada Warranty Service Outside of the U.S.A.
Contents Index 5 ABOUT THE MANUAL This manual provides quick access to information about your Cintiq Companion Hybrid (Cintiq). The information applies to the Windows and Mac operating systems (Desktop Mode), and to the Android operating system (Mobile Mode). For Desktop Mode, Windows screen captures are shown unless otherwise noted. • Go directly to Table of contents or Index topics by clicking on them. • Use the navigation controls to move through the manual. Contents Index Go to table of contents.
Contents Index 6 ABOUT THE CINTIQ COMPANION HYBRID The Cintiq Companion Hybrid is an interactive pen and touch display and sketch pad tablet in one device. It operates in two different modes: • Desktop Mode. When you connect the Cintiq to a computer using the Windows or Macintosh operating system, it functions as a display supporting pen and touch input for design and graphics work. It also can be used to play music from your computer, or for video conferencing. • Mobile Mode.
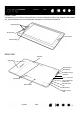
Contents Index 7 PARTS AND ACCESSORIES The Cintiq Companion Hybrid and supplied accessories are shown below. UNPACKING • Unpack the Cintiq and place it on your desktop, or another work area that is level and stable. Make sure the surface is flat, clean, and dry. Inventory the items and ensure the box contents are complete. • Remove any packing materials from the back of the Cintiq and its cabling. Save the packing materials and box for use when shipping or storing the Cintiq.
Contents Index 8 FRONT VIEW The features of your Cintiq are illustrated below. It can be configured for either right-handed or left-handed use, and positioned in one of two landscape orientations or two portrait orientations.
Contents Index 9 ATTACHING THE STAND In landscape orientation, the Cintiq stand can be used in one of three inclined positions. After attaching the stand, you can adjust the display incline as follows: 1. Place the Cintiq on a flat, stable surface. 2. Place the stand with the aluminum surface down and the three tabs facing up. 3. Decide which of the incline tabs you want to use. 4. Hold the Cintiq upright so you can see the back. 5.
Contents Index 10 GETTING STARTED When you have unpacked your Cintiq and are ready to begin using it, complete the following steps to turn on your Cintiq and launch the Setup wizard. Note: You must install the Windows or Macintosh driver for Cintiq to work properly in Desktop mode. Before you begin, read the Quick Start Guide that is included in the box with your Cintiq.
Contents Index 11 3-in-1 cable Interface and USB connectors Adapter plug Power adapter Caution Use only the power adapter provided, or an identical adapter, with your Cintiq. Use of an improper power adapter may damage the Cintiq. STEP 2: COMPLETE THE MOBILE MODE SETUP WIZARD 1. When your computer is connected, turn on the Cintiq to launch the Setup Wizard, which will guide you through the setup and installation process for Mobile Mode. 2.
Contents Contents Index Index 12 12
Contents Index • LANGUAGE. Select your preferred language. • WELCOME video. • PEN TO CURSOR ALIGNMENT. This item opens a calibration setup screen. 13 1. Tap the center of each crosshair with the pen tip. When you have finished, a test screen appears. 2. On the test screen, check the calibration by drawing several times on the screen. If you are satisfied with the results, click SAVE to accept the calibration. Click RECALIBRATE if you want to repeat the calibration for any reason.
Contents • Index 14 GOOGLE REGISTRATION. This item brings up a box for entering Google account information so you can register your Cintiq and access Google Play, Google +, Google Wallet, Gmail, and other Google services. From this screen, log in to your Google account if you have one. If you do not have a Google account, you can set one up here. You will need a Google account to access the Play Store. After you have logged in, you can: • Select your preferred language if it is not already displayed.
Contents Index 15 DESKTOP CENTER AND MOBILE CENTER FEATURES The following table provides an overview of key features and capabilities available in each mode. Item Desktop Mode Mobile Mode System requirements Windows 7 or 8 (32 or 64 bit configurations) or Mac OS X 10.
Contents Item Index 16 Desktop Mode Mobile Mode Front camera Webcam only Photos and video Rear camera Not supported Photos and video Microphone Webcam only Yes Headphone jack Yes Yes Speaker Yes Yes MicroSD card slot Yes Yes Micro HDMI-out port Not supported Yes Bluetooth Not supported Yes GPS Not supported Yes USB port Storage media, other peripheral devices Storage media, other peripheral devices Wifi Not supported Yes Attachable, adjustable stand Yes (three angles,
Contents Index 17 Item Desktop Mode Mobile Mode Customize Open the Wacom Desktop Center from the Start screen (Windows 8), the Start menu (Windows 7), or System Preferences (Mac) for links to system updates, file management, control panels, tutorials and manuals, and related features. 1) Open the Wacom Mobile Center from the Android Home screen for links to system updates, settings, file management, tutorials, and related features for the Cintiq.
Contents Index 18 MOBILE MODE The Cintiq Mobile Mode uses the Android operating system. It is the mode you are using when the Cintiq is not connected to your computer with the 3-in-1 cable or the HDMI connector. When in Mobile Mode, the Cintiq will function as an Android tablet with pen and touch input capability. When you are using the Cintiq in Mobile Mode, connect the cable from the power adapter directly into the 3-in-1 connector if you want to charge the Cintiq.
Contents Index 19 The following options are available from the Wacom Mobile Center: • USEFUL APPS. • FILE MANAGEMENT. Launches ASTRO File Manager, which helps you manage your content and files, including pictures, music, videos or documents, on your Cintiq and your computer via networking. You can also use ASTRO File Manager with popular cloud services such as Facebook Photo Albums, Dropbox, Google Driver, SkyDrive and Box.
Contents • Index 20 CREATIVE APPS. Launches Wacom Creative Canvas, Wacom Manga Canvas, or other apps that will enhance your creativity. These apps can also be launched from the Android Home screen. In CREATIVE APPS you can select WACOM RECOMMENDS to access a list of useful Android apps. • SYSTEM UPDATE. The system will inform you when a software update is available, and provides options for downloading and installing the update.
Contents Index 21 BATTERY STATUS AND OPERATION The battery status LED on the Cintiq indicates battery conditions as follows: Status Off Charging Fully charged Low battery Sleep LED Off Amber With AC power: Green Without AC power: Off With AC power: Amber Without AC power: Red (battery is below 10%) Off Battery status is displayed on the Wacom Desktop Center, the Mobile Center, and on the task bar on the Mobile screen. You will receive notifications if the battery charge falls to a low level.
Contents Index 22 DESKTOP MODE Desktop Mode is enabled when the Cintiq is connected to your computer with the 3-in-1 cable, and the software for PC or Mac operation has been installed (see Getting Started). Wacom Desktop Center will launch automatically after the Mac or PC driver has been installed. See The Wacom Desktop Center. Note: The use of some HDMI adapters can cause the Cintiq to switch to Desktop mode even if it is not connected to a computer, and your screen will be blank.
Contents Index 23 The following options are available from the Wacom Desktop Center: • SOFTWARE UPDATES. If software updates are available, you will see a notification message. Click on WACOM SOFTWARE UPDATES to view Cintiq driver updates for Desktop Mode. Click on the update you want to begin downloading and installation of the update.
Contents • Index 24 DEVICE. • ORIENTATION. During driver installation, you were asked to select a setting for either right-handed or left-handed use. This item allows you to reset that value, and to select a separate orientation for your Cintiq if you would like to do so. Note: On a Mac the orientation must be set from the Display Preference pane. A link to the pane location is provided under this option. • • PEN, TOUCH & BUTTONS. • TOUCH ON/OFF.
Contents Index 25 PEN FEATURES Side switch: The pen comes equipped with a customizable side switch. It has two functions that can be selected by rocking the switch in either direction. You can use the side switch whenever the pen tip is within proximity (5 mm (0.2 inch)) of the screen surface. You do not need to touch the pen tip to the display surface in order to use the switch. In Desktop Mode, by default the upper switch is set to DOUBLE CLICK, and the lower switch is set to RIGHT CLICK.
Contents Index 26 USING THE PEN The cordless, battery-free pen senses the amount of pressure and tilt you apply to the tip. There are four basic techniques for using the pen: pointing, clicking, double-clicking, and dragging. If you are unfamiliar with using the pen, see the following pages. Holding the pen The multi-touch feature Clicking Dragging Working with pressure sensitivity Drawing with tilt HOLDING THE PEN Hold the pen like you would a normal pen or pencil.
Contents Index 27 POSITIONING To position the screen cursor, move the pen slightly above the Cintiq screen without touching the screen surface. Press the pen tip on the screen to make a selection. Note: Calibrating the Cintiq ensures correct alignment of the screen cursor with the pen tip. In Desktop Mode, if the screen cursor does not jump to a position near the pen tip when you place the pen on the screen, the Cintiq software driver may not be installed or is not loading.
Contents Index 28 EXPRESSKEYS, ROCKER RING, AND CENTER BUTTON You can use the ExpressKeys, Rocker Ring and Center Button to perform frequently used functions or keystrokes, or to modify your pen or other input tool properties as you work. The four positions of the Rocker Ring (left, right, top and bottom) can be set and used just like ExpressKeys. The Center Button can be programmed to perform a specific function.
Contents Index 29 THE MULTI-TOUCH FEATURE Your Cintiq Companion Hybrid provides interactive multi-touch functions, which enable you to interact with a computer using only your fingertips on the pen display screen surface. You can use touch on the pen display as you would on any other Mac, Windows or Android device. For Windows and Mac gestures, refer to the Wacom Gesture Guide at www.wacom.com/en/support/ manuals. For Android gestures, see http://developer.android.com/design/patterns/gestures.html.
Contents Index 30 You can also customize touch functions with the ExpressKeys, Rocker Ring, and Center Button. See Pen features. Notes: • Two-finger actions and gestures apply primarily to the Mac. • Although some gestures may be similar, Windows systems use the Windows standard two-finger gestures by default. For a consistent experience across applications, select the USE WACOM gestures option in the Wacom Tablet control panel TOUCH OPTIONS tab.
Contents Index 31 CUSTOMIZING MULTI-TOUCH In Desktop Mode, you can use the Wacom Tablet control panel to customize your product for the way you like to use multi-touch. Select the TOUCH icon in the TOOL list. Then select an appropriate tab to customize, and change settings using the available options. See also selecting multi-touch.
Contents Index 32 You can create custom touch gestures by selecting the MY GESTURES tab. On a Mac: Enable touch by clicking the box. So that you can work in different ways, some functions (such as a right-click) can be performed using different actions or gestures. In Windows: The MY GESTURES tab is visible if you select the USE WACOM GESTURES option in the TOUCH OPTIONS tab. Multi-touch gestures are modified based on your selection from the drop-down menus, and are available when selected.
Contents Index 33 TESTING MULTI-TOUCH If you encounter problems with multi-touch: 1. Make sure the Cintiq is powered on. 2. Check the assigned touch functions or reset them to their default conditions. 3. Attempt to move the screen cursor by touching your finger in different places on the display screen surface. Touch to select an item. 4. If you are in Desktop Mode, open the Wacom Tablet control panel and click on the ABOUT button. In the dialog box that appears, click DIAGNOSE...
Contents Index 34 Allows you to choose a display if you are working with more than one Cintiq. Adjusts pen display brightness and contrast. Enables you to adjust the Cintiq color temperature, in degrees Kelvin. The default is 6500K. Independently adjusts the red, blue, and green color values. Changes you manually make to the color settings will override the color profile settings. Displays the Advanced dialog. Resets Wacom Display Settings choices to their previous settings.
Contents Index 35 CUSTOMIZING YOUR CINTIQ In Desktop Mode, you can customize your Cintiq and adjust input tool settings. Advanced users can learn how to further optimize the Cintiq by creating application-specific settings.
Contents Index 36 CONTROL PANEL OVERVIEW When you are working in Desktop Mode, you can use the Wacom Tablet control panel to customize your Cintiq and your pen. When you open the control panel, an icon for the pen or other input tool is displayed in the TOOL list. The appropriate tabs are displayed. To open the Control Panel: Windows 8: From the Windows 8 Start screen, click the WACOM TABLET PROPERTIES tile.
Contents Icons represent your pen display (TABLET), TOOL, and APPLICATION settings. Index 37 Choose FUNCTIONS to customize the ExpressKey and Radial Menu settings. Display Toggle options are available on multiple monitor systems. Choose PRO PEN to customize the pen settings. The icon is available after you have used a pen on the pen display. Tabs display customizable settings for the selected TOOL Displays information dialog, and option to DIAGNOSE... your product.
Contents Index 38 Tool Tips are available for most control panel items. Position the screen cursor over an item and let it rest there. The appropriate Tool Tip will pop up in a few moments. Your keyboard tab and arrow keys can also be used to navigate the control panel. Control panel lists and tabs: The control panel TABLET, TOOL, and APPLICATION lists allow you to select the display, tablet, tool, or application for which you want to change settings.
Contents Index 39 CALIBRATING THE CINTIQ For optimum performance, you must calibrate the Cintiq to align the screen cursor with the position of the pen on the screen. This is required to compensate for viewing angle, and to adjust for parallax. Place the Cintiq in its working position, then follow this procedure. 1. Open the Wacom Tablet control panel. If more than one tablet or pen display is installed on your system, select the pen display you are working with from the TABLET list. 2.
Contents Index 40 CUSTOMIZING THE PEN Use the pen when opening the Wacom Tablet control panel. The pen will be selected in the TOOL list and the appropriate tabs will be displayed. If not selected, choose the pen from the TOOL list. Select a tab and choose from the available options.
Contents Index 41 ADJUSTING TIP FEEL AND DOUBLE-CLICK To adjust the tip sensitivity of your pen, select the PEN tab. Customizes the amount of pressure needed to click, draw, or ink. To create broad brush strokes or to click with a light touch, use a SOFT tip setting. For maximum control while drawing thin lines, use a FIRM tip setting. Click to further customize the tip sensitivity. With your screen cursor positioned over an empty area of the control panel, press down on the pen screen with your pen tip.
Contents Index 42 ADJUSTING ERASER FEEL To adjust the eraser sensitivity of your pen, select the ERASER tab. Select the function to perform when using the eraser. Customizes the amount of pressure needed to erase. Click to further customize the eraser sensitivity. With your screen cursor positioned over an empty area of the control panel, press down on the Cintiq’s screen with your pen eraser. Use the pressure bar to determine how hard you must press on the eraser to reach maximum pressure.
Contents Index 43 CUSTOMIZING PEN BUTTONS Select the PEN tab to change the functions assigned to the side switches and tip of your pen. Drag to increase or decrease TILT SENSITIVITY. Test the new setting in an application that supports tilt. The tilt setting applies to both the tip and eraser. Tilt is direction-sensitive, and can be used in some applications to control brush orientation or other characteristics. When you bring the pen tip within 5 mm (0.
Contents Index 44 CUSTOMIZING TILT SENSITIVITY To adjust the tilt sensitivity of your pen, select the PEN tab. Tilt sensitivity determines how far you have to tilt the tool to produce the maximum tilt effect. You need to tilt the pen less at high sensitivity than at low sensitivity. Drag to increase or decrease TILT SENSITIVITY. Test the new setting in an application that supports tilt. The tilt setting applies to both the tip and eraser of your tool.
Contents Index 45 CUSTOMIZING THE EXPRESSKEYS To customize the ExpressKeys, select the EXPRESSKEYS tab. Each key can be customized to perform a Display Toggle, modifier, keystroke, or other function. The default ExpressKey settings are shown below. Choose a function to perform when the key is pressed. ExpressKey functions can be defined for use with specific applications. See ExpressKeys, Rocker Ring, and Center Button for more information. Click Show Express View to toggle Express View on or off.
Contents Index 46 CUSTOMIZING THE ROCKER RING AND CENTER BUTTON To customize the Rocker Ring or Center Button, select the ROCKER RING tab. Each position on the Rocker Ring, as well as the Center Button, can be set to perform a Display Toggle, modifier, keystroke, or other function. For Desktop mode, the default settings for the Rocker Ring buttons and Center Button are shown below. Choose a function to perform when a Rocker Ring button or the Center Button is pressed.
Contents Index 47 CREATING SCREEN KEYS OR SCREEN TOUCH STRIPS To create a new Screen Key panel or Screen Touch Strip panel: 1. Select the Functions icon from the Tools list in the Wacom Control Panel, and then the On-Screen Controls tab. Panel icons New Rename Duplicate Delete 2. In the On-Screen Controls tab, select NEW. The NEW PANEL dialog box will appear. 3. Enter a name for the panel. 4. Click the SCREEN KEY or TOUCH STRIP icon under PANEL TYPE, then click OK.
Contents Index 48 The default layout for a Screen Touch Strip panel is a 4 x 2 strip with a default function of AUTO SCROLL/ ZOOM. Wacom Control Panel icon opens Control Panel to On-Screen Controls tab Pin icon keeps key panel or touch strip panel open on the screen 5. To change the layout of the Screen Key or Screen Touch Strip panel, select the icon for the panel layout you prefer In the Layout area of the tab.
Contents Index 49 CUSTOMIZING SCREEN KEYS OR SCREEN TOUCH STRIPS To customize a Screen Key panel: 1. Select the name of the panel in the PANELS list. 2. Select the functions for each of the keys from the dropdown menus under SCREEN KEY ASSIGNMENTS. Each key will display the function you assign to it. 3. If you select Keystroke as your assigned function, the Keystroke dialog box will open for you to enter the keystrokes. (See KEYSTROKE...
Contents Contents Index Index 50 50
Contents Index 51 USING SCREEN KEYS OR SCREEN TOUCH STRIPS All Screen Key and Screen Touch Strip actions can be performed using your pen, finger, or mouse.To access an on-screen control, press the associated ExpressKey or Rocker Ring button. To use the Screen Key: Press the key for the desired function. The panel will close after you press the key, unless you select the Pin icon to keep the panel open.
Contents Index 52 BUTTON FUNCTIONS Customize the Cintiq for the way you like to work. When you are working in Desktop Mode you can simply use the Wacom Tablet control panel to change the button function that is assigned to a pen tool button, ExpressKey, or Radial Menu setting. Button function options may vary, depending on your Cintiq model. Not all options are available for all controls or Cintiq models. FUNCTION NAME DESCRIPTION CLICKS • CLICK Simulates a primary mouse button click.
Contents Index 53 FUNCTION NAME DESCRIPTION KEYSTROKE... Enables you to simulate keystrokes. Select this option to display the DEFINE KEYSTROKE dialog box. Enter a keystroke or keystroke combination in the KEYS entry box. Keystroke combinations can include letters, numbers, function keys (such as F3) and modifier keys (such as SHIFT, ALT, or CTRL for Windows, or SHIFT, OPTION, COMMAND, and CONTROL for Mac).
Contents Index 54 FUNCTION NAME DESCRIPTION RADIAL MENU Displays the Radial Menu on your screen. Each level of the hierarchical menu consists of eight menu slices which may contain various features and options to choose from. BACK Simulates the BACK command in browser applications. FORWARD Simulates the FORWARD command in browser applications. PAN/SCROLL... Enables you to position a document or image in any direction within the active pane.
Contents Index 55 FUNCTION NAME DESCRIPTION OPEN/RUN... Opens a dialog box where you can select a specific application, file, or script to launch. Click BROWSE... to locate an application, file, or script to launch. The selection you make appears in the NAME box. Click OK to accept the selection. The dialog box will close and the OPEN/RUN... option you have selected will be assigned as the pen button option. Simply press the pen button to launch the assigned option.
Contents Index 56 FUNCTION NAME DESCRIPTION PRECISION MODE Changes the mapping around the current pen tip position so that you must move the pen farther for the screen cursor to cover a specific distance on the screen. This feature can be very useful for the precise control of pen or brush strokes. You can adjust the precision setting when assigning this function to a tool button.
Contents Index 57 FUNCTION NAME DESCRIPTION MODE TOGGLE... Toggles between pen mode and mouse mode. When using the Cintiq on a multiple monitor system, this enables you to use your pen to control the other monitors in mouse mode. When first setting a pen button to MODE TOGGLE..., the MOUSE MODE dialog box is displayed where you can adjust the mouse acceleration and speed. Sets the screen cursor tracking speed when in mouse mode. Sets the screen cursor acceleration when in mouse mode.
Contents Index FUNCTION NAME DESCRIPTION SETTINGS Activates (on your screen) an interactive diagram of the current ExpressKey, Rocker Ring, Center Button, and pen settings. The current functions for each control are shown. 58 Click on any section of the diagram to change the settings or to open the appropriate Wacom Tablet control panel tab to adjust the settings.
Contents Index 59 USING AND CUSTOMIZING THE RADIAL MENU The Radial Menu is a pop-up menu that provides quick access to editing, navigation, media control functions, and more when you are working in Desktop Mode. • Set a tool button or ExpressKey to the RADIAL MENU function. Press the button to display the Radial Menu centered at the screen cursor position. • The hierarchical Radial Menu appears in circular format.
Contents Index 60 WORKING WITH DISPLAY TOGGLE The Display Toggle feature is available only on multiple monitor systems, in Desktop Mode. Set an ExpressKey or pen side switch to the DISPLAY TOGGLE function. Then press that button to toggle the screen cursor between the Cintiq and your other displays.
Contents Index 61 APPLICATION-SPECIFIC SETTINGS You can customize your tools for use with a particular application. For example, you may prefer a firm pen tip pressure setting in one application and a soft pressure setting in another. The APPLICATION list enables you to add an individual application to the list and then customize your tool settings for that application.
Contents Index 62 CREATING AN APPLICATION-SPECIFIC SETTING First choose the product and input tool for which you want to create an application-specific setting. Click on the APPLICATION list [ + ] button. Choose a method to select an application: • Open the application for which you want to create custom settings, and then select that application from the CURRENTLY OPEN APPLICATIONS box. • BROWSE to select the executable file of any application installed on your computer.
Contents Index 63 CHANGING APPLICATION-SPECIFIC SETTINGS To change tool settings for a specific application, select the tool and the application, and customize the tab settings. REMOVING APPLICATION-SPECIFIC SETTINGS To remove an application-specific setting: 1. In the TOOL list, select the tool from which you want to remove the application-specific setting. Then, in the APPLICATION list select the application you want to remove from the list. 2. Click on the APPLICATION list [ – ] button.
Contents Index 64 TROUBLESHOOTING The problems and solutions described in this section are applicable to the Cintiq when it is operating in Desktop mode. You have several options available for troubleshooting: 1. If the Cintiq does not function properly, refer to display troubleshooting (desktop mode) or tablet troubleshooting. The problem and solutions may be described there. 2. Check the NOTES file provided with the driver download for updates. 3. Visit www.wacom.
Contents Index 65 TESTING THE CINTIQ IN DESKTOP MODE 1. If there is no display: • Make sure that your computer is turned on. • Verify that the Cintiq is connected to an active digital video port. • Check that your video card has been properly installed and is functional. If you have another display that is compatible with your video card, you can connect that display to the card in order to verify that the video card is operating correctly. 2.
Contents Index 66 TESTING CONTROLS AND INPUT TOOLS If the pen or the Cintiq controls do not work as you expect, check the assigned functions or reset them to their default conditions. When you are in Desktop Mode, a quick way to return a pen to its default condition is to remove it from the control panel TOOL list. Do this by selecting the pen and clicking on the TOOL list [ – ] button. After the pen has been removed, place it back onto the screen surface.
Contents Index 67 TESTING THE EXPRESSKEYS, ROCKER RING, AND CENTER BUTTON If you are in Desktop Mode, use the following procedures to test these features. 1. With the DIAGNOSTICS dialog box open, observe the TABLET INFO column as you test each ExpressKey or Rocker Ring button. Be sure to select the pen display you are testing from the TABLET INFO column. 2. Test the ExpressKeys, Rocker Ring buttons or Center Button by pressing them one at a time.
Contents Index 68 3. Test tilt for the x-axis by moving the pen from a vertical position toward the right; the X TILT value should change from approximately 0 to +60. Now move the tool to the left of vertical; the X TILT value should change from approximately 0 to - 60. 4. Test the tilt for the y-axis by moving the pen from a vertical position toward the bottom of the tablet; the Y TILT value should change from approximately 0 to +60.
Contents Index 69 A ‘set refresh range’ message appears briefly on the screen. Set the refresh rate to a vertical frequency that is compatible with your Cintiq. See the Important Product Information guide for frequency range details. The image appears multiple times on the display. When a still image is displayed for a long period of time without refreshing the screen, an after-image remains for a short period of time. Color quality is inaccurate.
Contents Index 70 TABLET TROUBLESHOOTING If you encounter problems with the tablet portion of the Cintiq, check the following tables. Your problem may be described here, and you can try the solution offered. Also check the Notes linked to the driver download screen for the latest information updates. For additional information, visit the Wacom website. Windows-specific problems Mac-specific problems The computer does not have an available USB port.
Contents The eraser selects everything or will not stop erasing. You notice a delay at the beginning of pen or inking strokes. You have to press hard with the pen when clicking, drawing, or writing. The pen tip does not function. Index 71 • Open the Wacom Tablet control panel and go to the ERASER tab and move the ERASER FEEL slider toward FIRM. • Select CUSTOMIZE... and increase the CLICK THRESHOLD setting. If this does not help, see testing controls and input tools.
Contents Index 72 When using Cintiq on a multiple monitor system, you cannot use the pen to control the other monitor(s). • Cycle between pen control for Cintiq and your other displays by pressing an ExpressKey or pen button that is set to Display Toggle. • The line you are drawing does not line up with the location of the screen cursor. • You can use your pen to control the other monitors in mouse mode. To use mouse mode, first set a pen button to MODE TOGGLE....
Contents Index 73 WINDOWS-SPECIFIC PROBLEMS You suspect the Cintiq preferences may be corrupted, or want to make certain that all settings are at their factory defaults. Use the Wacom Tablet Preference File Utility to work with preferences: • Close any open applications. • Click the START icon and select ALL PROGRAMS. • Then select WACOM TABLET and WACOM TABLET PREFERENCE FILE UTILITY. Windows 8: From the Windows 8 Start screen, click the WACOM TABLET PREFERENCE FILE UTILITY tile.
Contents Index 74 MAC-SPECIFIC PROBLEMS At startup, a dialog box appears telling you that either the driver failed to load or the Cintiq preferences have not yet been created. You suspect the Cintiq preferences may be corrupted, or want to make certain that all settings are at their factory defaults. The tablet portion of the Cintiq was not detected at startup. Make sure the USB cable is securely connected to an active USB port on your computer or USB hub.
Contents Ink does not work correctly with the Cintiq. Index 75 There may be a problem with the Ink preferences. Remove the damaged preference files as follows. They will be re-created when you enable handwriting recognition. 1. Open SYSTEM PREFERENCES, choose SHOW ALL and select INK. Then turn off handwriting recognition. 2. From the GO menu, choose your HOME. Open the LIBRARY and PREFERENCES folders. Remove the following preferences: • COM.APPLE.INK.FRAMEWORK.PLIST • COM.APPLE.INK.INKPAD.
Contents Index 76 SUPPORT OPTIONS If you have a problem with your Cintiq, review Getting Started section to make sure the Cintiq is set up and installed correctly. • If you cannot find the answer you need in this manual, you may find updated information about your problem in the Notes file linked to the driver download screen on the Wacom website. You can also check the product FAQs (Frequently Asked Questions).
Contents Index 77 FREQUENTLY ASKED QUESTIONS This section provides answers to some of the more commonly asked questions about the Cintiq. To browse more FAQs, visit the Wacom website for your region. Will the Cintiq work in all applications? What software applications support the Cintiq’s features? Can I have the Cintiq and a mouse connected to my computer at the same time? Can I use older Wacom input tools with the Cintiq? The installer is asking for a password.
Contents Index 78 Can I use older Wacom input tools with the Cintiq? Pens and accessories are generally specific to the product model they come with, so they may not be interchangeable. Visit the Wacom website for your region and check the Support and Cintiq product pages for details. The installer is asking for a password. What is the password? The computer is looking for a password that is either your personal password or the administrative password to log into the computer.
Contents Index 79 CARE AND MAINTENANCE This section provides tips for the care and maintenance of the Cintiq. Caring for the Cintiq Replacing the pen nib CARING FOR THE CINTIQ Keep pens and the Cintiq LCD screen surface clean. Dust and dirt particles can stick to the pen and cause excessive wear to the screen surface. Regular cleaning will help prolong the life of your LCD screen surface and pen. Keep the Cintiq and pens in a clean, dry place and avoid extremes in temperature. Room temperature is best.
Contents Index 80 REPLACING THE PEN NIB To protect your Cintiq from damage and for best performance, periodically replace your pen nibs. Important: Replace the pen nib before or when it looks like this:. The pen nib (tip) will wear with normal use. Excessive pressure will cause it to wear more quickly. Replace the nib when it gets too short or develops a flat edge. 1.
Contents Index 81 OTHER USEFUL INFORMATION This section includes information and instructions on the topics listed below. Uninstalling Cintiq Managing preferences Installing multiple tablets Using applications integrated for tablet control Importing expert settings Pen and digital ink capabilities in Windows Product information Ordering parts and accessories UNINSTALLING CINTIQ Follow the appropriate procedure below to remove the Wacom driver software and the Cintiq from your system.
Contents Index 82 MANAGING PREFERENCES Windows 8: From the Windows 8 Start screen, click the WACOM TABLET PREFERENCE FILE UTILITY tile. If you are using Windows 8 Classic Desktop, press the Windows key on your keyboard, or select the Windows icon in the Charms bar, to access the Start screen. Windows 7: 1. Click the START icon and select ALL PROGRAMS. 2. Select WACOM and WACOM TABLET PREFERENCE FILE UTILITY. For all Windows systems, set your preferences as follows: 1. Close any open applications. 2.
Contents Index 83 INSTALLING MULTIPLE TABLETS In Desktop Mode, any Cintiq or tablet that has been detected on your system will appear as an icon within the Wacom Tablet control panel TABLET list. Select a pen display or tablet icon for which to customize tool and application settings. • The control panel will not launch unless a supported pen display or tablet is connected to the computer. • Settings can only be viewed or changed for an attached pen display or tablet.
Contents Index 84 USING APPLICATIONS INTEGRATED FOR TABLET CONTROL Some software applications may be designed to directly control ExpressKey or Rocker Ring functions. When working in an application that has been integrated in this manner, the ExpressKeys or Rocker Ring may perform differently than the function that is set in the Wacom Tablet control panel.
Contents Index 85 IMPORTING EXPERT SETTINGS The import expert settings feature enables you to import customized Wacom Tablet control panel settings that have been specified in an XML (Extensible Markup Language) file. • Some software developers may create custom settings files which are specifically designed to provide optimum performance when using your Wacom product with their applications.
Contents Index 86 PEN AND DIGITAL INK CAPABILITIES IN WINDOWS Microsoft Windows 8 and Windows 7 provide extensive support for pen input. Pen features are supported in all versions of Windows 8 and Windows 7 except Windows 7 Starter and Home Basic. Note: For full functionality of Windows pen and ink capabilities, make sure that the USE WINDOWS INK checkbox on the Calibration tab of the Wacom Control Panel is checked. • Note taking. Jot notes and capture quick sketches in Windows Journal.
Contents Index 87 Search the Microsoft website for enhanced information about digital inking in Windows. You can also visit the Wacom website at www.wacom.com and search digital inking in Windows. Note: The following workaround in the Wacom software driver improves performance in Windows 7: • To improve performance, the Pen Flicks and ‘press-and-hold-to-right-click’ features are disabled in some graphics applications such as Photoshop.
Contents Index 88 WARRANTY SERVICE IN THE U.S.A. AND CANADA The full product warranty and licensing agreement is provided in the Important Product Information guide, which can be accessed from the Wacom Desktop Center. To obtain Warranty service within the U.S. or Canada contact: Wacom Support Center Phone: 1.360.896.9833 Email Inquiry form: http://www.wacom.com/support/email.cfm WARRANTY SERVICE OUTSIDE OF THE U.S.A.
Contents Index 89 ORDERING PARTS AND ACCESSORIES For a list of available parts and accessories, visit the Wacom website for your region. You can also do the following: • In the USA or Canada, call 1.888.884.1870 (toll-free) or visit Wacom’s website at http://direct.wacom.com (USA only). • In Europe, call +49 (0)180.500.03.75 or send an email to spareparts@wacom.eu. Or, visit http://shop.wacom.eu.
Contents Index 90 GLOSSARY Active area. The area of the Cintiq where your tools are detected. Application-specific settings. Cintiq tool and Cintiq settings that have been customized for individual applications. The Wacom Tablet control panel enables you to customize a tool to behave uniquely in different applications. Application-specific settings are in effect whenever you use the application. Aspect. The ratio between the vertical and horizontal dimension of the active area on the Cintiq. Click force.
Contents Index 91 Parallax. The angular distortion of an object’s position when viewed through glass or other medium. You must calibrate the Cintiq to compensate for this effect, and to align the screen cursor with the position of the pen on the screen. Parallax effect caused by screen glass. Note how the position of the pen tip and screen cursor are not aligned. No parallax. The pen tip and screen cursor are aligned. Pen mode. A method of positioning the screen cursor.
INDEX About the manual 5 Accessories ordering 89 Adding a new tool 63 Applications, integrated for tablet control 84 Application-specific settings changing settings 63 creating 62 removing 63 working with 61 ASTRO application 18 Button functions 52 Calibrating, pen display 39 Care and maintenance 79 Center Button 46 Cintiq Control Panel overview 36 customizing 35 front view 8 incline, adjusting 9 pen features 25 software installation 11, 14 testing 65 the multi-touch experience 29 troubleshooting 64 uni
On-screen controls assigning panels 49 customizing 51 managing 51 Screen Key 51 Screen Touch Strip 51 Ordering, parts and accessories 89 Parts ordering 89 Pen customizing 40 eraser 25 holding 26 nib, replacing 80 positioning with 27 pressure sensitivity, working with 27 side switch 25 testing 67 tilt, drawing with 27 tip 25 using 26 Pen display calibrating 39 customizing functions 38 Pen nib, replacing 80 Pens, optional 40 Positioning, with pen 27 Preferences, managing 82 Pressure sensitivity, working wi