User's Guide 끤녋 閻넯麗 使用手冊 使用手冊 DTI-520(A)_ 1-4.
The following symbols appear throughout this user guide in order to ensure safe use of the DTI-520 (hereafter referred to as “DTI-520,” “the product” or “this product”). Please read these items carefully and always heed the Warning and Caution items when using your DTI-520. Warning Caution User's Guide Safety Precautions This symbol indicates an item that, if ignored when handling the product, could lead to the loss of life or serious injury.
Safety Precautions Caution ■ Do not use organic solvents to clean this product. When cleaning the product, never use such organic solvents as alcohol. Such solvents may cause discoloration and deterioration in quality. ■ Do not let the product get wet. Please do not place containers such as cups and vases containing water near the product. Coming in contact with water or other liquids may cause product failure.
User's Guide Caution ■ Do not connect or disconnect any cable while the product or your computer is on. Do not connect or disconnect any cable (including the USB cable) or the power adapter while your computer or this product is turned on. This may cause damage to the product or to your computer. UM-0314(A)_EN.
Safety Precautions Please take the following precautions to protect the health of your eyes. Precautions 1 Wacom Company, Ltd. holds the copyright to the auxiliary tablet. ● When using the product, make sure that the 2 The unauthorized duplication or reproduction in room is sufficiently illuminated and be careful whole or in part of the tablet driver or this user not to get your face too close to the screen. guide is expressly prohibited.
Safety Precautions..................................................................... 1 Table of Contents....................................................................... 5 User's Guide Table of Contents Component Functions................................................................ 6 Opening the Stand.......................................................................................................7 Using the Penholder......................................................................
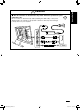
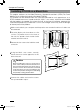
Component Functions Front Status LED When the pen switch is on, this will become blue. Power LED Lights blue when power has been supplied the DTI-520 and the computer and video signals are present. Glows orange when no video signal is detected by the DTI-520. Integrated LCD Monitor and Tablet Top Power Switch Menu Button - Button ▶ P.15 + Button ENTER Button Pen Rest Place the pen here while the pen is not in use. Back Stand Adjustment Lever ▶ P.7 Connector ▶ P.10-11 Stand ▶ P.7 UM-0314(A)_EN.
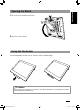
1Pull up on the stand adjustment lever. User's Guide Opening the Stand 1 2 2Lower the stand carefully. Using the Penholder Pull the penholder towards you as shown in the illustration below. Caution Always close the stand and, as shown in the above illustration, lay the tablet on its side before pulling the penholder out. UM-0314(A)_EN.
Component Functions Installing DTI-520 on a Mount Arm This product conforms to the Video Electronics Standard Association’s (VESA) Flat Panel Monitor Physical Mounting Interface Standard (FPMPMI). This product can be removed from the stand and mounted on such apparatuses as a VESA-standard mount arm. In order to do this, M4/0.7 mm screws, which are not included with the product, are needed. Use screws that will, at the time of installation, penetrate the surface of the product by no more than 15 mm.
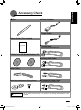
● Pen ● User ● Power Adapter ● Power Cable ● Serial Cable User's Guide Accessory Check Guide (This booklet) User Guide *Not included in DTI-520UB model ● Tablet Driver CD/ Bundled Software CD ● Analog ● Pen Tether ● USB ● Pen Tether Attachment Fitting / Screw Important RGB Cable Cable ● Composite Video Cable *Not included in DTI-520UB model Do no throw the box away; it is useful for the storage and transport of the product. UM-0314(A)_EN.
Connecting DTI-520 1Turn off both your computer and the product. 2Connect the Analog-RGB connector to your computer’s display port. 3Connect the power adapter to the power cable and connect the DC power connector to the DC power input terminal. Next, plug the power cable into your electrical outlet. Be sure to also connect a ground wire. 4Turn on the product’s power switch. The power indicator lamp will light up orange. 5Turn on your computer. Important - Do not modify the refresh rate.
User's Guide 2 Computer Analog RGB connector Analog RGB cable To analog RGB port 3 Connectors Area DC Power Input Terminal Outlet Power cable Ground Wire Power Adapter 8 Use the connection that is appropriate for your computer. Make sure to connect only one of the cables shown. (For Macintosh, only a USB cable connection is possible.) To USB port USB connector USB cable Serial connector Serial cable If necessary, connect them.
Installing the Tablet Driver Windows Setup Before installation, connect the DTI-520 USB cable or serial cable to your computer and turn the unit on. 1First turn on the DTI-520. Then turn your computer on and login, allowing the operating system to fully load. The DTI-520 will automatically register as a USB device. 2Insert the DTI-520 tablet driver CD into the CD-ROM drive. The DTI-520 menu should automatically display. If the menu does not display, double-click on the INSTALL icon (located on the CD).
Switching Display Images Either an image input from the RGB – RGB cable (see P. 11) or an image input from the composite video cable (see P. 11) will be displayed on the DTI-520. Either of these images can be replaced by using the following method: User's Guide The DTI-520 Display ● Switch at the INPUT CONVERSION screen, which can be assessed from the menu screen.( ▶ P.17) ● Click on the ENTER button.( ▶ P.
Blurring and Protrusion of the Picture from the LCD Panel Caution This setting is effective when the product and computer are connected by a RGB cable. Depending on the type of computer and graphics board, the Auto-Adjust function is sometimes not able to operate at full power, resulting in the picture blurring and protruding from the LCD panel. If this happens, adjust the pitch and phase. At 1024 x 768-bit, the resolution is optimally adjusted.
The DTI-520 Display Menu button : Opens or closes the OSD Menu. − buttons, + buttons : You can select an option that can be activated.After activatng a selected option, press the + button to increase a selected item value, and press the - button to decrease it. User's Guide On-Screen Display (OSD) Menu Buttons ENTER Button Activates or deactivates the selected OSD menu option. Also switches the image input from the RGB – RGB cable and the image input from the composite video cable. ▶ P.
Types of OSD Menus Some menu screen displays may vary depending on whether a RGB cable or a video cable is connected. The following screens explained in Common Screens below are the same ones regardless of the connection method. ● Common Screens Contrast Language Select to increase or decrease image contrast. Caution: Provided “direct” is selected on color temperature, it cannot be changeable. Select to choose a language option for the OSD: English, Deutsch, Francais, Espanol, Italiano, or Japanese.
The DTI-520 Display User's Guide Signal Source Select D-SUB and the image input from the RGB – RGB cable displays. Select VIDEO and the image input from the composite video cable displays. ● Screens that Display with a RGB Cable Connection Horizontal Center (VGA only) Phase (VGA only) Select to move the screen image left or right. To automatically adjust, use the Reset screen. Select to reduce or eliminate horizontal distortion lines. To automatically adjust, use the Reset screen.
Pen The Parts of the Pen and Their Functions Second Side Switch With one touch of the second side switch, functions that have been previously established become functional. ▶ P.21-22 Side Switch With one touch of the side switch, functions that have been previously established become functional. ▶ P.21-22 Pen Tip • You can change the position of the screen pointer by moving the tip of the pen. • By varying the amount of pressure applied, the boldness of lines and the size of points can be adjusted.
User's Guide Basic Operations of the Pen Moving the Pointer By raising the pen a little above the screen and moving it, you can move the position of the screen pointer. Clicking and Double-clicking Clicking Tap on the screen lightly once with the tip of the pen to click. Double-clicking Tap in the same place twice quickly with the tip of the pen to double-click. Note The second side switch is set to double-click as a default setting.
Using the Control Panel Change the settings for the pen and adjust the pointer and pen tip positions with the control panel. *When connecting and using multiple tablets, see page 24. Displaying the Control Panel Opening the Control Panel in Windows Click on the Windows Start button, go to All Programs (P) or Programs (P), open Pen Tablet and select Pen Tablet Properties. Opening the Control Panel in Macintosh Open System Settings and then Pen Tablet. Control Panel Basics You select the pen tab.
Using the Control Panel Function Names Windows Macintosh Click Click Right-Click Right-Click Middle-Click Middle-Click 4th click(Forward) 5th click(Back) Double-Click Click-Lock Pop-up Menu Erase Keystroke MODIFIER User's Guide Switch and Button Settings Description Performs the same operations as a normal mouse. Simulates a 4th mouse button click, which on Windows systems typically issues the Forward command in browser applications. Not available on Macintosh systems.
Function Names Windows Description Macintosh Journal Open/Run... Ink Toggle Application Defined Default Settings Disabled This function opens Microsoft Journal, an application for Windows Vista and tablet PC. Opens an application or file. This function will open a dialog box. Click Browse to select an application or file. The selection you make appears in the Application To Run box. Click "OK" to accept the selection. Lets you use your pen to toggle the Ink Anywhere function of Inkwell on and off.
Make the necessary adjustments so that when the pen nib is brought near the LCD screen, the pointer displays properly in the area where the pen nib is placed (parallactic adjusting). * When using an analog RGB input type of LCD pen tablet, please refer to “Blurring and Protrusion of the Picture from the LCD Panel” on P. 14 and make any necessary adjustments to the screen. * When using multiple tablets, see page 24. User's Guide Synchronizing the Positions of the Pen Tip and Pointer 1 Click on Calibrate..
Using Multiple Interactive Pen Displays When multiple interactive pen displays are connected and are to be used, it is necessary to set up the pen and calibrate for each interactive pen display individually. Please follow the procedures below to carry this out. 1Bring the pen tip near the display for which the setup is to take place. Verify that the pointer moves in conjunction with the pen tip. 2Open the control panel.
Removing Stains If the product casing or pen becomes soiled, wipe off with a clean, soft cloth. If this fails to remove the stains, soak a clean, soft cloth with a water-diluted detergent mixture, wring thoroughly and wipe off. If the protective covering for the LCD display becomes soiled, wipe with a dry, soft cloth. If the stain is difficult to remove, try moistening the cloth slightly. Caution User's Guide Supplementary Information Do not use detergents for cleaning.
Supplementary Information Attaching the Pen Tether The pen tether may be attached to ensure that the pen is not lost or mislaid. Procedure: 1Pass the tip of the pen tether through the fitting. Installation Fitting 2.Pass the tip through the loop of the opposite end of the pen tether. 3.Pass the opposite tip of the pen tether through the hole at the top of the pen, and then pass the fitting through the loop. 4.Secure the fitting with the screws provided.
User's Guide Troubleshooting Display Troubleshooting If One of These Messages Should Appear... Message What to Do Reference Prior to connecting the product, if you have a monitor that you have been using, connect it and then adjust the horizontal frequency to 30–80 kHz and the vertical frequency to 50 –75 Hz. Connect the product. - Verify that the video signal cable* is connected. - Verify that the video signal cable connector pins are not bent or broken.
Troubleshooting If One of These Conditions Should Appear... Condition What to Do Reference The power lamp lights up orange or orange and blue. • Verify that the video signal cable is connected. • Verify that the video signal cable connector pins are not bent or broken. • When the computer goes in to power saving mode, move the mouse or press any keyboard key. • Verify that the computer graphics board is correctly installed. • Verify that the power cable is connected and turn the power switch on. P.
Condition What to Do Reference The pen nib produces a click even when only very lightly coming in contact with the screen. The pen does not produce a click unless excessive pressure is used. The pen nib produces a click prior to coming into contact with the screen. Use the control panel to set the pen nib sensitivity to Firm setting. P.20 Use the control panel to set the pen nib sensitivity to Soft setting. Use the control panel to set the pen nib sensitivity to Firm setting.
Troubleshooting Troubleshooting for Windows Condition Even when connected to the USB port, the pen is inoperable. When Windows is in DOS full screen mode, moving the pointer with the pen becomes impossible. If the mouse is set for left-handed use in the regular mouse control panel, the ability to click with the pen nib is lost. What to Do •Check the connection of the USB connector. If using a USB hub connection, try connecting directly to the computer’s USB port.
User's Guide Specification General Specifications Physical dimensions(W D H): 344 × 300 × 49 mm (excluding stand) Weight: 4.
Warranty (WORLDWIDE, EXCEPT FOR EUROPE, AFRICA AND MIDDLE EAST) Limited warranty Wacom warrants the product, to the original consumer purchaser, except for the Software and consumable items such as the pen nibs, to be free from defects in materials and workmanship under normal use and service for a period of two (2) years, from the date of original retail purchase, as evidenced by a copy of the receipt and registration with Wacom within 30 days of purchase. The Software is licensed “as is.
Warranty service outside of the U.S.A. and Canada User's Guide In the event that any of the above limitations are held unenforceable, Wacom’s liability for any damages to you or any party shall not exceed the purchase price you paid, regardless of the form of any claim. This Limited Warranty is governed by the laws of the United States of America and the state of Washington.
Obtaining Technical Support If you experience a problem with this product that cannot be solved by referring to this guide or the manual included with your driver CD, please refer to our online FAQ or contact our support staff. Online FAQ: http://www.wacom-asia.com/faq/faq_index.html Email: http://www.wacom-asia.com/contact/contact_index.html Phone support is available from 9:00 am - 6:00 pm on weekdays: Tel: +81-3-5309-1588, Fax: +81-3-5309-1514 (International calling fees differ by region.
UM-0314(A) Interactive Pen Display DTI-520 User's Guide ©2007 Wacom Co., Ltd. All rights reserved. DTI-520(A)_ 1-4.indd 2 Wacom Co., Ltd.