
User's Manual


7
IndexContents
7
IndexContents
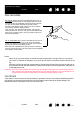
Interactive pen display
PEN DISPLAY FEATURES
Familiarize yourself with the features and components of your product.
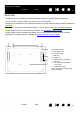
FRONT VIEW
123
4
Pen Display Features
1 - Status LED
2 - Pen storage compartment
3 - Pen stand
4 - ExpressKeys
DTU-1031 ExpressKeys are shown as
1 through 4, from top to bottom
(standard Landscape mode)
The features of the DTU-1031 pen display are illustrated below and listed in the Pen Display Features box.
See Using the ExpressKeys
for descriptions and a table of default ExpressKey functions.
Note: The DTU-1031X does not have ExpressKeys.
Place the pen into the storage compartment by inserting the nib end of the pen into the left side of the
compartment with the side switch up. Gently press the pen into the compartment. Take care not to damage
the pen nib.
Note: The DTU-1031 pen has a side switch, and the DTU-1031X pen does not. The DTU-1031 pen can be
used with the DTU-1031X. To obtain a DTU-1031 pen, please contact your Wacom representative.
To place the cover on the pen compartment, position the cover with the pen nib outline facing to the left.
Align the cover with the top of the pen compartment and press the cover into place.
Remove the pen by pressing on the pen tip side near the top notch to eject the opposite end from the
compartment, being careful not to damage the pen nib. Grasp the pen and remove.
The pen can also be placed upright in the pen stand, or secured to the pen display with the pen tether
provided (see Pen Tether
).
1
2
3
4
Pen Display Orientation Options
• Landscape (shown) - ExpressKeys left
• Landscape Flip - ExpressKeys right
• Portrait - ExpressKeys top
• Portrait Flip - ExpressKeys bottom