USER’S MANUAL FOR WINDOWS ® ® Navigation Contents Index
Wacom Graphire User’s Manual for Windows®, August 15, 2000 International English V2.1 for Windows Copyright Wacom Company, Limited, 2000 All rights reserved. No part of this manual may be reproduced except for your express personal use. Wacom reserves the right to revise this publication without obligation to provide notification of such changes. Wacom does its best to provide current and accurate information in this manual.
RADIO AND TELEVISION INTERFERENCE The equipment described in this manual generates, uses, and can radiate radio-frequency energy. If it is not installed and used properly—that is, in strict accordance with Wacom instructions—it may cause interference with radio and television reception. FCC NOTICE This equipment has been tested and found to comply with the limits for a Class B digital device, pursuant to Part 15 of FCC Rules.
CE DECLARATION The Graphire digitizing tablet, model ET-0405-R, has been tested by the WAVE Corporation in Japan, and model ET-0405-U has been tested by the Tokin Corporation in Japan and found to comply to the following harmonized European Norms: • EN 50082-1 (electromagnetic immunity) • EN 55022 Class B (electromagnetic emissions) Based on the results of these tests, Wacom declares that the above mentioned devices conform to Article 10.
TABLE OF CONTENTS Trademarks Radio and Television Interference FCC Notice CE Declaration About the Manual Navigating the Manual 2 3 3 4 8 10 INSTALLATION 11 Things to Know Before Installation USB Tablet Installation Installing the Hardware Installing the Software Serial Tablet Installation Installing the Hardware Installing the Software Windows 98, Me, and 2000 (Plug and Play Install) Windows 95 and NT 4.
Customizing Your Pen and Cordless Mouse Graphire Pen Tabs Graphire Cordless Mouse Tabs Adjusting Tip Feel Adjusting Double-Click Customizing Tool Buttons Button Functions Adjusting Eraser Feel Tablet to Screen Mapping Positioning Mode Orientation Aspect Tablet Area Display Area Customizing the Graphire Cordless Mouse Customizing the Cordless Mouse Fingerwheel Customizing the Pop-up Menu Add Keystrokes Add Mapping Options Removing Keystrokes and Mapping Options Working with Graphire Tools Adding a Tool Worki
Contacting Technical Support Linking to the Web Page Pre-Contact Checklist Who to Call USA, Canada, Central and South America Europe, Middle East and Africa Japan Asia Pacific (English) APPENDICES 99 99 99 100 101 102 103 103 104 Installing Multiple Tablets Product Specifications Graphire Tablet (Models ET-0405-R, ET-0405-U) Graphire Pen (Model EP-100E) Graphire Cordless Mouse (Model EC-100) Graphire Inking Pen (Model EP-200, optional) Parts and Accessories Ordering Parts and Accessories License and War
ABOUT THE MANUAL This interactive User’s Manual provides quick access to information about Graphire. Just click on a navigation button or highlighted word to move through the document. The information is common to both serial and USB tablets, unless otherwise noted. • The Table of Contents enables you to go directly to a topic by clicking on it. • Installation describes how to install the hardware and software, and how to uninstall the software.
SMALL CAPITAL LETTERS are used to identify the names of keyboard keys, dialog boxes, and control panel options. As you read through the Customizing and Advanced Features chapters, you will notice that the screen shots of the control panel tabs do not show the tab buttons. These are intentionally left out in order to save space within the manual. Remember that you can always use the Acrobat Reader zoom-in tool to increase the size of the manual on your display screen.
NAVIGATING THE MANUAL Use the navigation controls to move through the manual: Go to front page. Contents Index Go to Table of Contents. Go to Index. Go back to previous view. Page back, or page forward. HEADING TEXT Go to beginning of section. Topic Go to topic. Topic continued. The Acrobat Reader provides you with additional tools for using and printing the manual. Refer to the Acrobat Reader Online Guide for more information.
INSTALLATION USB tablets are compatible with Windows 98, Windows Me, Windows 2000, and with all applications that support a mouse. Graphire serial tablets are compatible with Windows 95, 98, Me, NT 4.0, Windows 2000, and with all applications that support a mouse.
THINGS TO KNOW BEFORE INSTALLATION For USB tablets, your computer must be USB ready and the USB port or hub you are connecting your tablet to must be active. See Verifying Your Computer is USB Ready for more information. For serial tablets: • Turn off your computer and attach the tablet before installing the software. • If your computer does not have an available serial port, you will need to remove an existing serial device or add an additional serial port.
USB TABLET INSTALLATION INSTALLING THE HARDWARE Graphire USB tablets require a Windows 98, Me, or 2000 system with USB port. Graphire supports hot-plugging, which allows you to connect or disconnect Graphire while your computer is turned on. 1. Plug Graphire... ...into an active USB port on your computer ...or into an active USB hub. 2. If your computer is off, turn it on and allow the operating system to fully load. Windows 98 .
INSTALLING THE SOFTWARE Graphire USB tablets require a Windows 98, Me, or 2000 system with USB port. Note that you must install the tablet software from the Graphire Tablet CD to get full tablet functionality. • • Insert the Graphire Tablet CD into the CD-ROM drive. Double-click on the software SETUP icon located on the Graphire Tablet CD. • Select a language from the CHOOSE SETUP LANGUAGE dialog box and follow the prompts to complete the installation of the Graphire driver software.
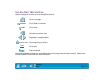
SERIAL TABLET INSTALLATION INSTALLING THE HARDWARE First turn off your computer. A. Disconnect your mouse or keyboard and plug the PS/2 tablet connector into that port. B A B. Plug your mouse or keyboard (whichever one you removed) into the adaptor cable. C. Plug the serial connector C into your computer’s serial port. Important: You must plug in both the serial connector (C) and the power splitter cable (A) for your tablet to work.
INSTALLING THE SOFTWARE Follow the instructions for your version of Windows. WINDOWS 98, ME, AND 2000 (PLUG AND PLAY INSTALL) WINDOWS 95 AND NT 4.0 (MANUAL INSTALL) Windows 98, Me, and 2000 (Plug and Play Install) • • • • • • • Turn on your computer. The tablet LED will light. The NEW HARDWARE FOUND dialog box will display, followed by the ADD NEW HARDWARE WIZARD. If the ADD NEW HARDWARE WIZARD does not display, follow the instructions under the Windows 95 and NT 4.0 (Manual Install) section.
Windows 95 and NT 4.0 (Manual Install) • • • • • • Turn on your computer. The tablet LED will light. If the NEW HARDWARE FOUND dialog box displays, select CANCEL. Insert the Graphire Tablet CD into the CD-ROM drive. Click on the START button and select RUN.... In the dialog box, type the letter of your CD-ROM drive and \SETUP. For example, D:\SETUP. If your CD-ROM has a different drive letter, type that letter instead of D:. Then click OK.
UNINSTALLING THE SOFTWARE To remove the Graphire software from your system: 1. 2. 3. 4. Click the Windows START button. Then choose SETTINGS and CONTROL PANEL. In the CONTROL PANEL window, double-click on the ADD/REMOVE PROGRAMS icon. In the dialog box that appears, choose the Wacom tablet option. Click on the ADD/REMOVE... button and follow the prompts to remove the Graphire software driver. REGISTRATION Please be sure to register your product.
USING GRAPHIRE This section introduces you to the Graphire pen and mouse set. If you are new to using a graphics tablet and tablet input tools, read the following sections. They describe your Graphire tools and explain how to use them with the tablet.
APPEARANCE AND FEATURES The Graphire Pen and mouse set consists of two basic elements: a graphics tablet that serves as your work area, and the Graphire Tools you use with the tablet. GRAPHIRE TABLET Cable Status LED Pen Stand Active Area Tablet Overlay Note: To learn more about your tablet, see Working with the Tablet.
GRAPHIRE TOOLS Your Graphire tools are cordless, batteryless, and ergonomically designed. The Graphire Pen is a pressure-sensitive freehand tool for image editing and creating natural-looking pen and brush strokes.
The Graphire Cordless Mouse is an ideal tool for navigation, with three customizable buttons that you can program for different functions. The integrated fingerwheel is both a programmable middle button and a rolling wheel that can be used for scrolling.
SETTING UP YOUR WORK AREA Organize your work area so you can work comfortably. Position your Graphire tablet, input tools, and keyboard so they are easily accessible without unnecessary reaching. Your monitor should be positioned so you can view it comfortably with a minimum of eyestrain. To minimize fatigue: • • • • Take short breaks between tasks to stretch and relax your muscles. Use a gentle grip when working with your Graphire tools. Alternate tasks throughout the day.
WORKING WITH THE TABLET Your tablet comes with a detachable pen stand and a transparent overlay. For free-standing use, place the pen stand within easy reach of your tablet. To attach the pen stand, place the stand above the tablet cable. Push the stand toward the tablet’s pen stand cutout until the stand fits snugly. To detach the pen stand, slide it back away from the tablet. To trace or digitize an image, lift the tablet overlay and slide the image beneath it.
USING THE GRAPHIRE PEN Your Graphire Pen is cordless, batteryless, and pressure sensitive. There are four basic techniques for using the Graphire Pen: pointing, clicking, double-clicking, and dragging. With a bit of practice, using the pen will become second nature to you. If you are unfamiliar with using a pen, try the exercises on the following pages. HOLDING THE PEN Hold the Graphire Pen like you would a normal pen.
POINTING The Graphire Pen positions the pointer (or cursor) on your screen. You can position the screen cursor two different ways, like a pen (Pen Mode) or like a mouse (Mouse Mode). • In Pen Mode, the tablet’s active area is a mapped representation of your computer screen where every point on the tablet’s active area corresponds to exactly one point on the display screen; wherever you place the pen on the tablet, the screen cursor will jump to the corresponding point on the screen.
CLICKING Clicking. To click, tap the tablet once with the tip of the Graphire Pen, or press the pen tip on the tablet with enough force to register a click. (With the pen tip, there is no audible “click” sound.) Try clicking on a folder icon by moving the screen cursor over the icon and pressing down on the pen tip. The icon should highlight when you press. Double Clicking. To double-click, quickly tap the tablet twice in the same place with the pen tip. This is like clicking twice with a mouse button.
USING THE SIDE SWITCH The Graphire Pen is equipped with a DuoSwitch. This switch has two programmable functions that can be selected by rocking the switch in either direction. You can use the DuoSwitch whenever the pen tip is in Proximity of the tablet. You do not have to touch the pen tip to the tablet in order to use the switch. The upper switch position is set to left double-click by default. Windows Hint: Use right-click to bring up application-specific or icon-specific menus.
DRAGGING Dragging is used to select and move objects on the screen. To drag, first point to an object. Then press the Graphire Pen to the tablet and slide it across the tablet. The selected object will move across the screen. To select text, move the screen cursor to the beginning of a text line, then drag the Graphire Pen across the tablet until the text is highlighted. First, try moving an icon on the screen. Then, within a document, select some text by pressing and dragging the pen tip across the text.
PROXIMITY The pen is activated as soon as it enters proximity above the tablet’s active area. This allows you to position the screen cursor or use the side switch without touching the pen tip to the tablet. You can also trace a drawing or photograph as long as the pen tip remains within proximity height. Place a picture under the tablet overlay and try tracing it from within one of your graphics applications. For the Graphire Pen, proximity is about 5 mm (0.2 inch), average.
DRAWING WITH PRESSURE The Graphire Pen responds to the nuance and inflection of your hand movements, enabling you to create natural-looking pen and brush strokes. Many graphics applications have drawing tools that respond to the pressure you place on the pen. For example, in some drawing programs sliders are used to vary brush characteristics (width, color, and opacity). These characteristics can be controlled much better by the Graphire Pen’s pressure-sensitivity.
ERASING The eraser on the Graphire Pen works like the eraser on a pencil. In graphics applications that support the pen’s eraser, you can erase intuitively and naturally. When you use the pen’s eraser, the application will automatically switch to the eraser tool. You can also use the eraser in many standard office applications. The eraser will not be pressure sensitive, but you can use it to select and delete text or spreadsheet cells. Try your eraser by opening Windows Notepad and typing a few words.
EYE-HAND COORDINATION EXERCISE If you use a mouse, you may remember how long it took to get used to positioning the screen cursor. Your Graphire Pen, likewise, will take a bit of practice to master the technique of positioning the screen cursor in Pen Mode. This may seem difficult at first, but it is more natural and faster than in Mouse Mode. This exercise is designed to retrain your eye-hand coordination for using the Graphire Pen: 1. Open any graphics application.
USING THE GRAPHIRE CORDLESS MOUSE The Graphire Cordless Mouse is batteryless and works on your Graphire tablet. By moving the Cordless Mouse across the tablet’s active area, you can position the screen cursor like you do with a regular mouse. The buttons are programmable, and the integrated fingerwheel is both a programmable middle button and a rolling wheel for scrolling.
USING THE CORDLESS MOUSE FINGERWHEEL To use the fingerwheel, place your hand on the Graphire Cordless Mouse with your index finger on the wheel. • Button function. To use the button function, press down on the wheel to perform a button click. • Scrolling. The fingerwheel will control scrolling; move the fingerwheel forward to scroll up, and back to scroll down.
CARING FOR YOUR TOOLS AND TABLET Keep your Graphire tools and tablet surface clean. Dust and dirt particles can stick to your Graphire tools and cause wear to the tablet surface. Regular cleaning with a soft, damp cloth will help prolong the life of your tablet surface and Graphire tools. You can also use a very mild soap diluted with water. Do not use volatile liquids, such as paint thinner or benzene, because they may damage the plastic case.
REPLACING THE PEN TIP The tip (nib) will wear with normal use. When the nib gets too short or develops a flat point, you can replace it with another nib. 1. Clasp the old nib with a tweezer, needle-nosed plier, or similar instrument and pull it straight out of the pen. 2. Slide the end of the new nib straight into the barrel of the pen. Firmly push the nib until it stops. To order replacement parts, refer to Parts and Accessories.
CUSTOMIZING After you master the basics of using your Graphire pen and mouse set, you may want to customize the way Graphire works. This chapter describes how to use the Wacom control panel to adjust your Graphire tool and tablet settings. Advanced users can learn how to further optimize Graphire by creating application-specific settings.
OPENING THE CONTROL PANEL Open the control panel with the Graphire tool you wish to customize. 1. Using your Graphire tool, click on the Windows START button. Then, select SETTINGS and CONTROL PANEL. 2. Double-click on the tablet icon. To open the Wacom control panel, double-click here with the tool you wish to customize.
CONTROL PANEL FEATURES Use the Wacom control panel to customize your Graphire pen and mouse set. Pull-Down Menus access many control panel features. These buttons add an application or tool to the lists at the left. The Application List displays applications with customized settings. Control Panel Buttons apply to the entire control panel. The Tool List displays tools that are customized for the above selected application. The HELP... button displays online Help.
TABS The tabs allow you to customize your Graphire tablet, Pen, and Cordless Mouse. When you open the control panel with a Graphire tool, the tool is automatically selected in the TOOL LIST and the appropriate tabs are displayed. To change settings for your other tool, select the appropriate tool icon to display the corresponding tabs. Displayed if you are working with a serial tablet. These tabs are displayed for the Graphire Pen.
Tab buttons apply only to the selected tab: • To set the currently open tab to its factory default values, click • If you have changed settings on a tab and want to return the tab to its previously saved or last applied settings (whichever is most recent using the OK or APPLY buttons), click • To copy settings from one tool or application to another, click This will display the Copy Settings dialog box.
CONTROL PANEL LISTS Located in the upper portion of the control panel, the APPLICATION LIST and TOOL LIST allow you to create different tool settings for individual applications. For example, you might set your pen tip for a soft feel in Painter and a firm feel in all other applications. The APPLICATION LIST displays applications that have custom tool settings associated with them.
• When you first install your Graphire pen and mouse set, the APPLICATION LIST displays the ALL APPLICATIONS icon. This contains tablet and tool settings for all of your applications. • The TOOL LIST displays an icon for the Graphire Pen and Cordless Mouse. Each tool icon is automatically added to the TOOL LIST when a Graphire Pen or Cordless Mouse is first used on the tablet. See Adding a Tool for more information.
CONTROL PANEL BUTTONS The control panel buttons apply to all items in the control panel, including tab settings, items in control panel lists, and menu options. • To close the control panel and save changes, click • To close the control panel without saving changes, click • To apply your changes and remain in the control panel, click The changes you apply are saved. • To display online Help for the control panel, click Or, you can choose HELP... from the HELP pull-down menu.
CUSTOMIZING YOUR PEN AND CORDLESS MOUSE To change tool settings, open the control panel using the tool you wish to customize. The tool will automatically be selected in the TOOL LIST, and the appropriate tabs will be displayed. To customize settings for a different tool, select it from the TOOL LIST by clicking on its icon. GRAPHIRE PEN TABS If you selected the Graphire Pen, the following tabs are displayed: Displayed if you are working with a serial tablet.
GRAPHIRE CORDLESS MOUSE TABS If you selected the Graphire Cordless Mouse, the following control panel tabs are displayed: Displayed if you are working with a serial tablet. Settings on these tabs apply to both the Graphire Pen and Cordless Mouse.
ADJUSTING TIP FEEL To adjust the sensitivity of your Graphire Pen tip, select the TIP FEEL tab. To create broad brush strokes or to click with a light touch, use a soft tip setting. For maximum control while drawing thin lines, use a firm tip setting. A checkmark appears when advanced settings are in effect. Toggles to the advanced options display. Drag the slider to a softer or firmer setting. Make several pen strokes to test the current pressuresensitivity setting.
ADJUSTING DOUBLE-CLICK Double-clicking with the pen tip can be made easier by expanding the tap area that accepts a double-click (the double-click distance) and reducing the speed required to perform a double-click. This can be set in the DOUBLE-CLICK tab. Because a large double-click distance may adversely affect your brushstrokes in some drawing applications, Wacom recommends setting a small double-click distance and using the upper side switch to double-click.
CUSTOMIZING TOOL BUTTONS Select the TOOL BUTTONS tab to change the functions assigned to the eraser, side switch, and tip of your Graphire Pen. For each tool button, a pull-down menu enables you to choose the function that will be performed. Select the function to perform when using the eraser. Select the function to perform when pressing the upper side switch. Select the function to perform when pressing the lower side switch. Click here to change the function assigned to the pen tip.
Button Functions Each button has a pull-down menu that allows you to choose the function that will be performed when the button is pressed. The following list describes all available functions. However, some options are not available for all buttons. • LEFT-CLICK. Default setting for the Graphire Pen tip. This option simulates a left mouse button click. Be sure at least one button performs this function so you can always navigate and click. • LEFT DOUBLE-CLICK.
• KEYSTROKE.... Enables you to simulate a series of keystrokes. When you select this option, the DEFINE KEYSTROKE dialog box appears. There, you can enter a keystroke or keystroke sequence to play back. Keystroke combinations can include letters, numbers, function keys (such as F3) and modifier keys (such as SHIFT, ALT, or CTRL). After defining a keystroke sequence, click OK. Important: Because the ENTER key can be selected as a defined keystroke, it cannot be used to select OK.
• MODIFIER.... Enables you to simulate modifier key(s) (such as SHIFT, ALT, or CTRL). Many applications use modifier keys to constrain the size or placement of objects. If you select this option, the DEFINE MODIFIER dialog box appears. There, you select the modifier key(s) to simulate. You can select the CLICK box plus one or more modifier key options to define the function you want your tool button to simulate.
• PRESSURE HOLD. (Graphire Pen only.) Sets a button so that, when pressed, the pressure is locked at the current pressure level until the button is released. For example, you can paint with pressuresensitivity until you reach the brush size that you like. You can then press the button and continue painting with the same size brush until the button is released. • MODE TOGGLE. Toggles between Pen Mode and Mouse Mode. • POP-UP MENU. Displays a Pop-up Menu on your screen.
ADJUSTING ERASER FEEL To adjust the sensitivity of your Graphire Pen eraser, select the ERASER FEEL tab. To erase with a broad stroke or to click with a light touch, use a soft eraser setting. For maximum control while erasing, use a firm eraser setting. A checkmark appears when advanced settings are in effect. Toggles to the advanced options display. Drag the slider to a softer or firmer setting. Using your eraser, test the current eraser pressure-sensitivity setting by erasing here. Erase this text.
TABLET TO SCREEN MAPPING To change the relationship between tool movement on your tablet and cursor movement on the screen, select the MAPPING tab. The default POSITIONING MODE for the Graphire Pen is PEN MODE, which means that each point on the tablet maps to a corresponding point on the screen. (The default setting for the Graphire Cordless Mouse is MOUSE MODE.) In PEN MODE, the MAPPING tab looks like this: Select the Orientation of your tablet. Positioning Mode.
With MOUSE MODE selected, the MAPPING tab looks like this: Positioning Mode. In Mouse Mode, the screen cursor moves with relative positioning. This is the default mode for the Graphire Cordless Mouse. Select the Orientation of your tablet. Select a slower or faster screen cursor speed when in Mouse Mode.
Positioning Mode The POSITIONING MODE controls how the screen cursor moves. • In PEN MODE, wherever you place a Graphire tool on the tablet, the cursor jumps to the corresponding point on the screen. This is required for tracing. • In MOUSE MODE, the screen cursor is positioned like a mouse, requiring a “pick up and roll” action to move the cursor on the screen. By default, your Graphire Pen is set to PEN MODE for drawing, and your Graphire Cordless Mouse is set to MOUSE MODE for navigation.
Orientation If you are working with a tall monitor or prefer to work with the tablet in a different position, you can rotate the tablet to one of the following orientations: • LANDSCAPE. Tablet orientation is horizontal, with the tablet cable at the top. This is the default setting. • PORTRAIT. Rotate the tablet 90 degrees clockwise from landscape orientation. The tablet orientation will be vertical, with the tablet cable on the right side. • LANDSCAPE FLIPPED.
Aspect Aspect defines the constraints of the tablet to screen relationship. ASPECT options include: • PROPORTIONAL. Maintains correct vertical and horizontal proportions between the tablet and display. A traced image appears proportionally correct on your display, but may be smaller or larger than the original image. • TO FIT. Correct scale or proportions are not maintained. The selected tablet area is mapped to the selected display area.
Tablet Area These settings allow you to define the tablet area that will be mapped to the display area. Uses the entire active area of the tablet for tablet to display mapping. This is the default setting. Displays the PORTION OF TABLET dialog box where you can select a portion of the tablet’s active area for tablet to display mapping.
Enter coordinates to select the tablet area. • • Select UNITS of measure for the displayed values. A count equals one line of tablet resolution. Enter values for the TOP, LEFT, BOTTOM, and RIGHT boundary of the tablet area. Values are measured from the top left corner of the tablet’s active area. Drag corners of the foreground graphic to select the tablet area. The background graphic represents the entire active tablet area. Values in the ENTER COORDINATES text boxes change accordingly.
Display Area The DISPLAY AREA options allow you to define which portion of the display screen your tablet will map to. • ENTIRE DISPLAY. Select this option to access the entire display. This is the default setting. If more than one monitor is in use, a pull-down menu is displayed with options for selecting ALL MONITORS or individual monitors. • PORTION OF DISPLAY.... This option allows you to select a portion of the display for tablet to screen mapping. Selecting PORTION OF DISPLAY...
CUSTOMIZING THE GRAPHIRE CORDLESS MOUSE To modify your Graphire Cordless Mouse button settings, select the TOOL BUTTONS tab. Select the function to perform when pressing the left button. Select the function to perform when clicking the fingerwheel button. Refer to Customizing the Cordless Mouse Fingerwheel to select the function to perform when rolling the fingerwheel. Select the function to perform when pressing the right button.
CUSTOMIZING THE CORDLESS MOUSE FINGERWHEEL The Graphire Cordless Mouse fingerwheel controls scrolling in most active windows. For line scrolling, the fingerwheel emulates the Microsoft IntelliMouse wheel to control scrolling in applications that support the IntelliMouse. To customize your Graphire Cordless Mouse fingerwheel, choose the FINGERWHEEL tab. Disables the fingerwheel function. Sets the fingerwheel to scroll the selected number of lines for each notch of fingerwheel movement.
CUSTOMIZING THE POP-UP MENU Select the POP-UP MENU tab to customize the available functions on the Pop-up Menu list. The Pop-up Menu list may include keystroke functions and mapping options. To display the Pop-up Menu, set one of your tool buttons to the POP-UP MENU function. Whenever you push that button, the Pop-up Menu is displayed. Select items in the Pop-up Menu by clicking on them. Adds a keystroke macro to the menu list. Adds PEN MODE and MOUSE MODE options to the menu list.
ADD KEYSTROKES To add a keystroke definition to the Pop-up Menu, click on the ADD KEYSTROKE... button. A dialog box will appear where you can specify and name the keystroke function. You can also create different keystroke functions for different applications. See Working with Application-Specific Settings for more information. ADD MAPPING OPTIONS When you click on the ADD MAPPING OPTIONS button, the following mapping options can be added to the Pop-up Menu list: Pen Mode and Mouse Mode.
WORKING WITH GRAPHIRE TOOLS The Wacom control panel is designed to help you customize and keep track of your Graphire tool settings. The tool you use to open the control panel is automatically selected, and the appropriate tabs for that tool are displayed. If application-specific settings have not been added, the ALL APPLICATIONS icon is displayed and the tool settings apply for all applications. The TOOL LIST displays icons for tools that are customized for the above selected application.
ADDING A TOOL When you place a Graphire Pen or Cordless Mouse on the tablet, it is automatically added to the control panel’s TOOL LIST and will function with its default settings. You can customize a tool by opening the Wacom control panel and changing the tab settings. When you select a tool from the Tool List, the appropriate tab settings for that tool are displayed. Any changes you make to the tab settings will then apply to that tool when you click on the control panel’s APPLY or OK button.
WORKING WITH APPLICATION-SPECIFIC SETTINGS You may wish to have different tool settings for a particular application. The APPLICATION LIST lets you customize your Graphire tablet and tool settings for individual applications. The APPLICATION LIST displays icons for applications with customized settings. The TOOL LIST displays icons for tools that are customized for the above selected application. Tab settings apply only to the selected tool and application. Your current selections are highlighted.
If application-specific settings have not been created, a single icon labeled ALL APPLICATIONS is displayed in the APPLICATION LIST, and the tool settings displayed in the tabs are applied to all applications. When a second application is added to the APPLICATION LIST, the ALL APPLICATIONS icon changes to ALL OTHER APPS, and a new icon is displayed for the new application settings.
CREATING AN APPLICATION-SPECIFIC SETTING To create an application-specific setting, click on the ADD APPLICATION TO LIST... button or select APPLICATIONS FOR CUSTOM SETTINGS... from the ADD pull-down menu. The ADD APPLICATION FOR CUSTOM SETTINGS dialog box appears. BROWSE to select the executable file of any application installed on your computer. Select an application to add to the APPLICATION LIST.
If you have used both the Graphire Pen and Cordless Mouse on the tablet, the ADD TOOL TO APPLICATION dialog box is displayed. Choose one or both tools to add to the TOOL LIST for this application. By default, the tool in your hand is selected. Click OK to confirm your selection. Lists the tools that can be customized. Note: If a tool is not selected it will continue to work with the settings specified for ALL OTHER APPS. After you have added an application, its icon appears in the APPLICATION LIST.
ADDING A TOOL TO AN APPLICATION’S TOOL LIST To add a tool to an application’s TOOL LIST, click on the ADD TOOL TO LIST... button or select TOOL TO CUSTOMIZE... from the ADD pull-down menu. The ADD TOOL TO CUSTOMIZE dialog box appears. Choose the application and tool to create settings for. Click OK to confirm your selection. The dialog box will close, and the tool will appear in the TOOL LIST for the chosen application.
CHANGING SETTINGS FOR A SPECIFIC APPLICATION AND TOOL To change settings for a specific application and tool combination, from the APPLICATION LIST choose the application you want to change tool settings for. From the TOOL LIST, choose the tool you want to customize. Change the tab settings for the selected application and tool combination. REMOVING APPLICATION-SPECIFIC SETTINGS To remove application-specific settings: 1. Open the REMOVE menu and select CUSTOM SETTINGS FOR APPLICATION.... 2.
CHECKING YOUR SERIAL TABLET CONNECTION Select the CONNECTION tab to check the status of your tablet connection to the serial port. When checked, the tablet driver is on. Displays all serial ports. The port in use by the tablet is selected. Ports used by other devices are dimmed. Displays messages about your selected serial port. • • • • Contents Index CONNECTED. The tablet is connected and responding correctly. NOT RESPONDING. There is no communication between the tablet and the computer. OVERRIDDEN.
PULL-DOWN MENUS Use the pull-down menus to access additional custom settings options, a language selection menu, and online documentation. Help is available for most dialog boxes that appear when you make a menu selection—just click on the dialog box HELP... button for detailed information on settings and options. FILE The File menu contains the following options: • • SUMMARY.... Provides a summary of your current settings. EXIT. Exits the control panel.
ADD The ADD menu contains the following options: • • • TABLET.... Opens a dialog box where you can add one or more tablets. Refer to Installing Multiple Tablets for information on adding multiple tablets. APPLICATION FOR CUSTOM SETTINGS.... Opens a dialog box where you can add an application to the APPLICATION LIST. This is also accessed by clicking on the ADD APPLICATION TO LIST... button. Refer to Working with Application-Specific Settings for more information. TOOL TO CUSTOMIZE....
LANGUAGE The LANGUAGE menu allows you to switch between English and other installed languages. Typically, the language of the operating system is installed when you install the driver, but other languages can be specified during a custom install. HELP The HELP menu contains the following options: • • • • • HELP.... Displays online Help. USER’S MANUAL.... Displays the Graphire User’s Manual for Windows. GETTING STARTED.... Displays an overview of the control panel. DIAGNOSTICS....
ADVANCED FEATURES You can use advanced features to further customize your Graphire pen and mouse set for the way you like to work.
ADVANCED TIP PRESSURE SETTINGS To customize advanced tip pressure settings, from the TIP FEEL tab select MORE OPTIONS. The advanced options enable you to change the click pressure and pressure curve settings independently. (In the basic options display, these settings are adjusted simultaneously with the TIP PRESSURE FEEL slider.) Important: The TIP PRESSURE FEEL slider overrides the advanced pressure settings.
CLICK FORCE ADJUSTMENT The click force setting adjusts the amount of force required to generate a button click. The CLICK FORCE bar graphically displays the force level at which a click occurs. Enter a value from 1 to 50% or drag the CLICK FORCE bar to set the force at which a click occurs. Note: For optimal performance in graphics applications, set the click force and minimum tip force to the same value.
PRESSURE CURVE ADJUSTMENT Changing the shape of the pressure curve will change the feel of the pen tip. A pressure curve that increases quickly makes the tip feel more sensitive to changes in force. The control points at each end of the pressure curve set the minimum and maximum amount of force your pen will respond to. If you have a soft touch and want to achieve full pressure without having to apply full force to your pen, decrease the maximum force level.
To automatically set the maximum force for the way you draw, click the START OVER button and draw in the scratch pad area. As you draw, the MAXIMUM TIP FORCE control moves, and the value in the edit box changes to reflect the peak pressure registered by your hand movements. To start over, click the START OVER button and begin a new drawing. While applying normal pressure to the pen tip, draw several strokes here to automatically set the maximum force value.
ADVANCED ERASER PRESSURE SETTINGS To customize advanced eraser pressure settings, select the ERASER FEEL tab and click on the MORE OPTIONS button. You work with the advanced eraser settings in the same manner as with the Advanced Tip Pressure Settings. Important: The ERASER PRESSURE FEEL slider overrides the advanced pressure settings. If you customize advanced settings, then drag the ERASER PRESSURE FEEL slider, your advanced settings will be removed.
COPYING SETTINGS To copy settings between tools or to another application, choose the COPY SETTINGS TO... option from the EDIT menu, or click on the COPY SETTINGS TO... button. A dialog box is displayed where you can copy settings from one tool to another within the same application or between different applications. Note: If you copy settings between the Graphire Pen and Cordless Mouse, only those settings common to both tools (such as mapping settings) can be copied.
HAVING TROUBLE? Most of the time your tablet will work flawlessly. But if you are having trouble, Wacom recommends you do the following: 1. Refer to the troubleshooting procedures described in this chapter. 2. Look in the troubleshooting tables. Your problem may be described there and you can try the solution offered. 3. Open the Graphire Readme file for late-breaking information. 4.
TROUBLESHOOTING If the Wacom Tablet driver failed to load properly, first perform the recommended action in the error message on your screen. If that does not solve the problem, perform the troubleshooting tests for your tablet or tool(s). TESTING USB TABLETS TESTING SERIAL TABLETS TESTING YOUR GRAPHIRE TOOLS TESTING USB TABLETS Make sure your computer is turned on, the operating system has finished loading, and Graphire is properly connected to an active USB port. Then try the following tests: 1.
2. Check the pen. Move your Graphire Pen across the active area of the tablet; the screen cursor should move in the corresponding direction on your monitor. Press the pen tip against the tablet surface. The status LED on the tablet should turn from orange to green. Now, without applying pressure to the pen tip, press the side switch. The status LED should again change from orange to green.
TESTING SERIAL TABLETS Make sure your Graphire tablet is properly connected and that power is on to both your computer and to the tablet. 1. Check power to the tablet. You should see the tablet’s orange status LED whenever the tablet cables are properly connected and your computer is turned on. If the orange status LED does not come on, make sure that both the serial connector and the power splitter connector are properly connected to your computer.
TESTING YOUR GRAPHIRE TOOLS From the Wacom control panel’s HELP menu, select DIAGNOSTICS... to open the DIAGNOSTICS dialog box. The tablet driver version, tablet hardware and connection, and pointing device information is shown. TESTING THE GRAPHIRE PEN TESTING THE GRAPHIRE CORDLESS MOUSE Testing the Graphire Pen 1. While observing the POINTING DEVICE INFO column, bring your Graphire tool within proximity of the tablet. A value for proximity, the device name, and device type should be displayed. 2.
Testing the Graphire Cordless Mouse 1. Test the buttons on your Graphire Cordless Mouse by clicking each button. The tablet’s status LED should change color, and the SWITCHES state should change for each button you click. 1 2 3 Graphire Cordless Mouse 2. When the DIAGNOSTICS dialog box is first opened the WHEEL status should be 0. Move the fingerwheel backward. The WHEEL status should change from 0 to +1. 3. Move the fingerwheel forward. The WHEEL status should change to -1. 4.
TROUBLESHOOTING TABLES If you encounter problems with your Graphire tools or tablet, refer to the following tables. Your problem may be described here, and you can try the solution offered. Be sure you refer to the Readme file for the latest troubleshooting information. USB TABLET PROBLEMS SERIAL TABLET PROBLEMS GENERAL PROBLEMS WINDOWS-SPECIFIC PROBLEMS USB TABLET PROBLEMS The computer does not have an available USB port. The tablet status LED is off.
SERIAL TABLET PROBLEMS The computer does not have an available serial port. The tablet power light is off. The Graphire tool buttons do not work and the screen cursor will not move. Remove an existing peripheral serial device and any associated device drivers for that hardware, or add an additional serial port. Then install Graphire. Make sure your Graphire tablet is properly connected. Be sure your computer is off before disconnecting or connecting your tablet.
You notice a screen delay at the beginning of pen strokes. You have to press hard with the Graphire Pen when clicking or drawing. The Graphire Pen tip does not function. The side switch does not work. In the Wacom control panel, try decreasing the DOUBLE-CLICK DISTANCE or increasing the double-click speed (see Adjusting DoubleClick). If that does not work, try unchecking the DOUBLE-CLICK ASSIST checkbox. Open the Wacom control panel and go to the tool’s TIP FEEL tab.
Changing the function settings for the Graphire tools has no effect. The screen cursor jumps back. Cannot move the cursor where you want to on the screen, or the line you are drawing does not line up with the location of the pointer in paint applications. Make sure that you change the settings for the tool and the application that you are using. See Working with Graphire Tools and Working with Application-Specific Settings.
WINDOWS-SPECIFIC PROBLEMS Double-clicking is difficult. After changing right- and lefthanded settings in the Mouse control panel, the Graphire Pen tip no longer functions properly and the Graphire Cordless Mouse button functions are reversed. In Windows 95, 98, or Me, your Graphire tools do not function inside a full screen DOS window. Be sure you are quickly tapping the tablet twice in the same place on the tablet’s active area.
After pressing CTRL+ALT+DEL, the screen cursor cannot be controlled with your Graphire tools. Windows 98 or Me. When working with multiple monitors, the screen cursor positioning is incorrect after moving into the unmapped area of the virtual desktop. Windows NT 4.0. Applicationspecific settings do not work correctly or blue screen crash occurs. When the CLOSE PROGRAM dialog box (Windows 95, 98, or Me) or the TASK MANAGER (Windows 2000) is active, the Wacom tablet will not work.
CONTACTING TECHNICAL SUPPORT If you have a problem with your Wacom tablet, first check Installation and Having Trouble? to be sure the tablet is installed correctly. If you cannot find the answer in this manual, you may find updated information about your problem in the Readme file located on the Graphire Tablet CD. For information on accessing Wacom’s 24-hour automated online support and for a directory of Wacom Technical Support numbers, see Who to Call for your region.
WHO TO CALL If you think your Wacom tablet is not working properly, contact the Wacom support staff for the area where your product was purchased. If you have a modem, you can download the latest software drivers from the Internet.
USA, Canada, Central and South America Contact your local distributor, or: Worldwide Web: http://www.wacom.com/productsupport Anonymous FTP Site: Phone: ftp.wacom.com/pub/drivers ++1-360-896-9833 FAX: Internet Email: Fast FAX: ++1-360-896-9724 support@wacom.com 1-800-922-7590 (USA and Canada) 24-hour Technical Support information: FAQs—Frequently Asked Questions and answers. Software updates. Email support. Software updates. Technical Support.
Europe, Middle East and Africa Contact your local distributor, or: Worldwide Web: Anonymous FTP Site: Phone (Austria): Phone (Belgium): Phone (France): Phone (Germany): Phone (Italy): Phone (Netherlands): Phone (Switzerland): Phone (United Kingdom): Phone (other countries): FAX: Internet Email: http://www.wacom.de ftp.wacom.
Japan Contact your local distributor, or: Worldwide Web: http://tablet.wacom.co.jp Phone: FAX: Internet Email: ++81-(0)47-380-8877 ++81-(0)47-380-8711 tablet@wacom.co.jp Software updates and information. (Japanese) Technical Support. (Japanese) Technical Support. (Japanese) Technical Support and sales. (Japanese) To purchase parts and accessories, please contact your local dealer or distributor. Asia Pacific (English) Contact your local distributor, or: Worldwide Web: http://tablet.wacom.co.
APPENDICES This section contains information on working with multiple tablets. You will also find product specifications, a listing of available parts and accessories, and license and warranty information.
INSTALLING MULTIPLE TABLETS If multiple Wacom tablets are installed on a single computer when the Wacom control panel is opened, a TABLET LIST is displayed above the APPLICATION LIST. The TABLET LIST contains an icon for each installed tablet, and allows you to select the tablet for which your changes will apply. Select a tablet icon for which to customize application and tool settings. To add a new tablet, connect it to your computer.
PRODUCT SPECIFICATIONS GRAPHIRE TABLET (MODELS ET-0405-R, ET-0405-U) Active area (W x D) Physical size (W x D x H) Cable length Weight Power consumption Coordinate resolution Accuracy Maximum report rate Communication interface Connector Power requirements (USB tablets) Power supply (serial tablets) Operating temperature Storage temperature Operating relative humidity Storage relative humidity Certification Compliance 127.6 x 92.8 mm (5.02 x 3.65 in) 209.0 x 214.0 x 9.3 mm (8.23 x 8.43 x 0.37 in) 1.5 m (4.
GRAPHIRE PEN (MODEL EP-100E) Physical size (L x D) Pressure levels Pen tip travel Eraser tip travel Weight Tip refill type 145 x 12.5 mm (5.71 x 0.49 in) 512 levels 0.1 mm (0.004 in) or less 0.1 mm (0.004 in) or less 11 g (0.02 lb), approximately Polyacetal (Part No. PSI-A007) GRAPHIRE CORDLESS MOUSE (MODEL EC-100) Physical size (L x W x H) Weight Fingerwheel type 125 x 65 x 39 mm (4.92 x 2.56 x 1.54 in) 90 g (0.
PARTS AND ACCESSORIES Description Part Numbers Slate Blue Tangerine Strawberry Grape Blueberry Lime ET-0405-U ET-0405-U0T ET-0405-U0S ET-0405-U0G ET-0405-U0B ET-0405-U0L ET-0405-U0H EP-100E EP-100E-0T-00 EP-100E-0S-00 EP-100E-0G-00 EP-100E-0B-00 EP-100E-0L-00 EP-100E-0H Graphire Cordless Mouse EC-100 EC-100-0T-00 EC-100-0S-00 EC-100-0G-00 EC-100-0B-00 EC-100-0L-00 EC-100-0H Overlay Sheet PSH-A174-01 Pen Stand PST-A023 PST-A023-0L PST-A023-0H Graphire Serial Tablet ET-0405
LICENSE AND WARRANTIES (WORLDWIDE, EXCEPT FOR EUROPE, AFRICA AND MIDDLE EAST) SOFTWARE LICENSE This legal document is an agreement between you, the end-user, and Wacom Technology Corporation (Wacom). 1. Grant of License. The enclosed product includes computer programs embedded in firmware and accompanying diskette or CD-ROM (the “Software”).
LIMITED WARRANTY Wacom warrants the product, except for the Software, to be free from defects in materials and workmanship under normal use and service for a period of one (1) year from the date of original retail purchase, as evidenced by a copy of the receipt and a registration card that has been returned to Wacom within 30 days of purchase. The Software is licensed “as is.” Wacom makes no warranty with respect to its quality or performance.
EXCEPT FOR THE LIMITED WARRANTY DESCRIBED ABOVE, THERE ARE NO OTHER WARRANTIES MADE BY WACOM ON THIS PRODUCT. NO ORAL OR WRITTEN INFORMATION OR ADVICE GIVEN BY WACOM, ITS DEALERS, DISTRIBUTORS, AGENTS, OR EMPLOYEES SHALL CREATE A WARRANTY OR IN ANY WAY INCREASE THE SCOPE OF THIS WARRANTY, AND YOU MAY NOT RELY ON ANY SUCH INFORMATION OR ADVICE. THIS WARRANTY GIVES YOU SPECIFIC LEGAL RIGHTS, WHICH VARY FROM STATE TO STATE.
WARRANTY ON SALES OUTSIDE OF U.S. AND CANADA For products purchased or used outside of the United States and Canada, upon discovery of a defect in the product, except in the Software, within the Warranty Period you should notify your local dealer or distributor. In all other respects the terms of the warranty as set forth above apply to such sales.
LICENSE AND WARRANTIES (EUROPE, AFRICA AND MIDDLE EAST) SOFTWARE LICENSE AGREEMENT Important Notice to Customers This product contains copyrighted computer programs ("software") which are the inalienable intellectual property of WACOM Europe GmbH ("WACOM"). This software is both integrated within the product and also contained on the accompanying data carrier. The purchase of this product from your dealer does not include WACOM's software and the associated rights of usage.
LIMITED WARRANTY AND LIABILITY WACOM warrants to you as the original end-user that the product hardware is free from defects in materials and workmanship under normal use and service for a period of TWO (2) YEARS after the date of purchase, provided that they are unused at the time of such purchase. WACOM further warrants to you the accompanying diskettes against defects in materials and workmanship for a period of SIX (6) MONTHS after the date of purchase. The Software is licensed and distributed "AS IS".
LIABILITY OF WACOM WACOM and its employees or representatives shall not be liable for any damages, on any legal grounds, unless these damages (a) may be attributed to intent or to gross negligence or (b) result from the culpable infringement of an essential contractual obligation (cardinal obligation) in a way which may endanger the achievement of the contractual purpose or (c) result from the absence of a guaranteed feature or (d) are covered by product liability law.
GLOSSARY Active area. The drawing area of the tablet where your Graphire tools are detected. Application-specific settings. Graphire tool and tablet settings that have been customized for individual applications. The control panel enables you to program a tool to behave uniquely in different applications. Your application-specific settings are in effect whenever you use the application. Aspect. The ratio between the vertical and horizontal dimension of the tablet or display.
Double-click speed. The maximum time that can pass between clicks and still be accepted as a doubleclick. Increasing the double-click time makes double-clicking easier. Eraser-aware application. A software application that has built-in support for the Graphire eraser. These applications take advantage of the eraser in different ways, depending on what makes sense for the application. Fingerwheel. The control wheel on the Graphire Cordless Mouse. Landscape. A tablet ORIENTATION setting.
Nib. The replaceable tip of the Graphire Pen. Pen Mode. A method of positioning the screen cursor. Wherever you place your Graphire tool on the tablet, the screen cursor will be at that same corresponding point on the screen. This is known as absolute positioning, and is the default setting for the Graphire Pen. Absolute positioning (Pen Mode) allows you to position the screen cursor without having to first find it and then move it with a “pick up and roll” action. See also Mouse Mode. Pixel.
Screen cursor. The pointer on the display screen. Screen cursors come in different shapes (such as an I-beam, arrow, or box), depending on which application you are running. Tracking speed. A setting that allows you to adjust the speed at which your screen cursor moves when your Graphire tool is in Mouse Mode. USB. Universal Serial Bus. A hardware interface standard for connecting computer peripheral devices.
INDEX About the manual Accessories and parts ordering Add menu Adding a tool Advanced eraser pressure, customizing tip pressure, customizing Application-specific settings creating working with Aspect Button functions Care, for tools and tablet Checklist, pre-contact Click force adjustment Clicking, with pen Connection, checking tablet Control panel buttons features lists opening tabs Copying settings Contents Index 8 108 108 78 69 85 81 72 70 60 51 36 99 82 27 76 45 40 43 39 41 86 Customizing advanced er
Erasing, with pen Eye-hand coordination exercise Features control panel Graphire tools tablet File menu Fingerwheel customizing using Functions, button General problems, troubleshooting Graphire Cordless Mouse buttons, customizing tabs, customizing testing using fingerwheel Graphire Pen clicking with double-clicking with drawing with pressure erasing with holding pointing replacing the tip tabs, customizing testing using Contents Index 32 33 20 40 21 20 77 65 35 51 94 64 47 92 34 35 27 27 31 32 25 26 37 4
Parts and accessories ordering Pointing, with pen Pop-up Menu, customizing Positioning mode Pressure curve adjustment Pressure, drawing with Product information Proximity Radio and television interference Registration Remove menu Removing keystrokes from Pop-up Menu mapping options from Pop-up Menu settings Serial tablets problems, troubleshooting testing Settings changing for specific application and tool copying removing Software driver, downloading the latest uninstalling Specifications, product Graphire
Tools adding adding to Tool List customizing testing Troubleshooting general problems serial tablet problems serial tablets USB tablet problems tablets verifying readiness Windows-specific problems Uninstalling software USB readiness, testing tablet problems, troubleshooting tablets, testing WACOM International Offices Warranties and License Warranties and License (Europe) Web page, linking to Windows-specific problems, troubleshooting Work area, setting up Contents Index 69 74 46 91 88 94 94 90 93 88 89
WACOM INTERNATIONAL OFFICES WACOM Technology Corporation WACOM Europe GmbH 1311 S.E. Cardinal Court Vancouver, WA 98683 U.S.A. Telephone General: ++1-360-896-9833 Fax: ++1-360-896-9724 Europark Fichtenhain A9 47807 Krefeld Germany Telephone General: ++49-(0)2151-3614-0 Fax: ++49-(0)2151-3614-111 WACOM Co., Ltd.