
Installation Guide

Quick Mount Table Leg Installation
What Tools do I Need to Install Quick Mount Table Legs?
Here is the basic list of tools you will need to install quick mount table legs:
What Tools do I Need to Finish my Quick Mount Table Legs?
• Paint or Stain
• Drop Cloths
• Rags
• Brushes
• 220 Grit Sandpaper or sanding block
How Many Table Legs Do I Need?
To determine the number of Legs needed for your table project, identify these key elements of your project:
1. If your table will be mounted to a wall, you will likely use 1-2 legs. (Figure 1)
2. Whether your table has a geometric or organic form. Organic forms sometime only require 3 legs (Figure 1.1) while
geometric forms will need at least 4 (Figure 1.2).
3. The more weight or stability you need will determine the number of legs your table needs as well as how close to the
edge you need to place them (Figure 1.2).
Will I need to Cut anything?
No cutting is required to install the Quick Mount Table Legs. Our table legs come in an array of sizes to meet the needs
of any project.
How to install Quick Mount Table Legs:
1. Flip over the table top so the underside of the table is visible and facing up.
2. For tables with legs mounted in the corners, use your straight edge to draw lines diagonally from corner to corner.
If your table is round, draw perpendicular lines across the diameter of the table.
3. Place a mounting plate so the line you drew crosses the center of the mounting plate and decide how far in from
the edge of the table top you want to mount your legs. We recommend at least 2in.
4. Mark the screw holes in your mounting plate with a pen or pencil. Remove the plate from the table and use a bit
to drill your holes making sure you don’t drill all the way through the table top.
5. After drilling your holes, place your mounting plate and screws in line with the pre-drilled holes to secure the table.
6. Repeat steps 1-5 until all of your Quick Mount leg plates have been fixed to the table top.
7. Take your Table legs and screw the hanger bolt end into the mounting plates. Carefully flip over your table and
you are done!
How to Paint Quick Mount Table Legs:
1. Choose your painting method. You can choose from the following methods:
• The Hanging Method: Spray the table legs with an aerosolized prime and paint product. Best done outside.
• The Flip Method: Paint one side of the table legs at a time until completely coated. Letting each side dry before
flipping to the next.
• The Lean Method: Painting all side of the table legs and leaning the hanger bolt on a board to elevate them
for drying.
2. Prepare your work station. You will need to do the following for each method:
• The Hanging Method: Locate a place to hang your table legs ideally where you won’t get over-spray on any-
thing. If you can’t find such a place, cover everything you don’t want to get over-spray on it with a drop cloth
or painter’s plastic. Again, the easiest location will likely be somewhere outside.
• The Flip Method: Locate a flat surface or table and cover with a drop cloth or painter’s plastic.
• The Lean Method: Locate a flat surface or table and a 2X4 board. Put the board on top of the table and then
cover the table and the board with a drop cloth or painter’s plastic. Alternatively, if you are using a piece of
scrap lumber that can get paint on it, just cover the table and put the board on top.
3. Start painting:
• The Hanging Method: Spray all surfaces of the legs. Let dry, sand lightly and repeat for 1 coat of primer and 2
coats of paint, alternatively if using an all-in-one paint and primer, spray with two coats.
• The Flip Method: Paint one side of the table legs, let dry, flip, paint the other side, let dry, lightly sand, and
repeat for 1 coat of primer and 2 coats of paint, alternatively if using an all-in-one paint and primer, spray
with two coats.
• The Lean Method: Painting all sides of the table legs and leaning the hanger bolt on a board, let dry, lightly
sand and repeat for 1 coat of primer and 2 coats of paint, alternatively if using an all-in-one paint and primer,
spray with two coats.
How to Stain Quick Mount Table Legs:
1. Prepare work station: locate a flat surface, table or counter, cover with a drop cloth or painter’s plastic.
2. Lightly sand your table legs with a scuff pad or 220 grit or higher sand paper to ensure the smoothest surface
possible to receive your stain.
3. Use a rag or brush to apply stain to the table legs and with a fresh rag wipe off any excess to ensure an even coat.
Repeat until you achieve the desired intensity of your chosen stain.
4. Let dry using the lean method to ensure it dries evenly.
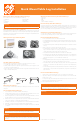
What makes Quick Mount Table Legs Different?
A distinguishing characteristic of the quick mount style table leg is the 5/16-inch hanger bolt on the top of the leg. This
hanger bolt allows for easy installation using one of the following surface plates; straight top plate, angled top plate,
dual top plate, or the heavy-duty top plate all of which are made of 18-inch gauge steel. All plate hardware comes
complete with 5/8-inch mounting screws.
Table Legs and Four Types of Mounting Plates:
• Tape Measure
• Pen
• Straight edge
• Drill and Bit
• Phillips Screw Driver
• Safety Glasses
• Hearing Protection
Figure 1 Figure 1.1 Figure 1.2
Safety Tip:
Always wear eye, ear, and respiratory protection when doing any home improvement project. Remember safety first.
How do I Sand my Quick Mount Table Legs?
Using a fine grit sanding sponge or 220 grit sandpaper, and always sand with the grain of the wood. Coarser grits of
sandpaper or sanding against the grain of the wood will leave fine gouges and blemishes in the wood. A very light touch
is required when sanding your quick mount table legs. It is recommended that you sand between each coat of primer,
paint or stain. This light sanding will ensure a strong bond between the coats and give a smoother finish.
Should I Prime my Quick Mount Table Legs?
If you plan to paint your table legs, it is important to prime them first. We recommend priming with a high quality primer.
If you plan on staining your table legs, priming is not necessary. (all legs come raw - none come primed)
For more information, visit www.homedepot.com
Handy Tip:
Mounting your table legs closer to the outside edge of the table gives the table more standing surface area and less
leverage from people leaning on the edge of the table. These things combined make a stable table.
Handy Tip:
Take one of your mounting screws and stick it through your mounting plate. Take your drill bit and hold it next to the
screw. Place tape around the drill bit to mark the where the top of the screw is. When drilling, only drill as deep as
your tape mark.
Bonus Step!!
Coat your now stained legs with a clear coat polyurethane to both protect the table legs from damage and seal
the stain and further bond it with the table legs. Don’t forget to lightly sand the legs between coats to smooth out any
imperfections before applying a second coat. We recommend applying at least two coats.
Safety Tip:
Use rubber gloves to protect your hands from getting stained while staining your table legs.
Straight Top PlateTable Leg & Hanger Bolt
Heavy Duty Top Plate
Angle Top Plate
Dual Top Plate