ASSEMBLY INSTRUCTIONS 1 OF 14
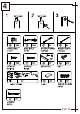
BOARD IDENTIFICATION 2 OF 14
BOARD IDENTIFICATION 3 OF 14
4 OF 14
STEP 1 - Attach panel (15) to (4) & (5) with screw (H) as shown in the picture. - Attach panel (15) to (6) & (7) with screw (H) as shown in the picture. STEP 2 - Screw cam bolts (B) into panel (4) & (5) & (6) & (7) as below shown. - Insert wood dowels (K) into panel (4) & (5) & (6) & (7) as shown in the picture.
STEP 3 WARNING STEP 4 - Install drawer track (C) to panel (4) & (5) & (6) & (7) with screws(E).
STEP 5 - Stick LED band to the side of the back panel. - Fasten the LED band with buckles. STEP 6 - Attach panel (4) & (5) & (6) & (7) to (3) with cam locks (A).
STEP 7 - Attach foot (J) to panel (2) with screw (F). - Screw cam bolts (B) into panel (2) as below shown. - Lock the rebounder (G) to the panel (2) with the screw (E) as shown in the picture. (Attention: Cam bolt & Insert nut need to be put together) STEP 8 - Attach panel (3) & (5) & (7) to (2) with cam locks (A).
STEP 9 - Screw cam bolts (B) into panel (1) as below shown. - Lock the rebounder (G) to the panel (1) with the screw (E) as shown in the picture. (Attention: Cam bolt & Insert nut need to be put together) STEP 10 - Attach panel (1) to (3) & (4) & (6) with cam locks (A).
STEP 11 - Screw cam bolts (B) into panel (10) & (12) as below shown. (Attention: Cam bolt & Insert nut need to be put together) STEP 12 - Attach panel (16) to (13) with screw (H) as shown in the picture. - Screw cam bolts (B) into panel (13) as below shown.
STEP 13 - Attach panel (11) to (10) with cam locks (A). - Attach panel (8) & (9) to panel (10) with screw (F) . STEP 14 - Insert panel (14) into the grooves. - Attach panel (12) & (13) to (8) & (9) & (11) with cam locks (A).
STEP 15 - Install drawer track (D) to panel (8) & (9) with screws(E).
STEP 17 -Connected pin of LED and power adapter to the RGB control box as below. -Remove the battery protection pad from remote controller. Align romote controller to the RGB Control box to adjust the color mode. Specifications of battery:cr2025 3v STEP 18 - Insert the drawers.
STEP 19 - Installation complete.