
Owner Manual

4
Preparation
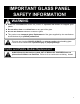
This product includes a GLASS panel! Always use extreme caution when handling
glass. Failure to do so could result in personal injury or property damage.
Remove all parts and hardware from the carton and place them on a clean, soft, dry surface. Parts
and assembly steps are grouped for wall-hanging use. Check the parts list to make sure nothing is
missing. Dispose of packaging materials properly. Please recycle wheneverpossible.
You will need the following tools (not included): Phillips screwdriver; stud finder; level; tape
measure; electric drill; 1/4” wood drill bit, hammer.
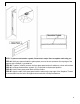
Parts and Hardware
A – Fireplace ( 1 )
B – Wood Screws ( 6 )
C – Drywall anchors (6 )
D – ST4x8 Metal Screws (2)
RC – Remote Control
E - Wall Bracket (1)
F - Decorative Crystals
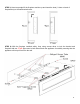
Installation and Assembly
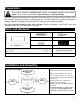
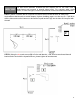
Rear View of Fireplace
Minimum 39.4”
(100 cm)
19.7”
(50 cm)
19.7”
(50 cm)
Minimum 19.7”
(50 cm)
Step 1. Find a safe location.
Minimum clearance on each side: 19.7” (50
cm).
Minimum clearance below: 19.7” (50 cm).
Minimum clearance above: 39.4” (100 cm).
Minimum clearance from the front and sides:
3 feet (90 cm).
Choose a location near an outlet so an
extension cord is not required.
DO NOT position the unit directly below a
power outlet.
See Safety Information on pages 2 and 3
for warnings about safe placement, safe
installation, and proper use of this product.