
Assembly Instruction


Installation
Step 1
Se
p
arate the Mountin
g
Plate
(
A
)
from the Lam
p
Unpack all parts from cartons carefully.
2 / 3
Separate
the
Mounting
Plate(A)
from
the
Lamp
Body(B) by removing the Canopy Nut(C) anti-
clockwise.
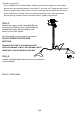
Step 2
Insert each Tube w/shade(F,G,H) through the
hole of the canopy of the Lamp Body(B). Place
Spring Washer(E) onto each threaded nipple
of the tube, fix each tube in place by turning
the Hex Nut(D) with Allen Wrench(I) clockwise
till tight as diagram.
Step 3
Insert the J-box wires through the center
opening of Mounting Plate (A).
A
ttach the Mounting Plate (A) onto the J-box and
secure it by turning the 2 Mounting Screws (K)
clockwise until tight.
A
K
Step 4 Wire connection
Connect,Hot,Black or Red outlet Supply Wire to: Connect,Neutral,White Outlet Supply Wire to:
K
*Note: When parallel wire(SPTI&SPTII)is used. The neutral wire is square shaped and
ridged and the hot wire will be round in shape and smooth (See illustration on left)
Clear,Brown,Gold or Black without Tracer(colored stripes) Clear,Brwn,Gold or Black without Tracer(colored stripes)
Insulated Wire(not green)with copper metal conductor Insulated Wire(not green)with Silver metal conductor
Black White
*Parallel Cord(round&smooth) *Parallel Cord(square&ridged)
pp y
pp y
r
id
ge
d
an
d
th
e
h
o
t
w
i
re w
ill
b
e roun
d
i
n s
h
ape an
d
smoo
th
.
(S
ee
ill
us
t
ra
ti
on on
l
e
ft)
2 / 3